


1998/2198-7
To calibrate the temperature
1. Display the barometric pressure/tempera-
ture in the Timekeeping Mode.
2. Hold down A until the display clears.
“OFF” or the temperature value should be
flashing on the display.
• The “OFF” indicator appears when the
factory setting is being used for the
calibration.
3. Each press of D increases the displayed
temperature by 0.1°C while pressing B
decreases it. Holding down either button
changes the value at high speed.
• Any time you calibrate the temperature, the message “TEMP ADJ” appears
on the display. This message remains on the display in any mode in which
the temperature is displayed.
• If you have selected Fahrenheit as your unit of measurement, the above
operations change the reading by 0.2°F.
• Pressing B and D at the same time returns to the “OFF” display.
4. After calibrating the temperature, press A to return to the Barometric
Pressure/Temperature screen.
• If you do not operate any button for a few minutes while the temperature
digits are flashing, the flashing stops and the watch goes back to the
Barometric Pressure/Temperature screen.
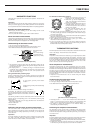
A
B
C
D
E
°
C
hPamb
A
S
TEMP ADJ
°
C
hPa mb
A
S
TEMP ADJ
°
C
WARNING INDICATORS
Warning indicators appear whenever any of the conditions described below
occur. Appearance of a warning indicator causes any measurement operation
that is currently underway to stop. Warning indicators appear in the upper
display, and this causes “– – –” to replace any directional, altitude, barometer,
or temperature values on the display.
Abnormal Magnetic Field Indicator
This indicator appears whenever the Digital
Compass has a problem obtaining a correct
reading. This condition could indicate that
the watch is within a very high magnetic field,
and so you should try moving to another
location. Also, see “Digital Compass
Precautions” for further information on
conditions that cause errors.
Low Battery Indicator
This message indicates that battery power is
too low to perform the measurement. It
appears whenever battery power drops below
a certain level, or when you try to use this
watch under very cold conditions (below about
–10.0°C/14.0°F).
If the “BAT” message appears because of use under cold conditions, it should
clear (and normal operation should return) after the watch is brought back to
normal temperature.
If battery power is low (indicated “BAT” appears under normal temperatures),
you should have the batteries replaced as soon as possible. Note that
replacement of the batteries causes all memory contents to be cleared.
Sensor Malfunction Indicator
This message indicates malfunction of
pressure sensor circuitry. Whenever a sensor
malfunction initially occurs, the “ERR”
messages flashes on the display and a buzzer
sounds for three seconds.
Note that calibrating the Digital Compass may cause the “ERR” message to
appear. In this case, the message does not indicate sensor malfunction, and
should be corrected if you re-calibrate the Digital Compass.
Important!
• If the sensor is malfunctioning when it comes time for a barometric pressure
measurement to be taken, the barometric pressure value appears as
“– – – –” on the display and the corresponding point on the barometric
pressure graph is left blank.
• There may be cases where the “ERR” or “BAT” message is cleared once
you change modes. In this case, you can continue using the watch normally
unless the error warning message reappears.
Whenever there is a sensor malfunction, be sure to take the watch to an
authorized CASIO distributor or Service Center as soon as possible.
ALARM FUNCTIONS
Five independent daily alarms can be set.
Each alarm lets you set the hour and minutes.
When the Daily Alarm is on, the alarm sounds
for 20 seconds at the preset time each day.
Press any button to stop the alarm after it
starts to sound.
When the Hourly Time Signal is on, the watch
beeps every hour on the hour.
• In the Alarm Mode, the segments in the
graphic display create a rotational
movement effect while an alarm is sounding.
To set alarms
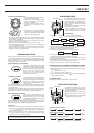
1. Use C to enter the Alarm Mode.
2. Press D to select Alarm 1 through 5.
Alarm 1 Alarm 4
Hourly Time Signal Alarm 5
Alarm 2 Alarm 3
3. After you select an alarm, hold down A until the hour digits flash on the
display. The hour digits flash because they are
selected
.
• At this time, the alarm is automatically switched on.
4. Press C to change the selection in the following sequence.
Hour Minutes
5. Press D to increase the selected digits and B to decrease them. Holding
down either button changes the selection at high speed.
• The format (12-hour or 24-hour) of the alarm time matches the format you
selected for normal timekeeping.
• When setting the alarm time using the 12-hour format, take care to set the
time correctly as morning (no indicator) or afternoon (P).
6. After you set the alarm, press A to return to the Alarm Mode.
To switch an alarm or the Hourly Time Signal on and off
1. In the Alarm Mode, press D to select an alarm or the Hourly Time Signal.
2. When the alarm or Hourly Time Signal you want to is selected, press E to
switch it on and off.
A
Indicates alarm is ON.
S
Indicates Hourly Time Signal is ON.
• If any alarm is on, the alarm on indicator (
A
) is shown on the display when
you change to another mode.
To test the alarm
Hold down D while in the Alarm Mode to sound the alarm.
A
B
C
D
E
A
Mode indicator
Graphic display
Hour Minutes
Alarm No.
Alarm on
indicator
STOPWATCH FUNCTIONS
The Stopwatch Functions let you measure
elapsed time, split times, and two finishes.
The range of the stopwatch is 23 hours, 59
minutes, 59.99 seconds.
Stopwatch functions are available in the
Stopwatch Mode, which you can enter using
C.
• In the Stopwatch Mode, the graphic display
indicates the counting of seconds.
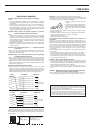
(a) Elapsed time measurement
(b) Split time measurement
(c) Split time and 1st-2nd place times
D
▼
D
▼
D
D
▼
A
▼
A
▼
▼
D AD
Start
Start
Start
Stop
Split
Split
A
A
A
Clear
Clear
Clear
▼▼▼
D
D
A
Stop
Stop
Split release
▼▼▼
Split release
Re-start
Stop
First runner
finishes.
Record time of
second runner.
Second runner finishes.
Record time of first runner.
Mode indicator
A
B
C
D
E
A
S
1/100 second
Graphic
display
Hours Minutes
Seconds