


1998/2198-2
• The backlight turns off in about two seconds, even if you keep the watch
pointed towards your face.
• Static electricity or magnetic force can interfere with proper operation of the
auto light switch. If the backlight does not illuminate, try moving the watch
back to the starting position (parallel with the ground) and then tilt it back
toward you again. If this does not work, drop your arm all the way down so
it hangs at your side, and then bring it back up again.
• Under certain conditions the backlight may not light until about one second
or less after turn the face of the watch towards you. This does not necessarily
indicate malfunction of the backlight.
Warning!
• Never try to read your watch when mountain climbing or hiking in
areas that are dark or in areas with poor footing. Doing so is dangerous
and can result in serious personal injury.
• Never try to read your watch when running where there is the danger
of accidents, especially in locations where there might be vehicular or
pedestrian traffic. Doing so is dangerous and can result in serious
personal injury.
• Never try to read your watch when riding on a bicycle or when
operating a motorcycle or any other motor vehicle. Doing so is
dangerous and can result in a traffic accident and serious personal
injury.
• When you are wearing the watch, make sure that its auto light switch
is turned off before riding on a bicycle or operating a motorcycle or
any other motor vehicle. Sudden and unintended operation of the auto
light switch can create a distraction, which can result in a traffic
accident and serious personal injury.
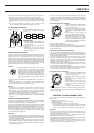
TIMEKEEPING FUNCTIONS
You can set the time and date in the
Timekeeping Mode, which you can enter
using C.
• In the Timekeeping Mode, the graphic
display shows counting of the seconds.
To set the time and date
1. In the Timekeeping Mode, press D until
the Timekeeping screen appears.
2. Hold down A until the seconds digits start
to flash on the display. The seconds digits
flash because they are
selected
.
3. Press C to change the selection in the following sequence.
Seconds
Hour
Minutes
Day
Month Year
12/24-Hour
Format
4. While the seconds digits are selected (flashing), press D to reset the
seconds to “00”. If you press D while the seconds count is in the range of 30
to 59, it is reset to “00” and 1 is added to the minutes. If the seconds count is
in the range of 00 to 29, the minutes count is unchanged.
5. While any other digits (besides seconds) are selected (flashing), press D
to increase the number or B to decrease it. Holding down either button
changes the current selection at high speed.
While the 12/24-hour setting is selected, press B or D to switch between
the two formats.
6. After you set the time and date, press A to return to the Timekeeping
Mode (Timekeeping screen).
• The day of the week is automatically set in accordance with the date.
• The date can be set within the range of January 1, 1995 to December 31, 2039.
• If you do not operate any button for a few minutes while a selection is
flashing, the flashing stops and the watch goes back to the Timekeeping
Mode automatically.
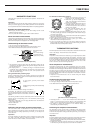
Day of week
A
B
C
D
E
P
A
S
Year
Hour
Month – Day
PM indicator
Minutes
Seconds
Graphic display
To enter and exit the Digital Compass Mode
1. In any mode (except for the Alarm Mode), press E to enter the Digital
Compass Mode.
• At this time, the watch immediately starts a Digital Compass operation.
After about one second, the direction that the 12 o’clock position of the
watch is pointing appears on the display.
• If you do not perform any button operation for a few minutes, the watch
automatically returns to the mode you were in before entering the Digital
Compass Mode.
2. Press C to return to the mode you were in before entering the Digital
Compass Mode.
• Note that when you enter the Digital Compass Mode from the Altimeter
Mode, the Altimeter Mode measurement (see “About altitude
measurements”) continues to be performed internally.
To take a direction reading without storing data into
memory
1. Place the watch on a flat surface or (if you
are wearing the watch), make sure that
your wrist is horizontal (in relation to the
horizon).
• Note that taking a measurement while the
watch is not horizontal (in relation to the
horizon) can result in large measurement
error.
2. Point the 12 o’clock position of the watch
in the direction you want to measure.
3. Press E to enter the Digital Compass
Mode and to start a Digital Compass
measurement operation.
• After about one second, the direction that
the 12 o’clock position of the watch is
pointing appears on the display.
• Also, four indicators appear to indicate
magnetic north, south, east, and west.
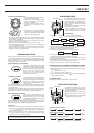
A
B
C
D
E
P
BEARING
A
S
Magnetic north indicator
Mode indicator
Time
Direction value (in degrees)
Direction
Date
DIGITAL COMPASS FUNCTIONS
This watch features a built-in bearing sensor that indicates any one of 16
directions. Up to five sets of direction readings can be stored into memory.
Each set of data includes the direction, along with the date and time of the
measurement. Direction readings can be performed in the Digital Compass
Mode.
• The direction value that appears on the
display represents the clockwise angle
formed between magnetic north (which is 0
degrees) and the displayed direction.
• You can repeat steps 1 through 3 as many
times as you like.
• The following table shows the meanings of
each of the direction abbreviations that
appear on the display.
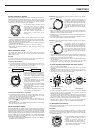
4. Next, you can adjust the rotary direction
bezel so that the “N” or “
” mark is aligned
with the magnetic north indicator. This
correctly aligns all of the markings on the
bezel.
• The Digital Compass operation is
automatically interrupted whenever an
alarm (Daily Alarm or Hourly Time Signal)
sounds. If this happens, start the Digital
Compass operation again from the
beginning.
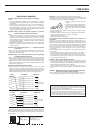
Direction Meaning Direction Meaning Direction Meaning
N
E
S
North
South
East
West
NNE
East-
southeast
North-
northeast
ESE
NE
SE
Northeast
Southwest
West-
northwest
South-
southwest
ENE
SSE
East-
northeast
South-
southeast
West-
southwest
North-
northwest
SW
SSW
NW
NNW
Southeast
WNW
WSW
Northwest
W
P
BEARING
A
S
S
E
W
NW
SE
SW
NE
N
N
W
S
E
Magnetic north
Direction
value
Displayed
direction
To take a direction reading and store data into memory
1. While in the Digital Compass Mode, use
D to select the memory area where you
want to store the data. Each time you
press D, the selected memory area
changes in the following sequence.
Normal
Screen
Memory 1
Memory 2
Memory 5
Memory 4 Memory 3
A
B
C
D
E
BEARING
A
S
Memory number
(memory area screen only)