


1998/2198-5
Setting a Reference Altitude
After you set a reference altitude, the watch automatically calculates the
difference between the current altitude and your preset value. The altitude
measurements produced by this watch are subject to error caused by changes
in air pressure. Because of this, we recommend that you set the reference
altitude during your climb whenever one is available.
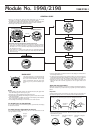
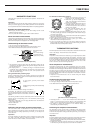
1. In the Altimeter Mode, hold down A until
the display clears. After 4 or 5 seconds,
either “OFF” or the current reference
altitude value (if set) will start to flash. The
data flashes because it is
selected
.
• The “OFF” indicator appears when the
factory setting is being used for the
calibration.
2. Press D to increase the current reference altitude value by 5 m or B to
decrease it. Holding down either button changes the value at high speed.
• If you have selected feet as your unit of measurement, the above operations
change the reading in increments of 20 feet.
• You can set the reference altitude within the range of –6,000 m to 6,000 m
(–19,680 feet to 19,680 feet).
• Pressing B and D at the same time returns to the “OFF” message.
3. After setting the reference altitude you want, press A to return to the
Altimeter Mode.
About the Altitude Alarm
The altitude alarm sounds for about five seconds whenever the current
altitude matches a preset value. You can press any button to stop the alarm
after it starts to sound.
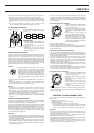
A
B
C
D
E
AL
AUTO
ALTI
m
A
S
Example
If you set the altitude alarm at 130 meters, it sounds when you pass the 130-
meter mark on your way up and on your way back down.
To set the altitude alarm
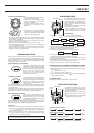
1. In the Altimeter Mode, hold down A until the display clears. After 4 or 5
seconds, either “OFF” or the current reference altitude value (if set) will
start to flash. The data flashes because it is
selected
.
2. Press C to change the selection in the following sequence.
Reference Altitude Setting
Altitude Alarm Setting
3. Press C to select the altitude alarm setting
display (indicated by the “AL” indicator).
4. Press D to increase the altitude alarm
value by 5 m or B to decrease it. Holding
down either button changes the value at
high speed.
• If you have selected feet as your unit of
measurement, the above operations change
the setting in increments of 20 feet.
• You can set the altitude alarm setting within
the range of –6,000 m to 6,000 m (–19,680
feet to 19,680 feet).
• Press B and D at the same time to change
the setting to “0”.
5. After setting the altitude alarm value, press
A to return to the Altimeter Mode.
To switch the altitude alarm on and off
1. In the Altimeter Mode, hold down A until the display clears. After 4 or 5
seconds, either “OFF” or the current reference altitude value (if set) will
start to flash. The data flashes because it is
selected
.
2. Press E to switch the altitude alarm on and off.
• The indicator “
AL
” is shown on the display while the altitude alarm is on.
3. After switching the altitude alarm on or off, press A to return to the
Altimeter Mode.
• If the altitude alarm is on, the altitude alarm indicator remains on the display
when you change to another mode.
A
B
C
D
E
AL
AUTO
ALTI
m
A
S
Altitude alarm indicator
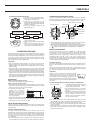
About the graphic display
In the Altimeter Mode, the graphic display normally indicates the counting of
the current time’s seconds. When a memory measurement operation is being
performed while the altitude alarm is on, however, the watch automatically
divides the graphic display into 10 equal parts. Each part represents 1/10 of the
difference between the first altitude measured by the memory measurement
operation and the value you set as the altitude alarm. The graphic representation
gives you some idea of how much farther you must go to reach the altitude
indicated by the altitude alarm setting.
• The graphic representation described below is not shown on the display if
the altitude alarm is switched off.
Example: When the initially measured altitude is less than the altitude
alarm setting.
The graphic display would appear as
illustrated here when your current altitude is
700 meters, after you set the altitude alarm
for 1,000 meters and the initial measurement
was 0 meters. Note that seven segments of
the graph are darkened because you are
7/10 of the way to the value set for the altitude
alarm.
• Segments in the graphic display darken as you approach the altitude alarm
setting. If you descend away from the altitude alarm setting, the darkened
segments are cleared from the graphic display.
• All 10 segments are darkened when you reach or exceed the altitude set for
the altitude alarm.
• If your current altitude is lower than that registered for the initial measurement,
none of the graphic display segments are darkened.
Example: When the initially measured altitude is greater than the altitude
alarm setting.
The graphic display would appear as
illustrated here when your current altitude is
1,500 meters, after you set the altitude alarm
for 1,000 meters and the initial measurement
was 2,000 meters. Note that five segments
of the graph are darkened because you are
5/10 of the way to the value set for the altitude
alarm.
Altitude alarm
setting
Current
altitude
Altitude alarm
setting
Current
altitude
• Segments in the graphic display darken as you approach the altitude alarm
setting. If you ascend away from the altitude alarm setting, the darkened
segments are cleared from the graphic display.
• All 10 segments are darkened when you reach or exceed the altitude set for
the altitude alarm.
• If your current altitude is higher than that registered for the initial
measurement, none of the graphic display segments are darkened.
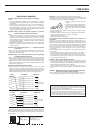
To recall altitude measurement data from memory
1. Use C to enter the Recall Mode.
2. Press D to scroll forward through the stored data items or B to scroll
backward.
• Holding down either button scrolls through the data items at high speed.
• The data item that is displayed when you exit the Recall Mode is still
displayed the next time you enter the Recall Mode.
*
It shows nine segments between the maximum and minimum altitudes
achieved during a memory measurement. The segments indicate how
altitude changed during the measurement.
• The maximum and minimum altitudes achieved during a measurement
operation are also stored in memory. When the maximum altitude is recalled,
the message “MAX” alternates every second with the date in the upper
display. The message “MIN” appears for the minimum altitude.
• Measured data is stored in memory even if an error occurs during the
measurement. For details on errors, see “WARNING INDICATORS”.
[ Final Display ]
P
AUTO
RECALL
°
C
A
S
m
D
B
D
B
Altitude graph
*
AUTO
RECALL
°
C
A
S
m
D
B
A
B
C
D
E
AUTO
RECALL
°
C
m
A
S
Mode indicator
[ Initial Display ]
Temperature
Date
Altitude
D
B
To delete data from memory
The following procedure deletes a entire set (from start measurement to end
measurement) of memory data.
Important!
You cannot delete any of the data being produced by a currently ongoing
memory measurement operation (indicated when “AUTO” is flashing on the
display). You can, however, delete data from another, already completed
measurement operation.
1. In the Recall Mode, display the initial data
of the set of memory data you want to
delete.
• Display the maximum altitude or the
minimum altitude if you want to delete it.
2. To clear the data, hold down A until the
watch emits a long beep (and until “CLR”
stops flashing on the display).
A
B
C
D
E
AUTO
RECALL
°
C
m
A
S