


1868-2
D
A
B
C
P
C
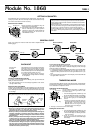
Direction value
Magnetic north pointer
Temperature
3. While hour, minutes, year, month, or day is selected (flashing), press
C to increase the setting or B to decrease it.
• When the 12/24-hour setting is selected, use C to toggle between
12-hour (12H) and 24-hour (24H) timekeeping.
4. After the time and date are set the way you want them, press A to
return to the current time screen.
Notes
• The year can be set in the range of 1995 to 2039.
• The day of the week is automatically displayed in accordance with the
month and day setting.
• The watch’s built-in full automatic calendar automatically make allowances
for different month lengths and leap years. Once you set the date, there
should be no reason to change it except after the replacement of the
watch’s batteries.
Taking a Direction and Temperature Reading
1. In the Timekeeping Mode, place the watch
on a flat surface or (if you are wearing the
watch), make sure that your wrist is horizontal
(in relation to the horizon).
2. Press C to start a reading operation.
• After about one second, the current
temperature, the direction pointers and
direction value appear on the display.
• You can repeat steps 1 through 2 as many
times as you like.
D
A
B
C
P
C
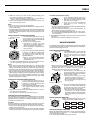
3. Next, you can adjust the rotary direction bezel
so that the “N” or “L” mark is aligned with
the magnetic north pointer. This aligns all of
the markings on the bezel with their
applicable directions.
• After you are finished taking direction
readings, press D to return to the current
time and date screen.
• The watch automatically returns to the current time and date screen if
you do not perform any operation for about 60 minutes.
Notes
• To take a temperature reading only, simply press C in the Timekeeping
Mode. This also performs a direction reading, but the pointers and
direction value will not be accurate if the watch is not oriented correctly.
• The direction value shows the direction that the 12 o’clock position of the
watch is pointing as an angle value. See “Direction Values” for details.
• After you take a direction and temperature reading in the Timekeeping
Mode, temperature readings continue to be performed every two minutes.
• See “Temperature and Direction Reading Precautions” and “Digital
Compass Precautions” for other important information about taking
direction and temperature readings.
Changing the Temperature Measurement Unit
1. In the Timekeeping Mode, press C to
perform a direction and temperature reading.
2. Hold down A until the temperature value
starts to flash on the display.
3. While the temperature value is flashing, press
D to toggle it between Celsius (°C) and
Fahrenheit (°F).
4. When the measurement unit you want is displayed, press A to return
to the measurement result screen.
• To return to the current time and date screen, press D.
N
N
E
E
S
E
S
S
W
W
N
W
P
C
N
E
S
W
D
A
B
C
P
C
Calibrating the Temperature Reading
The temperature sensor of this watch is calibrated at the factory before
shipment and further adjustment is normally not required. If you notice
significant error in the temperature readings produced by this watch, you
can adjust it to correct the error.
Important!
Incorrectly calibrating the temperature reading of this watch can result in
incorrect readings. Carefully read the following before doing anything.
• Compare the readings produced by the watch with those of another
reliable, accurate thermometer.
• If adjustment is required, remove the watch from your wrist and wait for
20 or 30 minutes to give the temperature of the watch time to stabilize.
To calibrate the temperature reading
1. In the Timekeeping Mode, press C to
perform a direction and temperature reading.
2. Hold down A until the temperature value
starts to flash on the display.
3. Press of C to increase the displayed
temperature by 0.1°C. Pressing B
decreases it.
• To return the temperature reading to its initial factory default calibration,
press B and C at the same time.
• If you have selected Fahrenheit as your unit of measurement, the
above operations change the reading by 0.2°F.
• You can change the displayed temperature value by ±9.9°C (18.0°F).
The overall temperature reading adjustment range is –10.0°C to 60.0°C
(14.0°F to 140.0°F).
4. After calibrating the temperature, press A to return to the measurement
result screen.
• To return to the current time and date screen, press D.
D
A
B
C
P
C
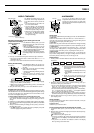
Direction value
Current time
Magnetic north pointer
Temperature
NAVIGATION MODE
The Navigation Mode provides you with storage for up to five sets of direction
and temperature data. Each set of data includes direction, temperature,
and the time the readings were taken.
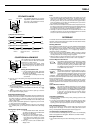
Taking Navigation Mode readings
1. In the Navigation Mode, use A to select the
memory area where you want to store the
data. Each time you press A, the selected
memory area changes in the following
sequence.
• Each memory area is identified by a number from 1 through 5. The
Initial Screen shows the current time without a memory number.
• Navigation Mode data is not stored in memory if you perform the
following steps while the Initial Screen is on the display.
2. Place the watch on a flat surface or (if you
are wearing the watch), make sure that your
wrist is horizontal (in relation to the horizon).
3. Press C to take a reading.
• After about one second, the current
temperature, direction pointers, and a
direction value appear on the display.
• You can repeat steps 1 through 3 as many
times as you like.
D
A
B
C
P
C
Mode indicator
Area number
Initial
Screen
Area 1
Area 2
Area 4Area 5 Area 3
Initial
Screen
Area 1
Area 2
Area 4Area 5 Area 3
D
A
B
C
P
C
4. Next, you can adjust the rotary direction bezel
so that the “N” or “L” mark is aligned with
the magnetic north pointer. This correctly
aligns all of the markings on the bezel.
• See “Temperature and Direction Reading
Precautions” and “Digital Compass
Precautions” for other important information
about taking direction and temperature
readings.
Recalling Navigation Mode Data
While in the Navigation Mode, use A to scroll
through the data in the following sequence.
Deleting All Navigation Mode Data
While in the Navigation Mode, hold down A and C for about two seconds,
until the direction value changes to ---. This indicates all Navigation
Mode memory data is deleted.
• You cannot delete individual memory area contents.
N
N
E
E
S
E
S
S
W
W
N
W
P
C
S
W
N
E