


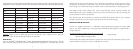


13 14
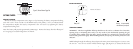
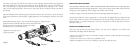
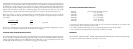
The front mount has a key that fits into the slots on the riflescope dovetail. Choose the appropriate
slot and attach the front mount securely with the two scope dovetail screws. The rear mount does not
have a key allowing it to slide forward or backward on the dovetail of the riflescope to fit. Loosely
place it on the riflescope dovetail – leave the two screws loose for now so that the mount can slide on
the dovetail.
Place the riflescope on the rifle, fitting the front and rear mounts to the weaver bases. Space the mounts
as far apart as possible to provide stability. Lightly tighten the screws holding the mounts to the weaver
bases.
Now look through the scope in your normal shooting position. Adjust the scope
(either forward or backward with the mounts) until you find the
furthest point forward (to insure maximum eye relief)
that allows you to see a full field of view.
Tighten the mounting screws
as tight as possible.
(Figure 8)
Key
Front Mount
Rear Mount
ELEVATION AND WINDAGE ADJUSTMENT
Your Bushnell
®
YARDAGE PRO
®
LASER RANGEFINDER RIFLESCOPE features finger-adjustable,
audible-click elevation and windage adjustments. If the point of impact of the bullet deviates from the
aiming point, then adjustment of the windage and elevation must be made.
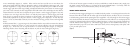
To adjust windage, remove the threaded cap from the Windage Adjustment (Figure 1.7).
Grasp the knob and turn it in the appropriate “L” (Left) and/or “R” (Right) direction indicated by the
arrows. Each “click” or increment on the adjustment scale ring will change the bullet impact by 1/4”
Minute of Angle. 1/4 MOA corresponds to 1/4 inch at 100 yards, 1/2 inch at 200 yards, 3/4 inch at
300 yards and so on.
RESETTING THE ADJUSTMENT SCALE RING
This step is not necessary, but, for future reference, you may want to realign the zero marks on the
Adjustment Scale Rings with the index dots.
- Using a coin, remove the center screw from the windage or elevation control. Lift the turret up being
careful not to rotate it.
- Position the turret to zero, or where you would like it to be.
- Replace and tighten the center screw, making sure you do not rotate the turret.