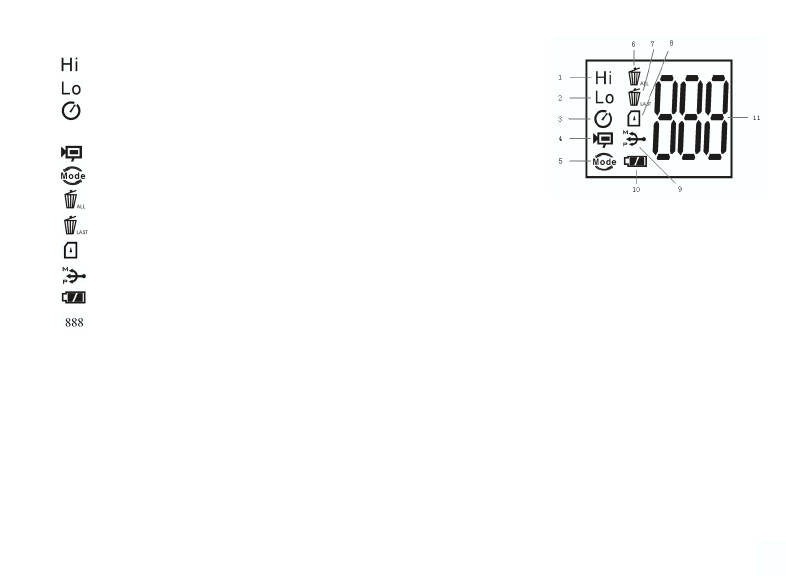
LCD DISPLAY
1. High Resolution Mode = 1600x1200 Pixels
2. Low Resolution Mode = 1280x1024 Pixels
3. Select the timer to take a delayed picture. This gives you
approximately a 10-second delay.
4. This mode allows you to take short movie clips, saved as “.avi” files.
5. Select different mode.
6. Deletes all the pictures in the memory.
7. Deletes the last picture taken.
8. SD mark appears when SD is inserted.
9. USB mark appears when USB cord is connected between the camera and the PC.
10. Battery mark keeps track of the battery life left.
11. a. Picture Number-- This area will show the number of pictures in the memory.
b. SET-- select HQ (high quality)/LQ (low quality) mode, STO (Mass Storage)/ PCC (PC
Cam) mode, 50Hz/60Hz frequency
c. FUL--When the memory is full , the display will show “FUL” and an alarm will sound.
OPERATION GUIDE
1. The camera is powered by one CR123A battery (not included) or USB power cable (included).
2. Insert the battery into the battery compartment.
3. Press and hold the MODE button until the camera turns on.
4. Press SNAP to take a picture, or press the MODE button quickly to change mode settings as described
above. The camera is set at infinity and will not be focused on an object closer than 49 feet.
3


