21WPMAN0141 (8/31/01)
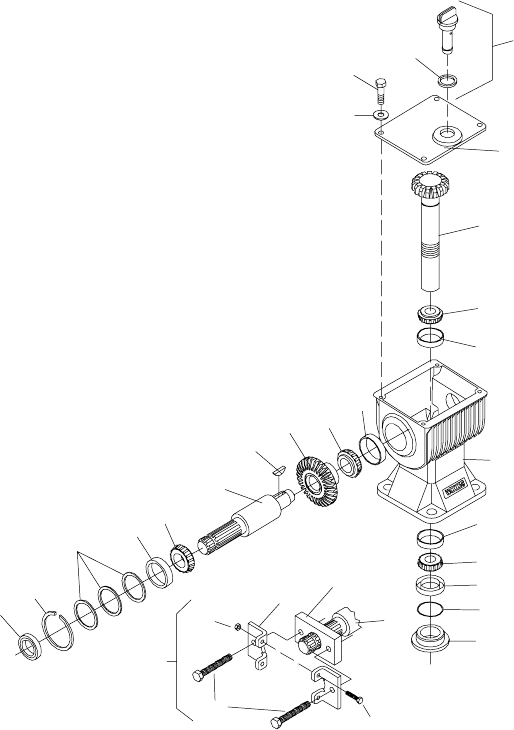
Insert vertical gear shaft i nto housing. Invert housing
in a press and place supports under gear to hold
bearing cone (16) against cup (17). Press bearing
cone (20) onto shaft until all free play is removed and
there is a slight drag when rotating the housing on the
shaft (similar to setting automobile front wheel
bearings).
If the bearings are too tight, loosen by holding
housing, protecting end of vertical gear shaft with a
wood block, and rapping with a hammer.
Install O-ring (22) into groove on vertical gear shaft
(15) next to bearing cone (20). Place a small bead of
gasket sealer on top of O-ring.
Use the proper size tubing to press against the
outside edge of s eal to prevent seal damage. Apply
gasket sealant to seal bore and press output shaft
seal (21) into housing until it seats against housing
shoulder . Coat inner portion of seal with grease.
Thread stake nut (23) onto shaft (15) in through seal
(21). Tighten until nut is snug against bearing cone
(20). Use a punch to stake the lip of stake nut (23) into
shaft (15) keyway.
Press bearing (5) onto horizontal gear shaft (6).
Lay housing down in a press. Place bearing (9) in cup
(10) and set horizontal gear (8) on top of it.
Place woodruff key (7) i nto horizontal gear shaft (6).
Insert shaft through horizontal shaft hole i n housing,
align key with keyway in gear (8). Press horizontal
shaft into bearing (9). Do not use excessive force to
seat bearing.
Place bearing cup (4) over horizontal shaft (6) and
press into housing until there is a slight drag on
bearings when shaft is rotated (similar to setting
automobile front wheel bearings). When you have
bearings adjusted, select shims from shim kit (3) and
place on top of bearing cup (4) until they are flush with
bottom of snap ring groove in horizontal shaft (6),
then reinstall snap ring (2).
Apply gasket sealant to housing seal bore and press
seal (1) into housing until it seats against snap ring or
is flush with housing.
Apply gasket sealant to top of housing flange and
replace top cover and secure with cap screws (11)
and washers (12).
Attach gearbox to gearbox stand and torque mount-
ing bolts.
Remove the dipstick and pour in one quart of SAE
90W gear lube, wait five minutes and add an
additional pint. Allow an additional five minutes for the
lube to flow through the bearings, then check to make
sure half of the horizontal gear shaft is covered.
Replace the dipstick.
1. Horizontal shaft seal
2. Retaining ring
3. Shim washer kit
4. Bearing cup
5. Bearing cone
6. Horizontal shaft
7. Woodruff key
8. Input gear, Horizontal
9. Bearing cone
10. Bearing cup
11. 3/8 NC x 3/4 Hex head
cap screw GR5
12. W asher
14. Top cover
15. Vertical shaft
16. Bearing cone
17. Bearing cup
18. Gearbox housing
19. Bearing cup
20. Bearing cone
21. Vertical shaft seal
22. O-Ring
23. Stake nut
24. Puller bolts
25
28
31
29
24
6
30
8
7
12
11
14
27
26
19
20
21
23
22
15
16
17
10
9
6
5
4
18
3
2
1
M5518
25. Puller (Includes items
24, 28, 29, 30 & 31)
26. Dipstick
27. O-Ring
28. 5/16 NC x 1--1/4 Hex
head cap screw GR5
29. 5/16 NC Nut
30. Puller plate
31. Puller flange
Figure 13. Gearbox Exploded View


