


A
88
2
3
2
3
4
5
1
Operation Operation
When the set time is counting down, the time indicator
will change indicating the time remaining.
8
2
3
4
B
Music Selection
Time Setting
Relaxing nature sounds provided (Daytime Brook, Dripping Water, Whale
Calls, & Nighttime Brook) can be turned on when the Oxygen Bar is in
operation. Turning on the provided music selection as follows:
Press the Music selection button one time, the first music selection
indicator will light and first music will be on continuously.
Press the Music selection button two times, the second music selection
indicator will light and second music will be on continuously.
Press the Music selection button three times, the third music selection
indicator will light and third music will be on continuously.
Press the Music selection button four times, the fourth music selection
indicator will light and fourth music will be on continuously.
Press the Music selection button five times, all the music selection
indicators will light and music will be on sequentially from the first one to
the fourth one.
Press the Music selection button six times, all the music indicators will
be off and music will stop.
Music volume can be adjusted. Use the volume control button to
adjust the sound volume.
Music can not play alone when the Oxygen Bar operation stops.
VOLUME
D
End of Operation Cycle
When the set time ends, the machine will automatically
activate the blowing cycle for one minute in order to
speed up the discharge of vapors.
After the blowing ends, the heat dispelling
fan will continue to run for 3 minutes to
drive away hot air. The machine will then
turn off automatically. Turn the power
switch off if you are not going to use it
within a short time.
If the unit will not be used for a period of
time, remove the power cord from electrical
outlet.
Exhaust
gas vent
A
Cleaning Condensation Chamber
During operation, water vapor may condense
and the optional condensation chamber in
the middle section of the external connection
hose may be used to collect it.
Note: Using the condensation chamber will
reduce airflow. Use only if necessary.
When using the condensation chamber if
water level exceeds 1/3, pour the water out
by gently twisting the condensation chamber
to open it. Then lightly shake both the upper
and lower end of the condensation chamber.
Re-assemble the condensation chamber by
twisting it closed.
If water accumulation exceeds more than 1/2, it may cause water backflow
and resulting water accumulation on the external connection hose.
Sometimes excessive water will cause abnormal sounds generated by
bubbles and this can be solved by clearing the accumulated water.
Accumulated water
Open Close
Ear buds can be used to listen to you own music selection by plugging them
into the audio jack of your personal media player.
In geographic regions of high humidity, use the
condensation chamber to collect excess water
condensate from the unit.
1
1
A
88
2
3
2
3
4
5
1
Operation Operation
When the set time is counting down, the time indicator
will change indicating the time remaining.
8
2
3
4
B
Music Selection
Time Setting
Relaxing nature sounds provided (Daytime Brook, Dripping Water, Whale
Calls, & Nighttime Brook) can be turned on when the Oxygen Bar is in
operation. Turning on the provided music selection as follows:
Press the Music selection button one time, the first music selection
indicator will light and first music will be on continuously.
Press the Music selection button two times, the second music selection
indicator will light and second music will be on continuously.
Press the Music selection button three times, the third music selection
indicator will light and third music will be on continuously.
Press the Music selection button four times, the fourth music selection
indicator will light and fourth music will be on continuously.
Press the Music selection button five times, all the music selection
indicators will light and music will be on sequentially from the first one to
the fourth one.
Press the Music selection button six times, all the music indicators will
be off and music will stop.
Music volume can be adjusted. Use the volume control button to
adjust the sound volume.
Music can not play alone when the Oxygen Bar operation stops.
VOLUME
D
End of Operation Cycle
When the set time ends, the machine will automatically
activate the blowing cycle for one minute in order to
speed up the discharge of vapors.
After the blowing ends, the heat dispelling
fan will continue to run for 3 minutes to
drive away hot air. The machine will then
turn off automatically. Turn the power
switch off if you are not going to use it
within a short time.
If the unit will not be used for a period of
time, remove the power cord from electrical
outlet.
Exhaust
gas vent
A
Cleaning Condensation Chamber
During operation, water vapor may condense
and the optional condensation chamber in
the middle section of the external connection
hose may be used to collect it.
Note: Using the condensation chamber will
reduce airflow. Use only if necessary.
When using the condensation chamber if
water level exceeds 1/3, pour the water out
by gently twisting the condensation chamber
to open it. Then lightly shake both the upper
and lower end of the condensation chamber.
Re-assemble the condensation chamber by
twisting it closed.
If water accumulation exceeds more than 1/2, it may cause water backflow
and resulting water accumulation on the external connection hose.
Sometimes excessive water will cause abnormal sounds generated by
bubbles and this can be solved by clearing the accumulated water.
Accumulated water
Open Close
Ear buds can be used to listen to you own music selection by plugging them
into the audio jack of your personal media player.
In geographic regions of high humidity, use the
condensation chamber to collect excess water
condensate from the unit.
1
1
8 9
1
1
2
2
3
4
Around Neck PlacementOver Ear Placement
A
[ Headset ]
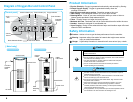
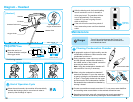
Diagram - Headset Operation
Headset
Headset Flexible Arm
Oxygen Outlet
Headset Tube
Operation
Getting started
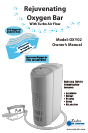
Open the box containing your Rejuvenating Oxygen
Bar with Turbo Air Flow, check the contents and
make sure the following components are enclosed:
Oxygen concentrator unit
Headset and hose (including optional condensation
chamber and Ear buds
)
Owner’s Manual
If there are missing items, please contact the
dealer where you purchased your
Rejuvenating
Oxygen Bar with Turbo Air Flow
.
Read Owner’s Manual carefully.
Connect the hose provided to the oxygen outlet on the side of the Oxygen Bar.
Operating Procedure
Place unit on a stable, flat surface which is clean and
free of dust. Do not set base on carpet or other soft
surface as this could cause air flow restriction and
damage to unit.
Check to see that the power switch is in the " "
(OFF) position.
Plug power cord into electrical outlet.
3
4
Press the power switch to " " (ON) position. The power switch is located at
the back of the machine in the lower bottom corner. When the power switch is
turned on it is in “stand by” status and there is no indication light.
Position the headset over your ears and adjust the position of the flexible arm
so that the oxygen outlet is below the nose.
Press the “Power” button on the control panel to start the machine.
The music does not operate unless turned on.
Set the running time by pressing the Start Timer Button as follows :
Positioning headset:
Time Setting
1
1
2
Move the arm in an
up/down direction to adjust
the oxygen outlet.
Oxygen Outlet
Larger Hole
Larger Hole
Small Hole
Small Hole
( Less air flow ) ( More air flow )
Press the Button one time and the unit will run 15 minutes, and the 15
minute indicator window will light.
Press the Button two times and the unit will run 30 minutes and the 30
minute indicator window will light.
Press the Button three times and the unit will run 45 minutes and the 45
minutes indicator window will light.
Press the Button four times and the unit will run 60 minutes and the 60
minutes indicator window will light.
Press the Button one time again and the unit running time will be reset to
15 minutes.
Adjusting Knob for
Oxygen Outlet Postion
Adjust Air Flow
When the set time is counting down, the time indicator
will change indicating the time remaining.
3
*In areas of high
humidity, use the
condensation chamber to
collect excess water
condensate from the unit.
Note: Using the
condensation chamber
will reduce airflow. Use
only if necessary.
*
Ear Buds
1
1
2
2
3
4
Around Neck PlacementOver Ear Placement
A
[ Headset ]
Diagram - Headset Operation
Headset
Headset Flexible Arm
Oxygen Outlet
Headset Tube
Operation
Getting started
Open the box containing your Rejuvenating Oxygen
Bar with Turbo Air Flow, check the contents and
make sure the following components are enclosed:
Oxygen concentrator unit
Headset and hose (including optional condensation
chamber and Ear buds
)
Owner’s Manual
If there are missing items, please contact the
dealer where you purchased your
Rejuvenating
Oxygen Bar with Turbo Air Flow
.
Read Owner’s Manual carefully.
Connect the hose provided to the oxygen outlet on the side of the Oxygen Bar.
Operating Procedure
Place unit on a stable, flat surface which is clean and
free of dust. Do not set base on carpet or other soft
surface as this could cause air flow restriction and
damage to unit.
Check to see that the power switch is in the " "
(OFF) position.
Plug power cord into electrical outlet.
3
4
Press the power switch to " " (ON) position. The power switch is located at
the back of the machine in the lower bottom corner. When the power switch is
turned on it is in “stand by” status and there is no indication light.
Position the headset over your ears and adjust the position of the flexible arm
so that the oxygen outlet is below the nose.
Press the “Power” button on the control panel to start the machine.
The music does not operate unless turned on.
Set the running time by pressing the Start Timer Button as follows :
Positioning headset:
Time Setting
1
1
2
Move the arm in an
up/down direction to adjust
the oxygen outlet.
Oxygen Outlet
Larger Hole
Larger Hole
Small Hole
Small Hole
( Less air flow ) ( More air flow )
Press the Button one time and the unit will run 15 minutes, and the 15
minute indicator window will light.
Press the Button two times and the unit will run 30 minutes and the 30
minute indicator window will light.
Press the Button three times and the unit will run 45 minutes and the 45
minutes indicator window will light.
Press the Button four times and the unit will run 60 minutes and the 60
minutes indicator window will light.
Press the Button one time again and the unit running time will be reset to
15 minutes.
Adjusting Knob for
Oxygen Outlet Postion
Adjust Air Flow
When the set time is counting down, the time indicator
will change indicating the time remaining.
3
*In areas of high
humidity, use the
condensation chamber to
collect excess water
condensate from the unit.
Note: Using the
condensation chamber
will reduce airflow. Use
only if necessary.
*
Ear Buds
B
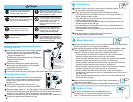
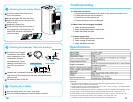
Cleaning the Air Intake Filters
C
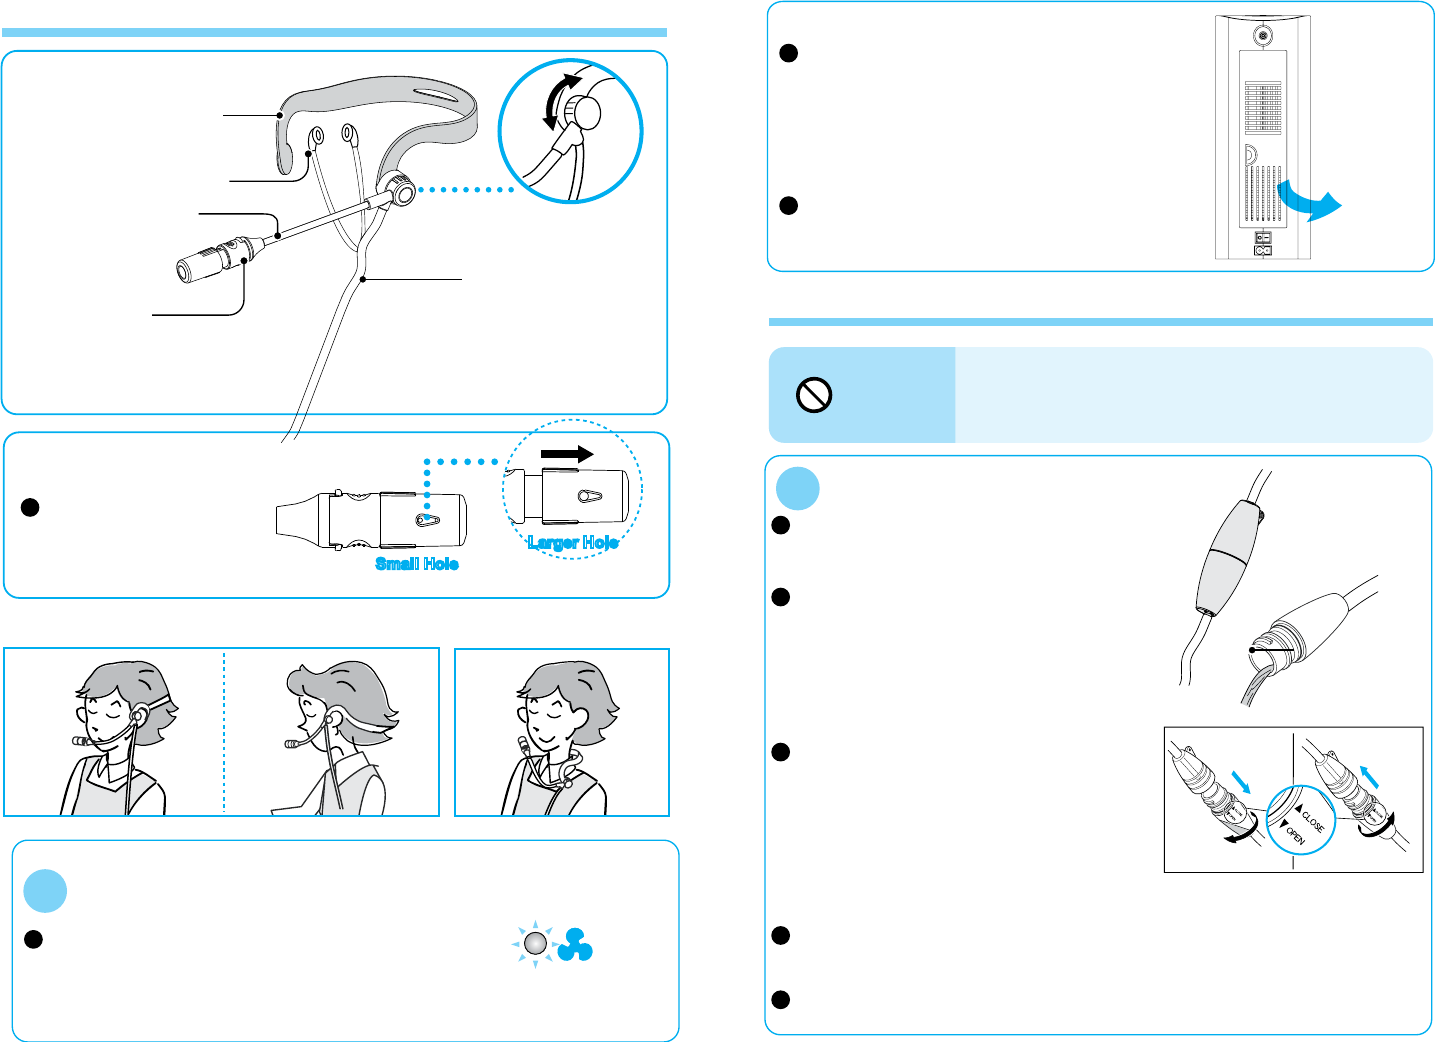
Cleaning the Headset Tube and Headset
1
2
3
4
5
11
1
Maintenance Maintenance
Troubleshooting
Danger
Turn off the unit and remove the Power Cord
from the electrical outlet before maintenance to
avoid electrical shock.
Pull off the Intake Filter Panel on the
rear of the machine.
Rinse thoroughly with warm tap water.
Shake out water, put in a dry place and
allow to air dry.
Replace the Intake Filter.
Clean the Intake Filter once a month. If
the Oxygen Bar is used frequently, the
Intake Filter will have to be cleaned
every two weeks.
During the use of Oxygen
concentrator, there will be
water condensation in the
condensation chamber
and headset tube. Proper
cleaning is necessary if not
used for a long period of
time.
2
2
1
3
Separate the Condensation chamber and front part of headset
tube from unit, and rinse these parts with warm water and allow
the parts to air dry.
Re-attach the parts to the unit.
Oxygen Outlet
D
Cleaning the Cabinet
Wipe the cabinet with a soft, moist, clean cloth.
Do not use washing detergent, benzene, thinner or alcohol.
A : Unit does not turn on
1. Check power switch located on the back of the machine to insure it is on.
2. Check power source and connections.
3. Check that your wall outlet is live.
4. Check that power cord is not damaged.
B: Motor runs, but no oxygen is emitted.
1. Check all hose connections.
2. Check for damaged hoses or hose kinks.
3. Check that filters are clean.
C: Limited oxygen flow
1. Check for damaged hoses or hose kinks.
2. Check voltage of wall outlet.
3. Check that filters are clean.
Oxygen OutletAttach the Parts
2
3
Separate the Condensation chamber and front part of headset
tube from unit. Rinse these parts with warm water and allow the
parts to air dry.
Re-attach the parts to the unit.
Filter
Intake
Filter
Panel
A
88
2
3
2
3
4
5
1
Operation Operation
When the set time is counting down, the time indicator
will change indicating the time remaining.
8
2
3
4
B
Music Selection
Time Setting
Relaxing nature sounds provided (Daytime Brook, Dripping Water, Whale
Calls, & Nighttime Brook) can be turned on when the Oxygen Bar is in
operation. Turning on the provided music selection as follows:
Press the Music selection button one time, the first music selection
indicator will light and first music will be on continuously.
Press the Music selection button two times, the second music selection
indicator will light and second music will be on continuously.
Press the Music selection button three times, the third music selection
indicator will light and third music will be on continuously.
Press the Music selection button four times, the fourth music selection
indicator will light and fourth music will be on continuously.
Press the Music selection button five times, all the music selection
indicators will light and music will be on sequentially from the first one to
the fourth one.
Press the Music selection button six times, all the music indicators will
be off and music will stop.
Music volume can be adjusted. Use the volume control button to
adjust the sound volume.
Music can not play alone when the Oxygen Bar operation stops.
VOLUME
D
End of Operation Cycle
When the set time ends, the machine will automatically
activate the blowing cycle for one minute in order to
speed up the discharge of vapors.
After the blowing ends, the heat dispelling
fan will continue to run for 3 minutes to
drive away hot air. The machine will then
turn off automatically. Turn the power
switch off if you are not going to use it
within a short time.
If the unit will not be used for a period of
time, remove the power cord from electrical
outlet.
Exhaust
gas vent
A
Cleaning Condensation Chamber
During operation, water vapor may condense
and the optional condensation chamber in
the middle section of the external connection
hose may be used to collect it.
Note: Using the condensation chamber will
reduce airflow. Use only if necessary.
When using the condensation chamber if
water level exceeds 1/3, pour the water out
by gently twisting the condensation chamber
to open it. Then lightly shake both the upper
and lower end of the condensation chamber.
Re-assemble the condensation chamber by
twisting it closed.
If water accumulation exceeds more than 1/2, it may cause water backflow
and resulting water accumulation on the external connection hose.
Sometimes excessive water will cause abnormal sounds generated by
bubbles and this can be solved by clearing the accumulated water.
Accumulated water
Open Close
Ear buds can be used to listen to you own music selection by plugging them
into the audio jack of your personal media player.
In geographic regions of high humidity, use the
condensation chamber to collect excess water
condensate from the unit.
1
1