


1
1
2
2
3
4
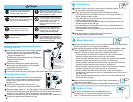
Around Neck PlacementOver Ear Placement
A
[ Headset ]
Diagram - Headset Operation
Headset
Headset Flexible Arm
Oxygen Outlet
Headset Tube
Operation
Getting started
Open the box containing your Rejuvenating Oxygen
Bar with Turbo Air Flow, check the contents and
make sure the following components are enclosed:
Oxygen concentrator unit
Headset and hose (including optional condensation
chamber and Ear buds
)
Owner’s Manual
If there are missing items, please contact the
dealer where you purchased your
Rejuvenating
Oxygen Bar with Turbo Air Flow
.
Read Owner’s Manual carefully.
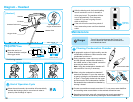
Connect the hose provided to the oxygen outlet on the side of the Oxygen Bar.
Operating Procedure
Place unit on a stable, flat surface which is clean and
free of dust. Do not set base on carpet or other soft
surface as this could cause air flow restriction and
damage to unit.
Check to see that the power switch is in the " "
(OFF) position.
Plug power cord into electrical outlet.
3
4
Press the power switch to " " (ON) position. The power switch is located at
the back of the machine in the lower bottom corner. When the power switch is
turned on it is in “stand by” status and there is no indication light.
Position the headset over your ears and adjust the position of the flexible arm
so that the oxygen outlet is below the nose.
Press the “Power” button on the control panel to start the machine.
The music does not operate unless turned on.
Set the running time by pressing the Start Timer Button as follows :
Positioning headset:
Time Setting
1
1
2
Move the arm in an
up/down direction to adjust
the oxygen outlet.
Oxygen Outlet
Larger Hole
Larger Hole
Small Hole
Small Hole
( Less air flow ) ( More air flow )
Press the Button one time and the unit will run 15 minutes, and the 15
minute indicator window will light.
Press the Button two times and the unit will run 30 minutes and the 30
minute indicator window will light.
Press the Button three times and the unit will run 45 minutes and the 45
minutes indicator window will light.
Press the Button four times and the unit will run 60 minutes and the 60
minutes indicator window will light.
Press the Button one time again and the unit running time will be reset to
15 minutes.
Adjusting Knob for
Oxygen Outlet Postion
Adjust Air Flow
When the set time is counting down, the time indicator
will change indicating the time remaining.
3
*In areas of high
humidity, use the
condensation chamber to
collect excess water
condensate from the unit.
Note: Using the
condensation chamber
will reduce airflow. Use
only if necessary.
*
Ear Buds
1
1
2
2
3
4
Around Neck PlacementOver Ear Placement
A
[ Headset ]
Diagram - Headset Operation
Headset
Headset Flexible Arm
Oxygen Outlet
Headset Tube
Operation
Getting started
Open the box containing your Rejuvenating Oxygen
Bar with Turbo Air Flow, check the contents and
make sure the following components are enclosed:
Oxygen concentrator unit
Headset and hose (including optional condensation
chamber and Ear buds
)
Owner’s Manual
If there are missing items, please contact the
dealer where you purchased your
Rejuvenating
Oxygen Bar with Turbo Air Flow
.
Read Owner’s Manual carefully.
Connect the hose provided to the oxygen outlet on the side of the Oxygen Bar.
Operating Procedure
Place unit on a stable, flat surface which is clean and
free of dust. Do not set base on carpet or other soft
surface as this could cause air flow restriction and
damage to unit.
Check to see that the power switch is in the " "
(OFF) position.
Plug power cord into electrical outlet.
3
4
Press the power switch to " " (ON) position. The power switch is located at
the back of the machine in the lower bottom corner. When the power switch is
turned on it is in “stand by” status and there is no indication light.
Position the headset over your ears and adjust the position of the flexible arm
so that the oxygen outlet is below the nose.
Press the “Power” button on the control panel to start the machine.
The music does not operate unless turned on.
Set the running time by pressing the Start Timer Button as follows :
Positioning headset:
Time Setting
1
1
2
Move the arm in an
up/down direction to adjust
the oxygen outlet.
Oxygen Outlet
Larger Hole
Larger Hole
Small Hole
Small Hole
( Less air flow ) ( More air flow )
Press the Button one time and the unit will run 15 minutes, and the 15
minute indicator window will light.
Press the Button two times and the unit will run 30 minutes and the 30
minute indicator window will light.
Press the Button three times and the unit will run 45 minutes and the 45
minutes indicator window will light.
Press the Button four times and the unit will run 60 minutes and the 60
minutes indicator window will light.
Press the Button one time again and the unit running time will be reset to
15 minutes.
Adjusting Knob for
Oxygen Outlet Postion
Adjust Air Flow
When the set time is counting down, the time indicator
will change indicating the time remaining.
3
*In areas of high
humidity, use the
condensation chamber to
collect excess water
condensate from the unit.
Note: Using the
condensation chamber
will reduce airflow. Use
only if necessary.
*
Ear Buds
6 7
1
1
2
2
3
4
Around Neck PlacementOver Ear Placement
A
[ Headset ]
Diagram - Headset Operation
Headset
Headset Flexible Arm
Oxygen Outlet
Headset Tube
Operation
Getting started
Open the box containing your Rejuvenating Oxygen
Bar with Turbo Air Flow, check the contents and
make sure the following components are enclosed:
Oxygen concentrator unit
Headset and hose (including optional condensation
chamber and Ear buds
)
Owner’s Manual
If there are missing items, please contact the
dealer where you purchased your
Rejuvenating
Oxygen Bar with Turbo Air Flow
.
Read Owner’s Manual carefully.
Connect the hose provided to the oxygen outlet on the side of the Oxygen Bar.
Operating Procedure
Place unit on a stable, flat surface which is clean and
free of dust. Do not set base on carpet or other soft
surface as this could cause air flow restriction and
damage to unit.
Check to see that the power switch is in the " "
(OFF) position.
Plug power cord into electrical outlet.
3
4
Press the power switch to " " (ON) position. The power switch is located at
the back of the machine in the lower bottom corner. When the power switch is
turned on it is in “stand by” status and there is no indication light.
Position the headset over your ears and adjust the position of the flexible arm
so that the oxygen outlet is below the nose.
Press the “Power” button on the control panel to start the machine.
The music does not operate unless turned on.
Set the running time by pressing the Start Timer Button as follows :
Positioning headset:
Time Setting
1
1
2
Move the arm in an
up/down direction to adjust
the oxygen outlet.
Oxygen Outlet
Larger Hole
Larger Hole
Small Hole
Small Hole
( Less air flow ) ( More air flow )
Press the Button one time and the unit will run 15 minutes, and the 15
minute indicator window will light.
Press the Button two times and the unit will run 30 minutes and the 30
minute indicator window will light.
Press the Button three times and the unit will run 45 minutes and the 45
minutes indicator window will light.
Press the Button four times and the unit will run 60 minutes and the 60
minutes indicator window will light.
Press the Button one time again and the unit running time will be reset to
15 minutes.
Adjusting Knob for
Oxygen Outlet Postion
Adjust Air Flow
When the set time is counting down, the time indicator
will change indicating the time remaining.
3
*In areas of high
humidity, use the
condensation chamber to
collect excess water
condensate from the unit.
Note: Using the
condensation chamber
will reduce airflow. Use
only if necessary.
*
Ear Buds
A
88
2
3
2
3
4
5
1
Operation Operation
When the set time is counting down, the time indicator
will change indicating the time remaining.
8
2
3
4
B
Music Selection
Time Setting
Relaxing nature sounds provided (Daytime Brook, Dripping Water, Whale
Calls, & Nighttime Brook) can be turned on when the Oxygen Bar is in
operation. Turning on the provided music selection as follows:
Press the Music selection button one time, the first music selection
indicator will light and first music will be on continuously.
Press the Music selection button two times, the second music selection
indicator will light and second music will be on continuously.
Press the Music selection button three times, the third music selection
indicator will light and third music will be on continuously.
Press the Music selection button four times, the fourth music selection
indicator will light and fourth music will be on continuously.
Press the Music selection button five times, all the music selection
indicators will light and music will be on sequentially from the first one to
the fourth one.
Press the Music selection button six times, all the music indicators will
be off and music will stop.
Music volume can be adjusted. Use the volume control button to
adjust the sound volume.
Music can not play alone when the Oxygen Bar operation stops.
VOLUME
D
End of Operation Cycle
When the set time ends, the machine will automatically
activate the blowing cycle for one minute in order to
speed up the discharge of vapors.
After the blowing ends, the heat dispelling
fan will continue to run for 3 minutes to
drive away hot air. The machine will then
turn off automatically. Turn the power
switch off if you are not going to use it
within a short time.
If the unit will not be used for a period of
time, remove the power cord from electrical
outlet.
Exhaust
gas vent
A
Cleaning Condensation Chamber
During operation, water vapor may condense
and the optional condensation chamber in
the middle section of the external connection
hose may be used to collect it.
Note: Using the condensation chamber will
reduce airflow. Use only if necessary.
When using the condensation chamber if
water level exceeds 1/3, pour the water out
by gently twisting the condensation chamber
to open it. Then lightly shake both the upper
and lower end of the condensation chamber.
Re-assemble the condensation chamber by
twisting it closed.
If water accumulation exceeds more than 1/2, it may cause water backflow
and resulting water accumulation on the external connection hose.
Sometimes excessive water will cause abnormal sounds generated by
bubbles and this can be solved by clearing the accumulated water.
Accumulated water
Open Close
Ear buds can be used to listen to you own music selection by plugging them
into the audio jack of your personal media player.
In geographic regions of high humidity, use the
condensation chamber to collect excess water
condensate from the unit.
1
1
Product and accessories illustration
Precautions
Operation
Maintenance
Troubleshooting
Specifications
Danger
Table of Contents
Brief Introduction
Introduction
Modeled after oxygen bars found in resorts and spas, Zadro’s
Rejuvenating Oxygen Bar
with
Turbo air flow increases the concentration of oxygen you breathe from 21% in the air* to about
30%** or about a 43% increase in oxygen levels.
• There are many benefits to increasing the amount of oxygen you breathe as oxygen is vital
to our well-being and helps to heighten concentration, alertness and memory, improving
energy and stamina levels.
• Increasing the supply of oxygen to the lungs increases the availability of oxygen to the cells
in our bodies. Oxygen is the key nutrient for the brain and body.
• Oxygen is important for the body to improve general well-being and facilitate relaxation.
• Low levels of oxygen result in lower energy production by the cells, making us feel sluggish
and drained of energy. Environmental pollution, stress, fatigue, and lack of exercise are key
factors which deplete our oxygen supply.
Rejuvenating Oxygen Bar with Turbo Air Flow
Operation:
• The Oxygen Bar works by drawing ambient air into the compressor which forces air
through the Oxygen Enriching Nano Membrane Filter, blocking out larger air molecules
such as nitrogen allowing for a higher concentration of oxygen.
• Concentrated oxygen is then pumped into the headset--worn either over the head or
around the neck--where it exits through the flexible arm of the headset positioned near the
nose or mouth, allowing you to relax comfortably as you inhale.
• The Oxygen Bar is designed with your comfort in mind and provides gentle air flow from the
headset to avoid drying and discomfort within the nose while still delivering a concentrated
30% oxygen level. Harsh air flow can cause drying of the nasal membranes, therefore,
concentrated oxygen is delivered for your comfort with a soft, gentle airflow.
• Turbo function allows you to receive accelerated air flow. Air flow will be strengthened from
2.5 liters/min. to 3.0 liters/min.
• After each session, the Oxygen Bar will cycle to purge excess water vapor and
impurities from the filter so there is no need to replace filters. ENJOY!
*At Sea level
** Exact concentration of Oxygen produced depends on the location of use and the local Oxygen concentration
Check the electrical rating on the
unit label and wall outlet before
connecting the power cord.
When the power cord is found
damaged or broken, send it to your
dealer or authorized service center
for examination or repair.
Infant, child, or disabled people
should use under the watch of other
adult to avoid accidental injury.
Do not attempt to open cabinet. If
service is required, return unit to a
qualified dealer or an authorized
service center. Opening or
tampering with the unit will void
warranty.
Rejuvenating Oxygen Bar
With Turbo Air Flow
4
6
5
9
11
11
O
x
y
g
e
n
E
n
r
i
c
h
i
n
g
m
e
m
b
r
a
n
e
21% Oxygen in
Air at sea level
Increases Oxygen to
30% concentrated
3
4
VOLUME
TURBO
[ Control panel ]
[ Main body ]
Dangerous
Please remove the plug from
electric outlet when not in use.
Keep the unit and all electrical
cords away from heated surfaces
or appliances. The oxygen will
make the material flammable.
Do not reach for the unit in the event
the unit falls into water. Unplug the
unit immediately, then send it to your
dealer or authorized service center
for examination or repair.
Do not use while bathing or
with wet hands.
Warning
DO NOT use the machine when there are any hazardous vapors or
pesticide spray in the room.
Do not use while bathing or in other wet location to avoid the risk of
serious or fatal injury from electrical shock.
Do not leave the machine near heated areas. High heat will cause
the plastic case to deform.
Disconnect the power cord from the electrical outlet if not in use.
Place unit on a stable, flat surface during operation. A tilted or
unstable placement will result in shifting of internal parts thereby
causing larger vibration and noise.
During operation, do not press hard upon the external plastic tube as
this will result in air flow restriction and damage to unit.
Caution
THIS MACHINE IS NOT FOR MEDICAL USE. It is designed for
health maintenance.
Do not block the ventilation port located on the back of unit.
Do not set base on carpet or other soft surface. This could cause air
flow restriction and damage to unit.
For best performance, regularly clean the Intake Filter and panel
located in the back of the machine.
Do not use the machine more than 60 minutes per session.
Adjust operating time if necessary.
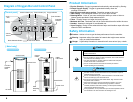
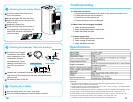
Diagram of Oxygen Bar and Control Panel
On/Off Button
Operation
Indicator
Purge Indicator
Time Indicator (x4)Music Indicator (x4)
Start Timer Button
Music Selection Button
Volume
Control
Front of machine Back of machine
Control Panel
Air Intake
Handle
Oxygen
Outlet
Exhaust Vent
Intake
Filter Panel
Heat
Dispelling
Vent
Power Switch
Power Cord
Safety Information – (Continued)
TURBO Button
Audio
Jack
Volume
Indicator
Turbo Indicator
1
2
3
4
15
30
45
60
Fold-Out
Headset
Rack
A
88
2
3
1
2
3
4
5
99
1
Operation Operation
When the set time is counting down, the time indicator
will change indicating the time remaining.
8
1
2
3
B
Music Selection
Time Setting
Relaxing music can be turned on when the Oxygen Bar is in operation.
Turn on the music selection as follows:
Press the Music selection button one time, the first music selection
indicator will light and first music will be on continuously.
Press the Music selection button two times, the second music selection
indicator will light and second music will be on continuously.
Press the Music selection button three times, the third music selection
indicator will light and third music will be on continuously.
Press the Music selection button four times, the fourth music selection
indicator will light and fourth music will be on continuously.
Press the Music selection button five times, all the music selection
indicators will light and music will be on sequentially from the first one to
the fourth one.
Press the Music selection button six times, all the
music indicators will be off and music will stop.
Music volume can be adjusted. Use the volume control button to
adjust the sound volume.
Music can not play alone when the Oxygen Bar operation stops.
C
Turbo Air Flow
To receive accelerated air flow strengthened from 2.5
liters/minute to 3.0 liters/minute press the Turbo button
once. This feature will auto shut off after 3 minutes.
After the blowing ends, the heat dispelling
fan will continue to run for 3 minutes to
drive away hot air. The machine will then
turn off automatically. Turn the power
switch off if you are not going to use it
within a short time.
If the unit will not be used for a period of
time, remove the power cord from electrical
outlet.
Exhaust
gas vent
A
Cleaning Condensation
Chamber
During operation, water vapor will
condense and therefore, there is a
condensation chamber in the middle
section of the external connection hose.
If water in the condensation chamber
exceeds 1/3, pour the water out by
gently twisting the condensation
chamber to open it.
Then lightly shake both the upper and
lower end of the condensation chamber
and then re-assemble the condensation
chamber.
If the water accumulation exceeds more than 1/2, it may cause water
backflow and resulting water accumulation on the external connection hose.
Sometimes excessive water will cause abnormal sounds generated by
bubbles and this can be solved by clearing the accumulated water.
Accumulated water
Open Close
TURBO