


9
48
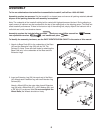
2
53
12
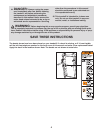
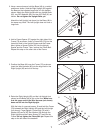
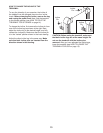
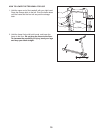
12. With the help of a second person, carefully raise the
Left Upright (53) and Right Upright (not shown), to a
vertical position. Attach the Storage Latch (48) to the
Left Upright (53) with two 3/4” Screws (2).
13. Make sure that all parts used in assembly are properly tightened before you use the treadmill. Keep
the included allen wrench in a secure place; the allen wrench is used to adjust the walking belt (see page
17). To protect the floor or carpet, place a mat under the treadmill.
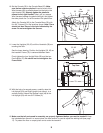
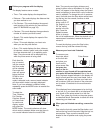
11. Lower the Uprights (53, 62) until the Handrails (59) are
touching the floor.
See the lower drawing. Position the Uprights (53, 62) so
the treadmill Frame (79) is centered between them.
Firmly tighten the four Upright Bolts (65) and the two
Frame Bolts (70). Be careful not to overtighten the
Frame Bolts.
53
53, 62
59
70
79
62
Top View
11
65
52
N
o
S
crew
60
2
59
2
2
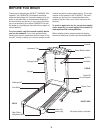
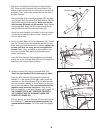
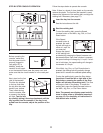
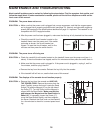
10. Set the Console (55) in the Console Base (52). Make
sure that no wires are pinched. Insert as much of the
W
ire Harness (60) as possible down into the hole in the
right Handrail (59).
Securely tighten the plastic tie
n
earest to the right Handrail.
N
ext, pull any excess
Wire Harness between the plastic ties tight, and tighten
the other plastic tie. Cut off the ends of the plastic ties.
Attach the Console (65) to the Console Base (52) with
five 3/4” Screws (2) in the locations shown.
Note: There
should not be a Screw in the hole indicated by the
arrow. Do not overtighten the Screws.
5
5
Ties
10