7
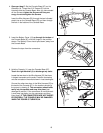
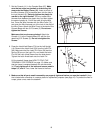
3. With the help of a second person, tip the treadmill so the
Base Pads (33) (see drawing 1) are lying flat on the floor.
Raise the Uprights (14, 15) to the vertical position.
Hold a Handrail Spacer (3) so the arrow between the two
large holes is pointing upward. Thread the Wire Harness
(53) through the upper large hole in the Handrail Spacer.
Next, insert the Wire Harness into a Handrail (4) and out of
the indicated hole in the side of the Handrail. If necessary,
use needlenose pliers to pull the Wire Harness out of the
hole.
Hold the Handrail Spacer (3) and the Handrail (4)
against the right Upright (15). Attach the Handrail and
the Handrail Spacer with two 3” Bolts (1) and two 5/16”
Star Washers (61) as shown. Make sure that the Wire
Harness (53) is not in the way of the Handrail Bolts.
Do not tighten the Handrail Bolts yet.
Attach the other Handrail (not shown) to the Left Upright
(14) as described above. Note: There is not a Wire
Harness in the Left Upright.
53
1
14
61
4
53
3
15
3
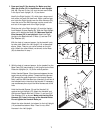
2. Open part bag B. See drawing 2a. Make sure that
there are U-nuts (10) in the bottom of each Upright
(14, 15). Clip two U-nuts (10) over the two round holes
in the top of each Upright (14, 15) as shown.
Identify the Right Upright (15), which has a large round
hole and a slot near the lower end. While a second per-
son holds the Right Upright near the Wire Harness (53),
insert the end of the Wire Harness into the round hole
and out of the upper end of the Right Upright.
Slide the slot in the Right Upright (15) onto the Upright
Lock Bracket (2) (see drawing 2b). Slide the Right Upright
down until it reaches the Base (38). Make sure that the
Wire Harness (53) is not pinched. Attach the Right
Upright to the Base with two 3” Bolts (1) and two 5/16”
Star Washers (61).
With the help of a second person, tip the treadmill onto
its other side. Attach the Left Upright (14) as described
above. (Note: There is not a wire harness on the left
side.) Attach the other Wheel (not shown) to the Base
(38) as described in step 1.
15
2
53
14
38
1
Round Hole
Slot
15
Side View
10
14, 15
2
2
2a
2b
10
61


