


Reset the console and start the walking belt.
Turn the speed
control to the RESET
position. Note: Each
time the walking belt
is stopped, the
speed control must
be turned to the
RESET position be-
fore the walking belt
can be restarted.
Next, slowly turn the speed control until the walk-
ing belt begins to move at slow speed. Carefully
step onto the walking belt and begin exercising.
Change the speed of the walking belt as desired
by turning the speed control.
To stop the walking belt, step onto the foot pads
and turn the speed control to the RESET position.
Note: During the first few minutes that the treadmill
is used, inspect the alignment of the walking belt
and align it if necessary (see page 13).
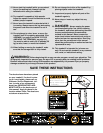
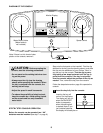
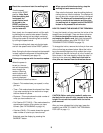
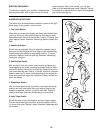
Follow your progress with the monitor modes.
When the power is
turned on, the con-
sole will automatically
scan through five
modes. A flashing
mode indicator will
show which mode is
currently displayed.
The modes are described below.
• Speed—This mode shows your speed, in miles
per hour.
• Time—This mode shows the elapsed time. Note:
If you stop exercising for ten seconds or longer,
the time mode will pause.
• Distance—This mode shows the total number of
miles you have walked or run.
• Fat Calories (FAT CALS)—This mode shows the
approximate number of fat calories you have
burned. (See FAT BURNING on page 14.)
• Calories (CALS)—This mode shows the approxi-
mate number of calories you have burned.
If desired, reset the display by pressing the
ON/RESET button.
When you are finished exercising, stop the
walking belt and remove the key.
Step onto the foot pads, stop the walking belt and
remove the key from the console. The displays will
turn off about six minutes after the key is removed.
Note: The display will automatically turn off in
order to conserve the batteries any time that
the walking belt is stopped and the ON/RESET
button is not pressed for six minutes.
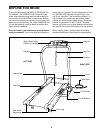
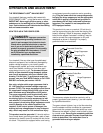
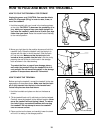
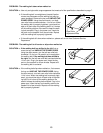
HOW TO CHANGE THE INCLINE OF THE TREADMILL
To vary the intensity of your exercise, the incline of the
treadmill can be changed. There are three incline lev-
els. Before changing the incline, remove the key
and unplug the power cord. Next, fold the treadmill
to the storage position (see HOW TO FOLD THE
TREADMILL FOR STORAGE on page 10).
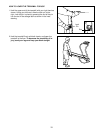
To change the incline, remove the incline pin from one
of the incline legs as shown below. Adjust the incline
leg to the desired height and fully reinsert the incline
pin. Make sure that the incline pin is in the “locked” po-
sition shown in the inset drawing. Adjust the other in-
cline leg in the same way. Make sure that both in-
cline pins are inserted from the direction shown.
CAUTION: Before using the treadmill, make sure
that both incline pins are fully inserted at the same
height. Do not use the treadmill with the incline
pins removed.
After you have adjusted the incline legs, lower the
treadmill (see HOW TO LOWER THE TREADMILL
FOR USE on page 11).
4
3
2
Mode Indicator
9
Incline
Pin
Incline
Pin
Incline
Pin