


13
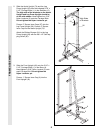
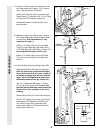
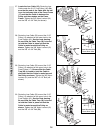
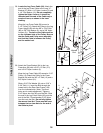
24. See the inset drawing. Attach a 3 1/2Ó Pulley
(15) and a Cable Trap (66) to the upper hole in
a Long ÒUÓ-Bracket (57) with a 3/8Ó x 2Ó Bolt
(12) and a 3/8Ó Nylon Locknut (21). Be sure
that the Cable Trap is inside the Long ÒUÓ-
Bracket. Note: This may come pre-assem-
bled.
Route the High Cable (58) through the Long
ÒUÓ-Bracket (57) and the 3 1/2Ó Pulley (15)
shown in the inset drawing. Be sure that the
Cable is in the groove of the Pulley and that
the Cable and Pulley move smoothly.
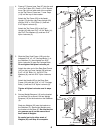
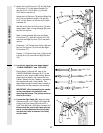
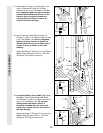
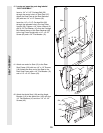
25. Wrap the High Cable (58) around a 3 1/2Ó
Pulley (15). Attach the Pulley to the bracket on
the Top Frame (55) with a 3/8Ó x 2Ó Bolt (12)
and a 3/8Ó Nylon Locknut (21). Be sure that
the Cable is in the groove of the Pulley and
that the Cable and Pulley move smoothly.
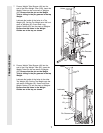
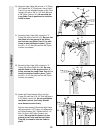
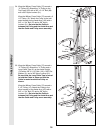
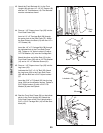
26. Note: This assembly step shows how to
complete the assembly of several pre-
attached parts.
The 5/8Ó x 9/16Ó Spacer (7) has been pre-
attached on the outside of the 3 1/2Ó Low
Pulley (102) for shipping purposes. Remove
the 3/8Ó Nylon Locknut (21), the Spacer, and
the Pulley from the 3/8Ó x 3 3/4Ó Bolt (88). Do
not remove the Bolt. The Bolt has been
shown removed for part identification.
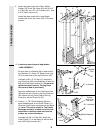
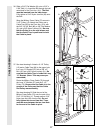
Reattach the 3 1/2Ó Low Pulley (102), with the
5/8Ó x 9/16Ó Spacer (7) between the Pulley and
the Press Frame (17). Do not tighten the 3/8Ó
Nylon Locknut (21) yet. Be sure that the
3/8Ó x 3 3/4Ó Bolt (88), the 3/8Ó Flat Washer
(9), the 5/8Ó x 9/16Ó Spacer (7), the 3 1/2Ó
Low Pulley (102), and the 3/8Ó Nylon
Locknut (21) are oriented as shown.
24
58
15
15
66
21
12
57
Bracket
55
21
12
15
58
25
26
CABLE ASSEMBLY
58
57
21
17
102
7
9
88