


9
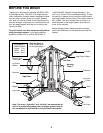
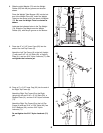
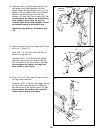
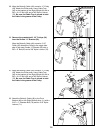
13. Lubricate a 3/8” x 2” Bolt (62) with grease. Attach
the Pivot Bracket (48) to the Right Butterfly Arm
(11) with the Bolt and a 3/8” Nylon Jamnut (50).
Do not overtighten the Locknut; the Pivot
Bracket must be able to pivot easily.
Press a 1 1/2” x 2” Inner Cap (23) into the indicat-
ed end of the Right Butterfly Arm (11). Wet the
bottom end of the Arm with soapy water. Slide a
Large Foam Pad (19) onto the Arm.
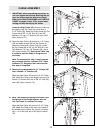
Slide a Foam Grip (76) onto a Press Handle (12).
Press a 1” Round Inner Cap (24) into the end of
the Handle. Attach the Handle to the Right
Butterfly Arm (11) with two 5/16” x 5/8” Button
Head Bolts (64).
Slide the Large Foam Pad (19) down so that the
bottom of the Foam Pad is even with the bottom
of the Right Butterfly Arm (11).
Repeat this step with the Left Butterfly Arm
(10).
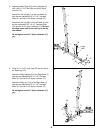
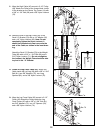
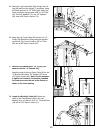
11. Press the two Weight Guide Bushings (44) into
the Center Top Frame (14). Slide the Center Top
Frame onto the Weight Guides (20).
Attach the Center Top Frame (14) to the Right
Top Frame (8) with two 5/16” x 2 3/4” Bolts (60),
two 5/16” Washers (26), and two 5/16” Nylon
Locknuts (71).
Attach the Center Top Frame (14) to the Left Top
Frame (3) with two 5/16” x 2 3/4” Bolts (60), two
5/16” Washers (26), and two 5/16” Nylon
Locknuts (71).
Tighten all of the 5/16” Nylon Locknuts (71)
used in steps 3–11.
Note: The remaining hardware from the
“Frame Assembly” bag will be used later.
26
26
26
71
71
14
8
3
44
20
60
60
71
71
11
22
41
70
8
6
9
61
Lubricate
12
64
64
76
19
10
12
11
50
48
62
24
23
13
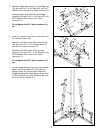
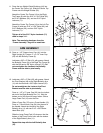
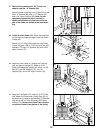
12. Press a 1 1/2” Square Inner Cap (41) into the
Right Upright (6). Press a 2” x 2 1/2” Inner Cap
(22) into the Butterfly Frame (9).
Lubricate a 3/8” x 3” Bolt (61) with grease. Attach
the Butterfly Frame (9) to the Right Top Frame (8)
with the Bolt and a 3/8” Nylon Locknut (70). Do
not overtighten the Locknut; the Butterfly
Frame must be able to pivot easily.
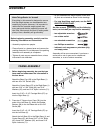
ARM ASSEMBLY
Lubricate