


15
14
20
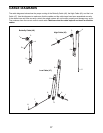
Weight
Tube
Weight
Weight
Stop
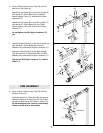
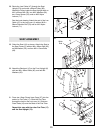
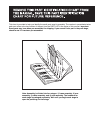
ADDING WEIGHTS TO THE WEIGHT CARRIAGE
To add resistance to the weight system, slide an equal
amount of weight (not included) onto each side of the
weight tube on the Weight Carriage (14). Be sure that
the weights are pushed against the weight stops. Note:
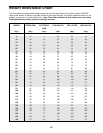
Due to the cables and pulleys, the actual amount of
resistance at each exercise station may vary from
the amount of weight used. Use the WEIGHT
RESISTANCE CHART on page 16 to find the
approximate amount of resistance at each station.
If Olympic weights are to be used, slide the two
Weight Adapters (20) onto the weight tube on the
Weight Carriage (14).
WARNING: Do not place more
than 125 pounds on the Weight Carriage (14).
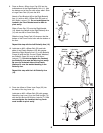
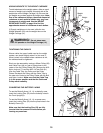
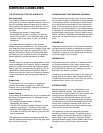
TIGHTENING THE CABLES
Woven cable, the type of cable used on the weight
system, can stretch slightly when it is first used. If
there is slack in the cables before resistance is felt,
the cables should be tightened.
Slack can be removed by moving a 90mm Pulley (38)
and Cable Trap (44) to a set of holes closer to the
center of the two Pulley Plates (36). Remove the M10
Nylon Locknut (71) and the M10 x 47mm Bolt (61)
from the Cable Trap, the Pulley, and the Pulley
Plates. Re-attach the Pulley and the Cable Trap to
the new set of holes in the Pulley Plates with the Bolt
and Nylon Locknut. Make sure that the Cable Trap
is in the proper position and that the Cable and
Pulley move smoothly.
36
44
38
71
61
38
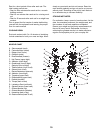
53
6
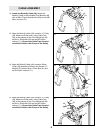
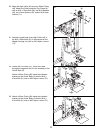
CONVERTING THE BUTTERFLY ARMS
To use the Butterfly Arms (10, 11) as butterfly arms,
insert the Locking Pins (53) into the butterfly holes in
the Front Upright (6).
To use the Butterfly Arms (10, 11) as press arms,
insert the Locking Pins (53) into the press holes in the
Butterfly Frame (9).
Make sure that the Locking Pins (53) are fully
inserted into the same set of holes before per-
forming any exercises.
9
10
11
Butterfly
Holes
Press
Holes