


4
STEP
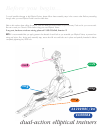
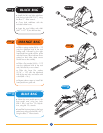
• X6000 only: Unfold the RPM sensor
wire, located in the frame console
mast bracket. Remove any kinks.
• All models: Slide the rubber console
mast cover onto the bottom of console
mast, and slide it up as far as it will
go.
• X6000 only: Holding the console
mast above the frame bracket, guide
the RPM sensor wire and lower
magnet cable up through the console
mast while simultaneously sliding the
console mast onto the frame bracket.
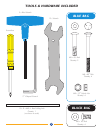
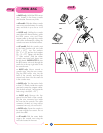
• All models: Bolt the console mast
to the frame bracket with two bolts
(M8 x 60
MM
), two flat washers
(8 x 17 x 1.5T), and two lock washers
(8 x 15 x 2T). Tighten with the Blue
5
MM
Allen wrench. Slide the rubber
console mast cover back down over
the bolt heads. X6000 NOTE: Be sure
the RPM sensor wire exits through the
small slot at the top right side of the
the console mast.
• X6000 only: Mount console to
console mast, using the two screws.
Plug the RPM sensor wire into the
back of the console, and feed the
excess back down into the small slot
in the console mast.
• X6000 only: Turn the tension knob
to Level 15. Reach inside the console
mast and connect the magnet cables.
Turn the knob to Level 1 and mount the
knob using a bolt (M5 x 25
MM
).
• X6200 only: Remove the four
screws from the back of the console.
Plug the wire connector from inside
the mast into the console. The cable
connector is slotted, so it may only be
connected one way; do not force it!
• X6200 only: Mount the console to
the mast using the four screws. Do not
pinch the cable!
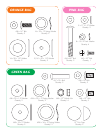
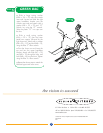
• All models: Bolt the water bottle
cage to the console mast using the
two bolts located in the mast.
PINK BAG
4
STEP
OR
X6200HRC/DA
X6000DA
6