


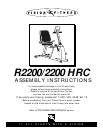
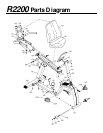
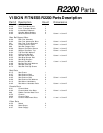
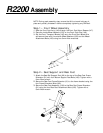
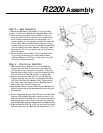

Step 3 • Seat Assembly
1: Secure the Seat Mount Handlebars (110) to the Seat
Frame (115) with four Seat Mount Handlebar Bolts (182).
2: When mounting the Seat Cushion Bottom (136), you
have two sets of holes to choose from. Using the rear
set of holes is recommended for most people. For a
smaller person, you may choose to use the forward set
of bolt holes. Mount the Seat Cushion Bottom (136) to
the Seat Frame (115) with four of the Seat Cushion Bolts
(195) and Seat Cushion Bolt Washers (196) using a 4mm
Allen wrench. Do not fully tighten any bolt until all four
bolts are started.
3: Mount the Seat Cushion Back (137) to the Seat Frame
(115) using the remaining four Seat Cushion Bolts
(195) and Washers (196). Do not fully tighten any bolt
until all four bolts are started.
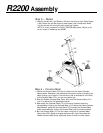
Step 4 • Aluminum Seat Rail
1: Place the Aluminum Seat Rail (121) on the Seat Rail
Support (96) and align the two holes in the Seat Rail
with the two holes in the Frame Lip (299). Thread the
Seat Rail Mount Bolts (182) through the Frame Lip (299)
into the Aluminum Seat Rail but do not tighten yet.
2: Secure the Aluminum Seat Rail (121) to the Seat Rail
Support Post (96) with the four Top Support Post Bolts
(182) and Top Post Bolt Washers (184). Tighten these
four bolts. Now fully tighten the two Seat Rail Mount
Bolts (182) at the front of the seat rail.
3: Slide the Seat Frame (115) onto the Aluminum Seat Rail (121)
while lifting the knob, so the seat frame will slide to the front
of the seat rail.
4: Slide the Seat Stop Bumper Rod (125) with one Seat Stop
Bumper (124) already attached through the hole in the
back of the Aluminum Seat Rail (121). Attach the second
Seat Stop Bumper to the other end of this rod using the
Bumper Rod Screw (188) and Bumper Rod Lock Washer (189).
5: Press the Seat Rail End Cap (129) into the Aluminum Seat
Rail and secure with the Seat Rail End Cap Screws (174).
R2200 Assembly