


5 6
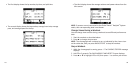
Initial System Setup
Time of Day
The time, date, and day of week are set by the GPS based on selections you
make.
1. Press MODE until CONFIGURE displays and press q to highlight WATCH.
2. Pressq or 8 and press q to select and change Time Format, Time Zone,
Date Format and other watch functions.
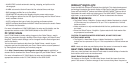
Personal Information
To accurately measure the performance of your workouts, and to assist in
calculating your heart rate zones, you should enter your personal information.
1. Press MODE until CONFIGURE displays and press q to highlight USER INFO.
2. Press 8 to set the PERSONAL screen and press q to set your Gender,
Weight, Height, and Date of Birth.
To refine your calories results further, see the steps to Configure Calorie
Expenditure Settings in the PERFORMANCE (Mode) View Screens section of the
USER GUIDE.
Digital 2.4 Heart Rate Sensor (Optional)
To minimize the possibility of picking up a signal from another person’s Heart
Rate Sensor, you should pair it to the Global Trainer
™
watch. To pair your sensor
for the first time, move 30 feet (10 m) away from other heart rate sensors.
NOTE: Repeating this procedure is only necessary for a new heart rate sensor
or when the heart rate sensor battery is replaced.
1. Press MODE until CONFIGURE displays and press q to highlight SENSORS.
2. Press 8 and the HEART RATE SCAN setting should be selected. If that field
is NO, press 8 and q to highlight SCAN, and 8 to confirm the selection.
The Global Trainer
™
watch will begin searching for the heart rate sensor
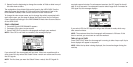
4. Secure the clip to the watch caseback by placing the fixed end of the clip
into the slot adjacent to the red dot and locking the hinged end of the clip
into the other slot.
Charge Using the AC Adaptor
1. Insert large USB-A plug on the download/charging clip into the USB port on
the AC adaptor, and plug the AC adaptor into an electrical outlet.
2. Attach the download/charging clip to the back of the Global Trainer
™
watch,
as instructed above in steps 3 and 4.
The Power Off Function is set to SHOW TIME, so the date and time will display
during charging. A blinking battery icon appears during charging. A solid battery
icon appears when charging is complete. To learn more about the Power Off
Function, refer to the section on CONFIGURE (Mode) and the MODES section of
the USER GUIDE.
NOTE: To prevent corrosion, please dry the download/charging contacts and
the surrounding area on the back of the Global Trainer™ watch.
Turn the Global Trainer
™
Watch On and Off
To turn the Global Trainer
™
watch on or off, press and hold 8 for 2 seconds until
you hear a three-note tone. The tone ascends in pitch when powering on, and
descends in pitch when powering off.
Because the Power Off Function is set to SHOW TIME, the date and time will
display when the Global Trainer
™
watch is turned off. The POWER OFF label will
appear in the upper status bar.
NOTE: When the Power Off Function is set to TURN OFF DISPLAY, better
standby battery life is obtained. To learn more about the Power Off Function,
refer to the CONFIGURE (Mode) and the MODES sections of the USER GUIDE.