


The safety and integrity designed into the AeroPilates® Home Studio can only be maintained when the
AeroPilates® Home Studio is regularly examined for damage and wear. Special attention should be
given to the following:
STORAGE
MAINTENANCE
11
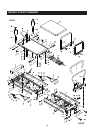
1. It is the sole responsibility of the user/owner to ensure that regular maintenance is performed.
2. Worn or damaged components should be replaced immediately or the AeroPilates® Home Studio
should be removed from service until repair is made.
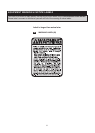
3. Verify that the WARNING LABEL(54) is in place and easy to read. Call Stamina Products
immediately at 1-800-375-7520 for a replacement WARNING LABEL(54) if it is missing or damaged.
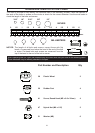
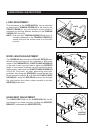
4. Verify that the ROPES(22) are properly installed on the PULLEY SETS(26).
5. Check the condition of the ROPES(22) and replace if they are frayed or worn.
6. Check the PLASTIC SNAP HOOKS(23) on the ends of the ROPES(22). Replace the PLASTIC
SNAP HOOKS(23) if they are damaged or deformed.
7. Check the TENSION CORDS(15). If any of the TENSION CORDS(15) are stretched and loose, re-tie
the knot on the end of the cord. Replace TENSION CORDS(15) that are frayed or worn.
8. Check the BUNGEE CORD(58) on the CARDIO REBOUNDER(56) for wear. Replace the the
BUNGEE CORD(58) if it is frayed or worn.
9. Check the PULLEY SETS(26) for excessive wear. Replace worn PULLEY SETS(26).
10. Check the HAND/FOOT STRAPS(24) for damage. Replace damaged parts.
11. Check the FOAM SLEEVE(11) and FOAM PADS(21) and replace if damaged or worn.
12. Check the STOP PLATES(31, 33) for looseness or damage and replace any damaged parts.
13. Check the CUSHION(18) and replace if it is damaged or worn.
14. Check and clean the ROLLERS(13) and the rolling surfaces on the rails. Clean by wiping with a dry
cloth.
15. Only Stamina Products supplied components shall be used to maintain/repair the AeroPilates®
Home Studio.
16. Keep your AeroPilates® Home Studio clean by wiping it off with an absorbent cloth after use.
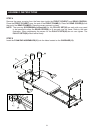
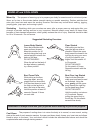
1. To store the AeroPilates® Home Studio, simply keep it in a clean dry place.
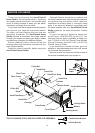
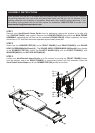
2. The FRONT FRAME(1) of the AeroPilates® Home Studio has built-in wheels for easy moving.
To move, be sure at least one of the tension cords is attached to prevent the CARRIAGE(12) from
sliding, then lift from the end of the REAR FRAME(2) and roll.
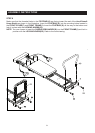
3. The AeroPilates® Home Studio folds for storage. To fold, be sure no tension cords are attached and
slide the CARRIAGE(12) to the end of the REAR FRAME(2). Remove the FOOTBAR(10), CARDIO
REBOUNDER(56), and FOAM PAD ASSEMBLIES(21), then lift the AeroPilates® Home Studio
onto its side with the LOCKING PIN(30) side up. With the machine hinging in the middle, move the
FRONT FRAME(1) toward the REAR FRAME(2) until the frame ends meet. Insert the LOCKING
PIN(30) into the hole in the REAR FRAME(2), and the AeroPilates® Home Studio is ready to store.