


XE Series Elliptical
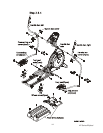
7
screws.
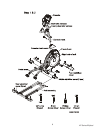
2. On the pedal arms, in the middle on top, there are two axles already installed in
the bushing housings. Remove, from one side of each axle, the bolt (one should
be loose) and washer. Remove the axle and set aside for the next step.
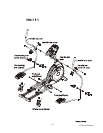
3. Locate the left foot pad/connecting arm. Holding the rear of the foot pad with
your right hand and the connecting arm, just in front of the foot pad, with your left
hand, place the foot pad over the bushing housing.
4. Holding the axle (removed in step 2) in one hand, and the foot pad in the other,
line up the large hole in the side of the bracket (under the foot pad) with the hole
in the bushing housing and insert the axle all the way until the washer is flush
against the bracket. You may have to wiggle the axle while moving the foot pad
slightly to get the axle to go in.
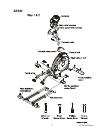
5. Take the bolt and washer that you removed from the axle in step 2 and thread it
into the hole in the axle. Tighten the bolt using two wrenches provided. You have
to put a wrench on both axle bolts to tighten firmly.
6. Align the hole in the end of the connecting arm (pivoting rod end) with the hole in
the bracket of the handle bar. The rod end should be on the inside of the handle
bar bracket. Take one of the 1-1/4” X 3/8” bolts and install it through the handle
bar bracket and the rod end. Install a flat washer and Nyloc® nut on the bolt and
tighten firmly using a wrench on the nut and one on the bolt.
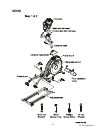
7. Repeat for the right side foot pad/connecting arm.
8. Install the plastic covers over the connection of the rod end and handle bar. The
front inside hole in the plastic uses a self tapping screw and the two rear holes
use the 3/8” machine screws (short). There is a short Phillips screw driver
provided for installing the inside screws.
9. Install the two wheel covers using the four 5/8” machine screws (long).
10. Install the locking pins for the adjustable foot pads into the desired holes (XE350,
XE550 only). *See Foot pad angle adjustment section for details of this feature.
11. This step is for the XE550 only. Install the two plastic parts that make up the rear
shroud using the seven Phillips head screws.