


NS-75
MATERIALS & TOOLS / INITIAL SETUP ADJUSTMENTS
step
#4
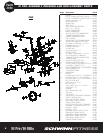
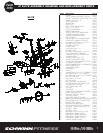
Ref. # Description Qty
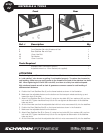
1 Frame 1
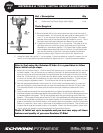
43 Pedals with Toe Clips & Straps (Left & Right) 1 Pair
Tools Required
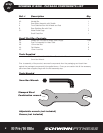
Stamped Steel Combination Wrench 1
A. Remove Pedals (43) from the small parts box and look at the ends of
the pedal threads. You will notice that each pedal is market with an "R"
or an "L" on the very end of the spindle past the threads. This mark
indicates which side of the bike the pedal is intended to mount. This is
important since the thread directions are different for each pedal.
B. Locate the Pedal that has the "R" on the spindle. This pedal is for the
right side crank arm of the bike (chain guard side) and is right hand
threaded (turn clockwise to tighten). It is a good idea to apply grease
to the threads before attaching them to the crank, this will assure that
they can be removed in the future. Using the supplied Combination
Wrench thread the right Pedal on to the crank arm, tighten firmly.
C. Locate the Pedal that has the "L" on the spindle. Follow the directions in step B. however, you will
need to turn the spindle left (counter-clockwise) to tighten as the "L" spindle is reverse threaded.
Prior to first using the Schwinn IC bike it is a good idea to follow
these initial set up steps.
A. Move bike into its final location. Confirm that all four feet are firmly in contact with the floor and that
the bike is stable. If any of the feet are not making full contact it is recommended that you adjust
them by turning the entire foot assembly counter-clockwise which will extend it further from the sta-
bilizer bar. Once the foot is in full contact and the bike is stable, thread the jam nut clockwise until
it comes into contact with the stabilizer at the point the foot assembly threads in. Tighten the jam
nut snug using an adjustable wrench. This will secure the foot at the desired height.
B. With the resistance adjustment knob turned fully in the counter-clockwise position (no brake con-
tact with flywheel) it is recommended that you soak the brake pads with Schwinn Fit-Tech Lube.
This will extend the life of the brake pads and assure a smooth resistance interface with the fly-
wheel.
C. Once the pads are lubricated it is recommended that you tighten the resistance adjustment knob
clockwise to tighten the brake pads against the flywheel surface. Do this until the brake pads are firm-
ly clamped against the flywheel. This will set the brake parts and give the springs some initial com-
pression. This process will also assure that the Fit-Tech Lube penetrates the entire brake pad surface.
D. Confirm that the Saddle is positioned in the desired location on the saddle mounting bracket. If the
angle of the saddle or the fore/aft position of the saddle needs to be adjusted, use the Combination
Wrench to loosen the 14mm nuts on either side of the saddle mounting bracket. This will allow you
to adjust the tilt angle and fore/aft position of the saddle. Once in the correct position, tighten both
14mm nuts on the saddle mounting bracket with the Combination Wrench.
That's it! Initial set up is complete and you can now enjoy all these
features and quality of you new Scwhinn IC Bike!
5
IC Pro / IC Elite