


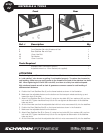
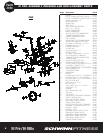
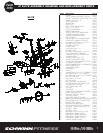

Ref. # Description Qty
1 Frame 1
29 Pop Pin Assembly for Head Tube 1
42 Handle Bar 1
7, 8, & 9 Seat Slider Assembly 1
51 Water Bottle Cage 2
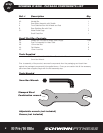
Tools Required
3mm Hex 1
Adjustable wrench (not supplied) 1
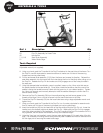
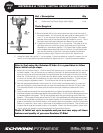
A. Using your hand, grab the T-handled of the Pop Pin attached to the seat tube of the frame. Turn
the Pop Pin counter clockwise for several revolutions to make sure it is free of the securing
threads and can be pulled freely.
B. Pull the entire seat slider assembly (7,8,9) from the frame and reverse its direction. Reinsert the
seat slider assembly into the frame (with the holes facing the front of the bike) while pulling out on
the Pop Pin. Release the Pop Pin and make sure it fully engages one of the holes provided in
the seat post.
C. Using the stamped steel combination wrench supplied, loosen up the 14mm nuts that secure
the saddle bracket to the seat slider (8). Once loose, rotate the saddle so that the nose of the
saddle is facing the handle bars and is level with the ground or in your desired position. Tighten
the 14mm nut securely and manually attempt to twist the saddle sideways to confirm that it is
secure before ridding.
D. Remove the Pop Pin Assembly (29) from the small parts bag and add some grease to the
threads of the large 21mm nut that will screw into the head tube boss on the bike.
E. Thread the Pop Pin Assembly (29) into the head tube boss using a large adjustable wrench and
tighten firmly.
F. Using your hand, grab the T-handled of the Pop Pin, turn it counter clockwise for several revolu-
tions to make sure it is free of the securing threads and can be pulled freely.
G. Insert the handle bar (42) into the head tube of the bike while pulling the Pop Pin out. Lower the
handle bar to the desired height and release the Pop Pin. Make sure the Pop Pin fully engages
one of the holes provided in the handle bar. Turn the T-handle of the Pop Pin clockwise until it is
fully tightened, this will secure the handle bar firmly at the desired height.
H. Using the 3mm hex tool supplied, mount the two water bottle cages (51) to each side of the fork
legs. The necessary mounting screws have previously been installed and must be removed from
the fork legs prior to securing the water bottle cage.
MATERIALS & TOOLS
step
#3
4
IC Pro / IC Elite