


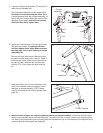

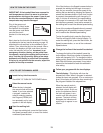
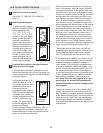
6. Attach the Latch Housing (73) to the left Upright
(84) with two Screws (3); start both Screws
and then tighten them. Note: Make sure that
the large hole in the Latch Housing is on the
indicated side.
Remove the knob from the pin. Make sure that
the collar and the spring are on the pin. (Note: If
there are two collars, place one on each side of
the spring.) Next, insert the pin into the Latch
Housing (73). Then, tighten the knob onto the
pin.
6
8
3
Pin
Spring
Collar
Knob
73
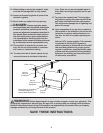
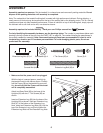
8. Make sure that all parts are properly tightened before you use the treadmill. If there are sheets of clear
plastic on the treadmill decals, remove the plastic
.
To protect the floor or carpet, place a mat under the tread-
mill.
N
ote: Extra hardware may be included. Keep the included hex key in a secure place; the large hex key is
used to adjust the walking belt (see page 26).
84
Large Hole
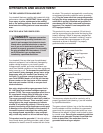
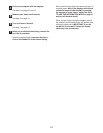
7. Note the location of the 75 ohm terminal on the
front of the treadmill near the uprights. For the
television to operate properly, a CATV cable
must be connected to the 75 ohm terminal (see
page 10).
75 Ohm Terminal
7
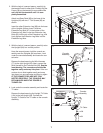
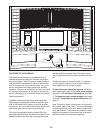
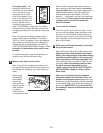
5. Insert the Console Wire Harness (77) and the TV
cable into the Uprights (84).
Set the console assembly on the Uprights (84).
B
e careful to avoid pinching the wires.
W
hile
a
second person holds the console assembly, at-
tach it with four Console Bolts (64) and four Star
Washers (8) as shown;
start all four Console
Bolts and then firmly tighten them.
C
onsole
Assembly
64
77
64
8
8
84
84
TV Cable
5