


30
(5) If the lever cannot be pushed all the way to a position
parallel to the fork blade, return the lever to the OPEN position.
Then turn the tension adjusting nut counterclockwise one-
quarter turn and try tightening the lever again.
(6) Re-engage the brake quick-release mechanism to
restore correct brake pad-to-rim clearance; spin the wheel
to make sure that it is centered in the frame and clears the
brake pads; then squeeze the brake lever and make sure that
the brakes are operating correctly.
!
WARNING: Secondary retention devices are not a
substitute for correct quick release adjustment. Failure to
properly adjust the quick release mechanism can cause the
wheel to wobble or disengage, which could cause you to loose
control and fall, resulting in serious injury or death.
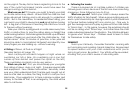
c. Removing a Quick Release Rear Wheel
(1) Shift the rear derailleur to high gear (the smallest,
outermost rear sprocket).
(2) If your bike has rim brakes, disengage the brake’s quick-
release mechanism to open the clearance between the wheel
rim and the brake pads (see Section 4.A, gs. 7 through 10).
(3) Pull the derailleur body back with your right hand.
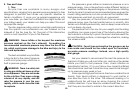
(4) Move the quick-release lever to the OPEN position
(g. 20b).
(5) Lift the rear wheel off the ground a few inches and,
with the derailleur still pulled back, push the wheel forward
and down until it comes out of the rear dropouts.
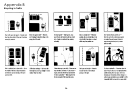
d. Installing a Quick Release Rear Wheel
NOTE: If your bike is equipped with disk brakes, be careful not
to damage the disk, caliper or brake pads when re-inserting
the disk into the caliper. Never activate a disk brake’s control
lever unless the disk is correctly inserted in the caliper.
(1) Shift the rear derailleur to its outermost position
(2) Pull the derailleur body back with your right hand.
(3) Move the quick-release lever to the OPEN position (see
g. 20a & b). The lever should be on the side of the wheel
opposite the derailleur and freewheel sprockets.
(4) Put the chain on top of the smallest freewheel sprocket.
Then, insert the wheel into the frame dropouts and pull it all
the way in to the dropouts.
(5) Tighten the quick-release adjusting nut until it is nger
tight against the frame dropout; then swing the lever toward
the front of the bike until it is parallel to the frame’s chainstay
or seatstay and is curved toward the wheel (g. 20b). To apply
enough clamping force, you should have to wrap your ngers
around a frame tube for leverage, and the lever should leave
a clear imprint in the palm of your hand.
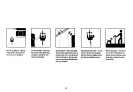
!
WARNING: Securely clamping the wheel takes considerable
force. If you can fully close the quick release without wrapping
your ngers around the seatstay or chainstay for leverage, and
the lever does not leave a clear imprint in the palm of your
hand, the tension is insufcient. Open the lever; turn the tension
adjusting nut clockwise a quarter turn; then try again
(6) If the lever cannot be pushed all the way to a position
parallel to the chainstay or seatstay tube, return the lever to the
OPEN position. Then turn the adjusting nut counterclockwise
one-quarter turn and try tightening again.
(7) Push the rear derailleur back into position.
(8) Re-engage the brake quick-release mechanism to
restore correct brake pad-to-rim clearance; spin the wheel