


17
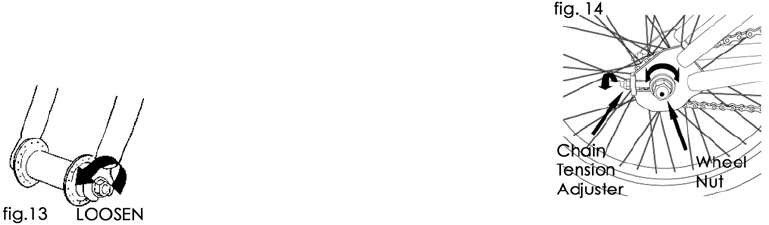
adjustable wrench, loosen the two axle nuts.
c. If your front fork has a clip‑on type secondary retention
device, disengage it and go to step (4). If your front fork has
an integral or a washer type secondary
retention device, loosen the axle nuts
enough to allow removal of the wheel;
then go to step (4).
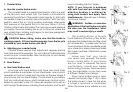
d. Raise the front wheel a few
inches off the ground and tap the top of
the wheel with the palm of your hand to
knock the wheel out of the fork ends.
3. Installing a Bolt-On Front Wheel
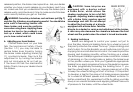
a. With the steering fork facing forward, insert the wheel
between the fork blades so that the axle seats rmly at the
top of the slots which are at the tips of the fork blades. The
axle nut washers should be on the outside, between the fork
blade and the axle nut. If your bike has a clip-on or washer
type secondary retention device, engage it.
b. While pushing the wheel rmly to the top of the slots
in the fork dropouts, and at the same time centering the
wheel rim in the fork, use a correctly sized socket, box, open
end or adjustable wrench to tighten the axle nuts as tight
as you can.
c. If your bicycle has a front wheel hand brake with quick
release, close the brake shoes; then spin the wheel to make
sure that it is centered in the frame and clears the brake
shoes, and squeeze the brake lever to make sure the brake is
functioning correctly.
4. Removing a Bolt-On Rear Wheel with Hand Brake
a. Open the rear brake shoes (see Section 4.A.2.a. above).
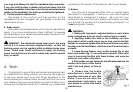
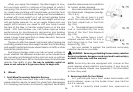
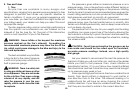
b. If the wheel is equipped with chain tension adjusters (g.
14) loosen the nuts on the adjusters
by turning both counterclockwise
with a correctly sized open end
or adjustable wrench an equal
number of turns. This allows you to
move the wheel as required by step
(4) below.
c. With a correctly sized
socket, box, open end or adjustable
wrench, loosen the two axle nuts.
d. Push the wheel forward to slacken the chain, and
remove the chain from the chainring and wheel sprocket.
e. Pull the wheel out of the frame.
5. Installing a Bolt-On Rear Wheel with Hand Brake
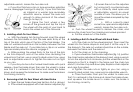
a. Put the chain on to the wheel sprocket. Then, insert the
wheel into the frame dropouts and push it all the way in to
the dropouts. The axle nut washers should be on the outside,
between the frame and the axle nut.
b. Put the chain on to the chainring.
c. If your wheel has chain tension adjusters (g. 14), position
the chain tension adjusters in the dropouts and, using a wrench
to turn the adjuster nuts clockwise, pull the wheel back in the
dropouts so that it is straight in the frame and the chain has
about 1/4 inches of up-and-down play. Replace chain adjuster
end caps if provided.
d. Tighten the axle nuts as tightly as you can, using a
correctly sized socket, box, open end or adjustable wrench.
e. Close the brake; then spin the wheel to make sure
that it is centered in the frame and clears the brake shoes,
and squeeze the brake lever to make sure the brake is
functioning correctly.