


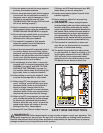
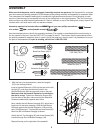
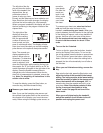

If you purchase the optional chest pulse sensor (see
page 20), follow the steps below to install the receiver
included with the chest pulse sensor.
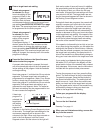
1. Make sure that the power cord is unplugged. Remove
the indicated Screw (95) and the Access Door (96) from
the left side of the Console Base (101).
2. Connect the wire on the receiver (A) to the indicated wire
extending from the Console Base (101).
Hold the re-
ceiver so the small cylinder is oriented as shown and
is facing the Console Back. Attach the receiver to the
plastic posts on the Access Door (96) with the two in
-
cluded small screws.
3. Make sure that no wires are pinched. Reattach the
Access Door (96) with the Screw (95). Discard the other
wires included with the receiver.
7
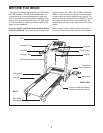
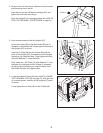
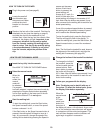
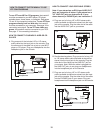
6. Attach the two Wheels (94) to the base of the Uprights
(97) with two Wheel Bolts (90), four Wheel Spacers (79),
and two Nuts (20) as shown. Do not overtighten the
Nuts; the Wheels must be able to turn freely.
With the help of a second person, carefully raise the
Uprights (97) to the vertical position.
79
94
79
97
94
79
90
20
79
90
6
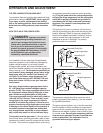
7. Make sure that all parts are properly tightened before you use the treadmill. Note: Extra hardware may
be included. Keep the included allen wrenches in a secure place. The large allen wrench is used to adjust the
walking belt (see page 23). To protect the floor or carpet, place a mat under the treadmill.
A
101
Small
Cylinder
95
96
Wire
Small
Screws
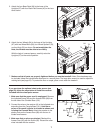
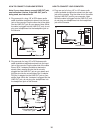
5. Attach the four Base Pads (99) to the base of the
Uprights (97) with four Base Pad Screws (40) in the loca-
t
ions shown.
40
97
99
99
40
99
40
4
0
99
5
20