


7
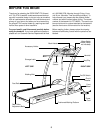
7. Make sure that all parts are properly tightened before you use the treadmill. There may be extra parts.
Keep the included allen wrench in a secure place (the allen wrench is used to adjust the walking belt, as de-
scribed on page 21). To protect the floor or carpet from damage, place a mat under the treadmill.
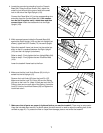
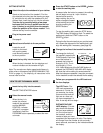
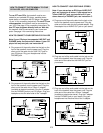
6. Make sure that the Lock Knob Sleeve (93) is fully in-
serted into the left Upright (15).
Remove the Lock Knob (92) from the Lock Pin (97).
Make sure that the Lock Pin Collar (95) and the Spring
(94) are on the Lock Pin. (Note: If there are two Lock Pin
Collars, place one on each side of the Spring.) Insert the
Lock Pin into the Lock Knob Sleeve (93) and tighten the
Lock Knob onto it.
95
95
97
93
94
92
15
6
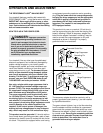
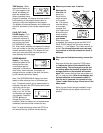
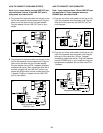
4. Locate the ground wire extending from the Console
Base (64). Using the Silver Screw (124), attach the
metal ring on the end of the ground wire to the small
hole in the side of the Right Upright (103).
Connect the Pulse Wire (121) to the corresponding wire
extending from the Console Base (64). If the connec-
tors do not fit together easily, rotate them and then
connect them. Insert the excess wire into the Right
Upright (103).
64
121
Ground
Wire
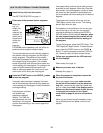
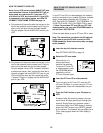
5. While a second person holds the Console Base (64)
against the Right Upright (103) and the Left Upright (not
shown), tighten two 3/4” Screws (75) into each Upright.
Raise the treadmill frame (not shown) to the vertical po-
sition so that it is centered between the Right Upright
(103) and the Left Upright (not shown).
Refer to step 2. Firmly tighten the four Upright Bolts (84).
Refer to step 3. Firmly tighten the two Pulse Bar Bolts
(104).
Lower the treadmill frame back to the floor.
64
103
75
4
5
124
90
103