


page 6
®
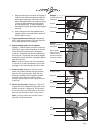
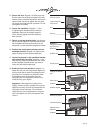
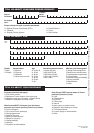
3. Assemble the base rails. Diagram 3. While
your assistant holds the upright supports, slide
the seat bracket under the base rails and align
the mounting holes. Place the alignment bracket
into position between the base rails and align
the holes.
4. Secure the base rails. Four fasteners secure
the seat bracket. A pair of fasteners with long
bolts is inserted through the side (horizontally)
and another pair of fasteners are inserted
(vertically) through the base of the seat bracket
and into the base rails. (
Note that the vertical
fasteners are not shown in Diagram 3.
) To
secure the base rails, take the following steps:
a. Insert the long bolts and washers
(horizontally) through the seat bracket, base
rails, and alignment bracket. Diagram 3.
b. Place a washer and locknut onto the ends
of the bolts and finger tighten.
c. Place a lock washer and washer on each
of the two shorter bolts. The lock washer
should be placed against the head of the
bolt.
d. Align the bolt holes and insert the bolts
(vertically) through the seat bracket and base
rails. Finger tighten the bolts.
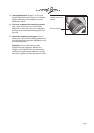
5. Position the handlebar over the upright supports.
Diagram 4. Slide the handlebar into place and align
the bolt holes. Be sure that the wrist straps, on the
handlebars, face toward the rear (seat assembly
location).
6. Insert the bolts (with washers) through the
upright supports and into the handlebars.
Diagram 4. Notice that there are two bolt holes
in front and two in back. Finger tighten each
bolt. Do not use the hex key at this time. Loose
bolts make it easier to install the seat frame.
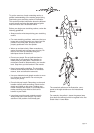
7. Put the seat assembly together. Diagrams 5
and 6. The seat assembly (seat frame, padded
seat, seat bumper, and knee pad) is put
together before it is attached to the base rails.
8. Start with the padded seat. Diagram 5.
Position the padded seat as shown and take
the following steps:
a. Align the bolt holes and make sure that the
narrow end of the seat faces the crossbars.
b. Place a washer on each of four 1-inch bolts.
Wrist straps
Bolt, lock washer,
and flat washer
Handlebar cap
Diagram 4
Positioning the handlebar.
Upright support
Diagram 5
Installing the padded seat.
Crossbars
Padded seat
Narrow end of seat plate
Fasteners
Seat frame
Seat bumper
Seat
bumper
2 long bolts,
4 flat washers, and
2 locknuts
Alignment bracket
Diagram 3
Positioning the base rails.
Base rails
Seat bracket
Washer
2 shorter bolts, 2 lock
washers, and 2 flat
washers are inserted
through the base of the
seat bracket.