


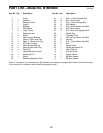

23
8
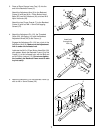
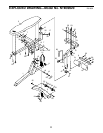
6. Press a 50mm Square Inner Cap (15) into the top
end of the Upright (4).
Attach a set of Pads (16, 31) to a Pad Bracket (6)
with four M6 x 16mm Screws (22). Make sure
the Pads and Pad Bracket are oriented as
shown. Repeat with the other set of Pads and
Pad Bracket.
Attach a Pad Bracket (6) to the top of the Upright
(4) with two M10 x 70mm Carriage Bolts (23), two
M10 Washers (24), and two M10 Nylon Locknuts
(26).
Attach the other Pad Bracket (6) to the indicated
side of the Upright (4) with two M10 x 70mm
Carriage Bolts (23) and two M10 Nylon Locknuts
(26).
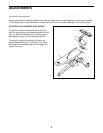
7. Wet the handle on the Upright (4) with soapy
water. Slide the Handle Grip (28) onto the handle.
Slide the 60mm Square Bushing (10) onto the
bottom of the Upright. Make sure the tabs are
on the indicated sides.
Press the 55mm Square Bushing (14) into the
bottom of the Upright (4). Secure the Bushing
with two M4 x 16mm Self-tapping Screws (27).
Have one person press the tabs on the 60mm
Square Bushing (10) into the indicated hole in the
Upright (4) while a second person slides the
Upright and Bushing into the Backrest Frame (3).
Engage the tabs on the Bushing into the slots in
the Frame. Be careful not to pinch your hands
as you slide the Bushing into the Frame.
Thread the Upright Collar (34) into the Backrest
Frame (3). Pull the Upright Adjustment Knob (17)
out, and use a wrench to fully tighten the Collar
into the Backrest Frame. Engage the Knob into a
hole in the Upright (4), and tighten it fully.
8. Make sure that all parts are properly tightened
before you use the weight bench. The use of
all remaining parts will be explained in
ADJUSTMENTS, starting on the next page.
6
7
10
27
27
4
14
Tab
Slot
Hole
3
17
34
28
4
16
16
15
26
24
31
31
6
6
22
Straight
Edge
Handle
Straight
Edge
22
23
26