


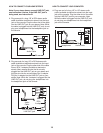
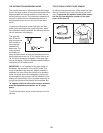
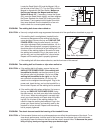

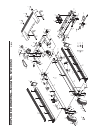

Locate the Reed Switch (22) and the Magnet (18) on
the left side of the Pulley (17). Turn the Pulley until the
M
agnet is aligned with the Reed Switch. M
ake sure
that the gap between the Magnet and the Reed
S
witch is about 1/8”.
I
f necessary, loosen the Screw
(23), move the Reed Switch slightly, and then retighten
the Screw. Reattach the Hood (33), making sure that
the Screws (7) are inserted into the holes from which
they were removed. Run the treadmill for a few min-
utes to check for a correct speed reading.
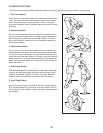
PROBLEM: The walking belt slows when walked on
SOLUTION:
a. Use only a single-outlet surge suppressor that meets all of the specifications described on page 10.
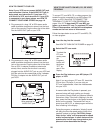
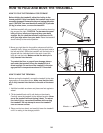
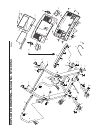
b. If the walking belt is overtightened, treadmill perfor-
mance may decrease and the walking belt may be-
come damaged. Remove the key and UNPLUG THE
POWER CORD. Using the allen wrench, turn both
rear roller adjustment bolts counterclockwise, 1/4 of a
turn. When the walking belt is properly tightened, you
should be able to lift each side of the walking belt 3 to
4 inches off the walking platform. Be careful to keep
the walking belt centered. Plug in the power cord, in-
sert the key, and run the treadmill for a few minutes.
Repeat until the walking belt is properly tightened.
c. If the walking belt still slows when walked on, see the front cover of this manual.
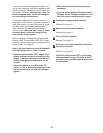
PROBLEM: The walking belt is off-center or slips when walked on
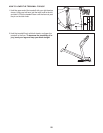
SOLUTION: a. If the walking belt is off-center, remove the key and
UNPLUG THE POWER CORD. If the walking belt
has shifted to the left, use the allen wrench to turn
the left rear roller bolt clockwise 1/2 of a turn; if the
walking belt has shifted to the right, turn the left
rear roller bolt counterclockwise 1/2 of a turn. Be
careful not to overtighten the walking belt. Plug in the
power cord, insert the key, and run the treadmill for a
few minutes. Repeat until the walking belt is centered.
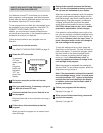
b. If the walking belt slips when walked on, first remove
the key and UNPLUG THE POWER CORD. Using
the allen wrench, turn both rear roller bolts clockwise,
1/4 of a turn. When the walking belt is correctly tight-
ened, you should be able to lift each side of the walk-
ing belt 3 to 4 inches off the walking platform. Be
careful to keep the walking belt centered. Plug in the
power cord, insert the key, and carefully walk on the
treadmill for a few minutes. Repeat until the walking
belt is properly tightened.
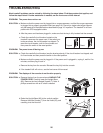
PROBLEM: The shock does not assist the lowering of the treadmill frame
SOLUTION:
a. Environmental factors such as cold temperatures can affect the performance of the shock. To re-
store shock performance, hold the ends of the frame near the endcaps firmly with both hands,
and carefully lower the frame to the floor and then raise it several times. To decrease the possi
-
bility of injury, bend your legs and keep your back straight.
Rear Roller Adjustment Bolts
3”–4”
b
a
b
18
22
23
Top
V
iew
1
/8”
17
27