


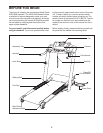


8
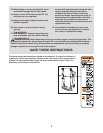
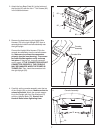
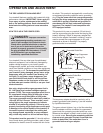
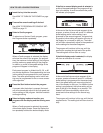
5. Attach the Latch Housing (34) to the left Upright
(20) with two Screws (7); start both Screws
and then tighten them. Note: Make sure that
the large hole in the Latch Housing is on the
indicated side.
Remove the knob from the pin. Make sure that
the collar and the spring are on the pin. (Note: If
there are two collars, place one on each side of
the spring.) Next, insert the pin into the Latch
Housing (34). Then, tighten the knob onto the
pin.
5
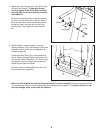
6. With the help of a second person, raise the
Walking Platform (15) to the storage position and
make sure that the latch pin is engaged as de-
scribed on page 24.
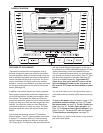
Position the Base Plate (75) on the treadmill as
shown. Attach the Base Plate to the Upright (20)
with the three Base Plate Bolts (77). Note: It may
be helpful if a second person tips the treadmill
slightly as you tighten the Bolts.
Carefully lower the Walking Platform (15) to the
floor as described on page 25.
6
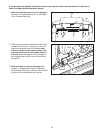
7. Make sure that all parts are properly tightened before you use the treadmill. Keep the included hex key
in a secure place. The hex key is used to adjust the walking belt (see page 27).
To protect the floor or car
-
pet from damage, place a mat under the treadmill.
75
15
77
20
7
Pin
Spring
Collar
Knob
34
20
Large Hole