


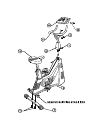

Step 1
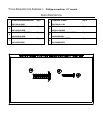
Before proceeding, familiarize yourself with the parts of the Lifecycle 9100 exercise bike and make sure that you have
received all the items described in the Parts List.
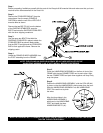
Step 2
Remove the STABILIZER BAR (#7) from the
carton base. Use the empty CONSOLE
CARTON to raise the rear of the LIFECYCLE
exercise bike as shown.
Remove the two BOLTS (#1) from the bottom
of the SHIPPING STABILIZER, save the
BOLTS and store the SHIPPING STABILIZER
with the other shipping containers.
Step 3
Use the same two BOLTS that held the
SHIPPING STABILIZER in place to attach the
STABILIZER BAR as shown. Make certain
that the BOLTS are tight and the STABILIZER
BAR is flush against the frame. Remove the
shipping carton.
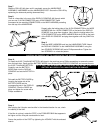
Step 4
Unfold the CONSOLE WIRE HARNESS from
the POST extending from the FRAME.
NOTE: THE COLLAR (#4) SHOULD ALREADY BE IN PLACE INSTALLED ON THE
HANDLEBAR ASSEMBLY (#5). IF NOT, INSTALL BEFORE PROCEEDING.
Step 5
Place the HANDLEBAR ASSEMBLY on the floor in front of the
FRAME with the two CONNECTORS next to each other. Align
the two CONNECTORS and push them together until they firmly
snap into place.
Step 6
Position the HANDLEBAR ASSEMBLY, with the COLLAR (#4)
in place, so that the HANDLEBAR is facing away from the user.
Slide the HANDLEBAR ASSEMBLY into the HANDLEBAR
POST. Be careful not to pinch
the wires.
Align the three holes in the
HANDLEBAR ASSEMBLY,
with those in the HANDLEBAR
POST and install the three
HANDLEBAR BOLTS (#1).
NOTE: BE CAREFUL NOT TO DAMAGE THE WIRES WHEN PASSING THE BOLTS THROUGH THE HOLES.
TIGHTEN THE BOLTS SECURELY.