


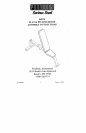

965101
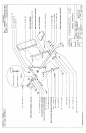
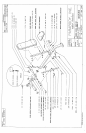
FLAT & INCLINE BENCH ASSEMBLY INSTRUCTIONS
1.
o
o
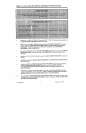
Slide one (1) 7/16 ID X 4 IN VINYL CAP onto the 6-1/8 X 3-7/8 IN U-PIN and proceed to assemble it to"
the BENCH FRAME WELDMENT as shown on drawing.
Insert two (2) 3 X 2 INSEP~T GUIDES into each end of the ADJ SLEEVE WELDMENT as shown
drawing. (NOTE: MAKE SURE THE INSERT GUIDES SNAP INTO THE HOLES OF THE
WELDMENT). SECURELY assemble the SPRING PIN ASSEMBLY to the ADJ SLEEVE
WELDMENT as shown in (DETAIL A).
Pull back the SPRING PIN on the ADJ SLEEVE WELDMENT and slide it over the end of the BENCH
FRAME WELDMENT ~ shown on drawing. Slide WELDMENT up to the flu-st adjustment hole
underneath.
Insert three (3) 3 X 2 IN END CAPS into the ends of the REAR UPRIGHT WELDMENT as shown
drawing.
SECURELY assemble ~e REAR UPRIGHT WELDMENT to the BENCH FRAME WELDMENT as
shown on drawing.
Assemble the LEFT and .RIGHT BACK PAD ANGLE WELDMENTS, along with two (2) H1NGE
TABS to the BENCH FtL~ME WELDMENT as shown on drawing. (NOTE: TIGHTEN
CONNECTION ENOUGH TO REMOVE THE PLAY YET ALLOWING THE PARTS TO
ROTATE FREELY).
Assemble two (2) 1/2 X 2 X 15-1/2 IN PLATES to the inside of the LEFT and RIGHT BACK PAD
ANGLE WELDMENTS as shown on drawing. (NOTE: TI(;HTEN CONNECTION ENOUGH
REMOVE THE PLAY ~’ET ALLOWING THE PARTS TC, ROTATE FREELY).
Rotate the LEFT and RIGHT BACK PAD ANGLE WELDMENTS up and assemble the 1/2 X 2 X 15-
1/2 IN PLATES to the ADJ SLEEVE WELDMENT as shown on drawing. (NOTE: DO NOT OVER
TIGHTEN THIS CONNECTION).
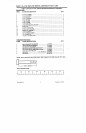
Part # 6653501
Revision: 1 ]/26/96