


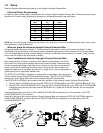


Check for Battery Power
The Inclusive Upright Lifecycle Exercise Bike console is powered by a rechargeable 6-volt battery. Check the battery by
pressing and holding the power on/off key. The console should beep and light up. The Message Center on the
console will display a prompt to set up a workout. If a prompt doesn’t appear or initializing doesn’t begin, mount the
Inclusive Upright Lifecycle Bike and begin pedaling. The console should light up and programming a workout should be
possible. Pedal for 20 minutes at 40 RPM or faster during a workout to charge the battery. The pedal action during workouts
keeps the battery charged. If the Inclusive Lifecycle Exercise Bike is powered by the external 36V DC power supply, battery
maintenance is automatic and pedaling is not required.
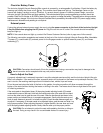
External power
If using the optional external power supply, be sure to plug the power connector to the front of the Inclusive Upright
Lifecycle Bike before plugging the AC power in. Plug the cord into an AC outlet. The console should immediately
beep and light up.
NOTE: If the console does not light up, contact Life Fitness Customer Service (refer to page one of this manual).
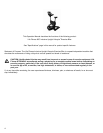
The following connection receptacles are located at the front of the Inclusive Upright Lifecycle Exercise Bike: Attachable
TV power (C), coaxial cable (D), external power for the Engage console or optional external power (E), and fitness
networking (F).
CAUTION: Connectors should easily fit into the receptacles. Forcing a connection may lead to damage to the
barrel connector and/or receptacle and may void product warranty.
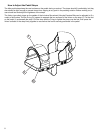
How to Adjust the Seat
A properly adjusted seat is extremely important in any bike-oriented exercise activity and the Inclusive Upright Lifecycle
Bike is no exception. If the seat is too close, excessive strain will be placed on the knees and quadriceps muscles; if the
seat is too far, the resulting reaching action will irritate the feet, ankles, hips and knees.
Sit on the seat and place the balls of the feet on the pedals. An optimum position will allow movement through the
bottom of the stroke without locking the knees or shifting in the seat. The knees should have a slight bend at the point
of fullest leg extension.
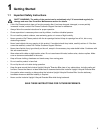
If the seat needs to be adjusted lower, lift the spring-loaded adjusting handle (G) located
underneath the nose of the seat. Hold both the handle and nose of the seat with one hand
and use the other hand to grab the rear of the seat. Slide the handle and seat down to the
proper position and release the pin to complete engagement. Gently slide the seat up and
down a small distance to ensure it is locked into place. Check the seat distance again and
re-adjust it if necessary. If the seat needs to be adjusted higher, grab the seat and slide it up
to the proper position. When adjusting the seat to a higher position, the user does not have
to lift the spring-loaded adjusting handle. Gently slide the seat up to the proper position.
CAUTION: Do not attempt to adjust the seat while pedaling the bike or sitting on
the seat. Doing so may result in an uncomfortable workout or cause injury.
7
G
D
F
C
E