


Page
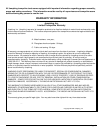
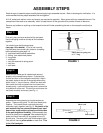
Step 6:
YellowYellow
12 o'clock
Bracket
FIGURE 7
RHS
LHS
MID
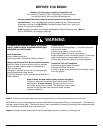
FIGURE 8
MID pole
FIGURE 6
Middle pole attaches here
Slide on to yellow marked pole
10
MID
3 o'clock
6 o'clock
Step 8:
Step 7:
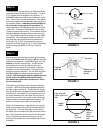
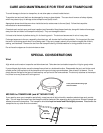
Find the two sliding pole attachment pieces. Put one on
each end of the 12 o'clock pole - it has yellow stickers on
the ends - and slide it up about 12 inches (see Fig. 7). This
pole (12 o'clock pole) will attach to the outside male pole
dowel (which is anodized yellow - gold) of the pole bracket.
The middle pole will ultimately be attached to the sliding
piece on the 12 o'clock pole.
Assembly of the 3 poles as attached to the bracket on the
frame is straight forward as long as you look at the drawings
and visualize the next few steps.
It may also help to place a drop of water on
each pole dowel to help the pole end slide over
the friction "o" ring that is on the pole dowel.
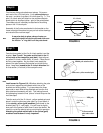
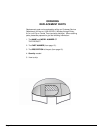
Face the three poles (at the 3 or 9 o'clock position) and the
bracket. Now "bunch" the poles and the tent to the 12
o'clock side of the trampoline mat (bed). Keep aligned
as yellow/12 o'clock, middle (MID), 6 o'clock. Poles should
be fairly close together. As you attach (next steps) the
poles to the pole dowels at the bracket and to the sliding
piece - keep them bowed to the 12 o'clock direction and
on that section (12 o'clock) of the trampoline mat.
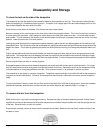
Look forward to Figures 8, 9, 10 before attaching the pole
ends to their respective pole dowels which are on the
brackets and sliding pieces. Try to see where the three
pole ends on each side will be attached and how the final
pole attachment assembly will look. This looking forward
and attempting to see the final "picture" should help over the
next few steps.
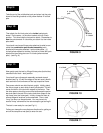
Take the ends of of the 12 o'clock - yellow marked pole and
place it under the other two poles (see Fig. 8) and attach it
to the outside, yellow (gold) anodized, pole dowel on the
bracket (see Fig. 9 - next page). You will have to slightly
bow each of the poles to make them fit onto the dowels. Be
careful to not let the pole(s) spring out during this operation.
Attaching the yellow marked pole to the yellow (gold)
anodized outside dowel is very important.
6 o'clock
pole
Yellow marked pole
Yellow marked
pole under other
two
HINT
HINT