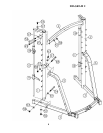
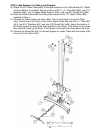
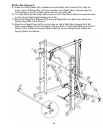
STEP 3 (See Diagram 3)
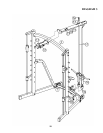
A.) Attach two Ø 2 3/8” x 2” Rubber Bumpers (#30) to the holes on the Cross Brace (#7). Insert
the two Rear Short Guide Rods (#17) through the two Rubber Bumpers into the holes on
Cross Brace.
B.) Secure each Guide Rod to the Cross Brace with one M10 x ¾” Allen Bolt (#56) and one Ø
¾” Washer (#57) from bottom.
C.) Slide the Sliding Weight Post (#16) onto the two Rear Short Guide Rods. Make sure the
Pulley bracket on the Weight Sliding Frame faces upward.
D.) Attach the Rear Upper Frame (#15) to the two Rear Short Guide Rods. Secure each Guide
Rod to the Rear Upper Frame with one M10 x ¾” Allen Bolt (#56) and one Ø ¾” Washer
(#57).
E.) Attach the front of Rear Upper Frame to the Top Beam (#4). Attach the Front Upper Frame
(#14) to the Top Beam from front. Align the holes. Secure them together with two M10 x 2
¾” Carriage Bolts (#47), two Ø ¾” Washers (#57), and two M10 Aircraft Nuts (#58).
F.) Securely tighten all Nuts and Bolts installed in Step-1, Step-2, and Step-3.
9


