


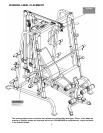
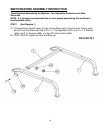
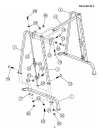
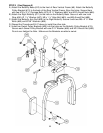
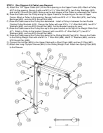
STEP 2 (See Diagram 2)
A.) Attach the right Front Vertical Frame (#3) to the right Base Frame (#1). Secure it with two
M10 x 3” Carriage Bolts (#76), one 5 1/8” x 2 ¾” Bracket (#34), two Ø ¾” Washers (#66),
and two M10 Aircraft Nuts (#86). Do not tighten the Nuts and Bolts yet.
B.) Align a Ø 2 ½” Rubber Bumper (#59) to the hole on the Base Frame. Insert a Guide Rod
(#25) through the Rubber Bumper and into the Base Frame. Secure it with one M10 x 1”
Allen Bolt (#68) and Ø ¾” Washer (#66).
C.) Slide a Lower Safety Stop Frame (#92) onto the Guide Rod (#25). Secure the Safety
Hook (#93) to the Safety Stop Frame (#92) with a M10 x 1” Allen Bolt (#68) and M10
Aircraft Nut (#86). Attach the Hook onto the back of the Front Vertical Beam (#3).
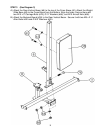
D.) Slide a Safety Stop Frame (#26) onto the Guide Rod (#25).
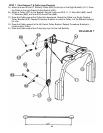
E.) Attach the hole on top of the Right Vertical Frame (#5) to the top of the Guide Rod (#25).
Attach the top of Right Vertical Frame (#5) to the top of Front Vertical Frame (#3). Attach
the bottom of Right Vertical Frame (#5) to the Base Frame (#1).
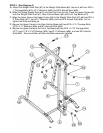
F.) Secure the Guide Rod (#25) to the Right Vertical Frame (#5) with one M10 x 1” Allen Bolt
(#68) and Ø ¾” Washer (#66).
G.) Secure the Right Vertical Frame (#5) to the Base Frame with two M10 x 3” Carriage Bolts
(#76), one 6 ¼” x 2” Bracket (#37), two Ø ¾” Washers (#66), and two M10 Aircraft Nuts
(#86). Do not tighten the Nuts and Bolts yet.
H.) Secure the Right Vertical Frame (#5) to the Front Vertical Beam (#3) with one Triangle
Bracket (#33), M10 x 3 1/8” Allen Bolt (#72), and ∅3/4” Washer (#66) to the top hole.
Secure the bottom two holes with two M10 x 3 3/8” Carriage Bolts (#78), ∅3/4” Washers
(#66) and M10 Aircraft Nuts (#86).
I.) Repeat the above Procedures A through H to install the other side.
J.) Attach the Front Top Beam (#15) to the Front Vertical Beams (#3) and the Triangle
Brackets (#33). Align the Holes. Secure each end with two M10 x 3 3/8” Carriage Bolts
(#78), Ø3/4” Washers (#66), and M10 Aircraft Nuts (#86).
K.) Securely tighten all Nuts and Bolts previously installed.
7