®
ENGLISH
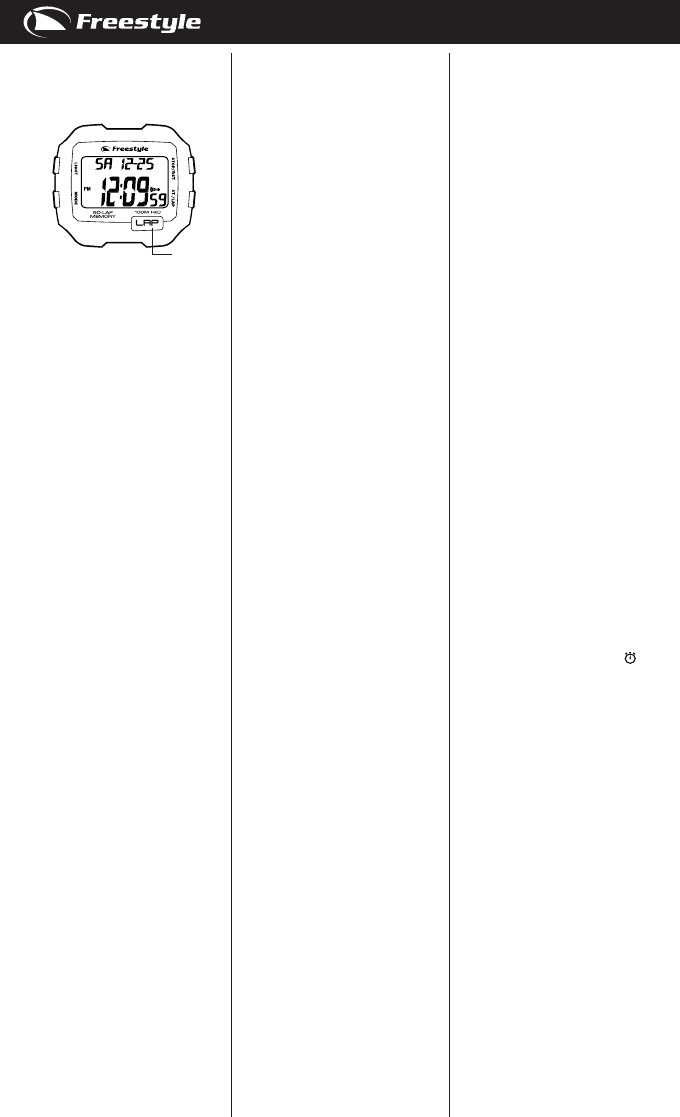
S1- Start/lap Button
S2- Stop/reset Button
S3- Mode/next Button
S4- Light Button
S5- Lap Button
SPECIAL FEATURE:
This Freestyle product features unique
Hydro Pushers®: these pushers can be
pressed under water to a dynamic water
pressure (not water depth) of 3 ATM.
DISPLAY MODES:
The watch has six display modes: NOR-
MAL TIME, CHRONOGRAPH, RECALL,
TIMER, HEAT TIMER and ALARM.
To change from one display mode to
another, press S3 button once.
TO SET THE TIME AND CALENDAR:
1. Press S3 button to select NORMAL
TIME mode.
2. Press and hold S1 button to toggle
between Time Zone 1 (T1) and Time
Zone 2 (T2)
3. Press and hold S2 button, the
message “HOLD TO SET” will be dis-
played for approximately 2 seconds
and the Time Zone setting will blink.
4. Press S1 button to select Time Zone
1 (TIME 1) or Time Zone 2 (TIME 2) to
set.
5. Press S3 button, the hour digits will
blink.
6. Press S1 button to increase the hour
digits by one unit. Holding down the
button will speed up the process.
7. Press S3 button, the minute digits
will blink.
8. Press S1 button to set the minute
digits.
9. Press S3 button, the second digits
will blink.
10. Press S1 button to reset the second
digits to zero.
11. Press S3 button, the month digits
will blink.
12. Press S1 button to set the month
digits.
13. Press S3 button, the date digits will
blink.
14. Press S1 button to set the date
digits.
15. Press S3 button, the year digits will
blink.
16. Press S1 button to set the year
digits.
17. Press S3 button, the time format
setting will blink.
18. Press S1 button to toggle between
12-hour (12HR) format and 24-hour
(24HR) format.
19. Press S3 button, the date setting
format will blink.
20. Press S1 button to toggle between
month-date (MM-DD) format and
date-month (DD-MM) format.
21. Press S3 button, the hourly chime
(CHIME) setting will blink.
22. Press S1 button to toggle between
ON and OFF of the hourly chime
setting.
23. Press S3 button once, the button
beep (BEEP) setting will blink.
24. Press S1 button to toggle between
ON and OFF of the button beep set-
ting.
25. When nished making all the set-
tings, press S2 button to conrm.
NOTE: In 12-hour format, the hour
digits are identied by “PM” for 12:00
P.M.-11:59 P.M.
NOTE: The day (of the week) is automati-
cally calculated.
NOTE: The year digits range from 2008
to 2099.
TO USE THE CHRONOGRAPH:
1. Press S3 button to select CHRONO-
GRAPH mode.
2. The maximum number of laps that
can be stored in a new workout will
be displayed. If the lap memory is full,
the message “FULL” will be displayed
and a tune will be emitted.
3. The chronograph will then be dis-
played in its current state- stopped,
running, or reset.
4. To resume a stopped counting, press
S1 button to resume from where it
left off.
5. To start a new counting, reset the
chronograph to zero rst. Press and
hold S2 button, the message “HOLD
TO CLR” will be displayed for approxi-
mately 2 seconds and the counter will
be reset to zero.
For changing the chronograph display
format:
In CHRONOGRAPH mode,
1. Make sure the chronograph is in the
reset state and there is no previous
lap record.
2. Press S4 button to toggle between
LAP format or SPL format.
3. If LAP format is selected, the lap time
(individual lap time) will be displayed.
If SPL format is selected, the split
time (cumulative lap time) will be
displayed.
For the measurement of elapsed time:
In CHRONOGRAPH mode,
1. Press S1 button to start counting.
2. To stop counting, press S2 button.
Press S1 button to resume from
where it left off.
3. To reset to zero, press S2 button to
stop counting, then press and hold S2
button, the message “HOLD TO CLR”
will be displayed for approximately 2
seconds and the counter will be reset
to zero.
For the measurement of split time:
In CHRONOGRAPH mode,
1. Press S1 button to start counting.
2. While the chronograph is running,
press S1/S5 button to register a lap.
3. Depends on the chronograph display
format chosen, the individual lap time
of the previous lap (if LAP format is
chosen) or the cumulative lap time
(if SPL format is chosen) will be
displayed. The lap number of the
previous lap will be blinking at the top
line of the display.
After 10 seconds, the current elapsed
time and the current lap number will
be displayed.
4. Repeat the last step until all the laps
have been registered.
5. To stop counting, press S2 button.
The total accumulated lap time will
be displayed.
6. To reset to zero, press and hold S2
button, the message “HOLD TO CLR”
will be displayed for approximately 2
seconds and the counter will be reset
to zero.
For using the 5-second countdown start:
In CHRONOGRAPH mode,
1. Make sure the chronograph is in the
reset state and there is no previous
lap record.
2. Press and hold S2 button, the number
“5” will ash for approximately 2
seconds, and then the 5-second
countdown start will be activated.
3. Press S1 button to initiate the 5-sec-
ond count down.
4. After 5 seconds (count down to zero),
a long beep will be emitted and the
chronograph will be initiated.
NOTE: The chronograph can count
up to a maximum time of 99:59:59:99
(99hours, 59 minutes, 59:99 seconds).
If the chronograph has reached the
maximum time as specied, press and
hold S2 button to reset the chronograph
to zero.
NOTE: You can leave the chronograph
running while switching over to other
operating modes. In NORMAL TIME
mode, the chronograph indicator
will
appear as a reminder.
For saving the lap record:
In CHRONOGRAPH mode,
1. Upon nishing a counting, press and
hold S4 button, the message “HOLD
TO SAVE” will be displayed for ap-
proximately 2 seconds.
2. If there is sufcient memory, the
lap record will be stored and the
remaining available lap memory will
be displayed.
If there is insufcient memory, the
lap record will be stored along with as
many of the oldest splits as possible
and the message “FULL” will be
displayed.
TO USE THE RECALL MODE:
1. Press S3 button to select RECALL
mode.
2. If there is lap record stored, the data
stamp (showing the day of the week,
date and month) of a stored data will
blink at the upper line of the display.
If there is no lap record stored, the
message “no DATA” will be displayed.
3. Press S1 button to cycle the date
stamp(s) of the corresponding lap
record(s). This has no effect if there is
no lap record stored.
4. When the desired lap record is dis-
played, press S2 button to select.
5. Press S1 button to cycle the details of
the selected lap record in the order of:
STRIDE
S1
S2
S3
S4
S5


