


15
released position,
the brakes are in op er a tive
. Ask your dealer
whether you have a quick release on your brakes; and if you
do, make sure that you understand the way the brake quick
release works, and check
each time
to make sure both brakes
work correctly before you get on the bike.
!
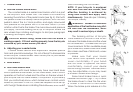
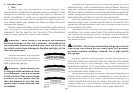
WARNING: Some bicycle brakes, such as linear-pull ( g. 7)
and disc ( g. 6) brakes, are ex treme ly powerful. You should take
extra care in be com ing familiar with
these brakes and exercise particular
care when using them. Applying these
brakes too hard or too sud den ly can
lock up a wheel, which could cause
you to lose control and fall.
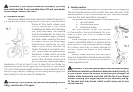
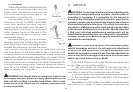
b. Adjusting your hand brakes
If
either brake lever on your bike
fails the Mechanical Safety Check
(Section 1.C.) you may be able to
restore brake lever travel by turning
the brake cable ad just ing barrel ( g.
11)
counterclockwise
; then lock the
ad just ment in by turning the bar rel’s
lock nut
clock wise
as far as it will go.
If the lever still fails the Me chan i cal
Safety Check, have your dealer check
the brakes.
!
CAUTION:
Some bi cy cles are
equipped with a device called
a Brake Rotor, which allows the
steering mech a nism to turn a full 360
degrees. Adjusting brakes equipped
with a Brake Rotor requires special
knowl edge and skill. Do not attempt
to adjust the front brake of a bicycle
equipped with a Brake Rotor. Take the
bicycle to a dealer for service and ad just ment of the brakes.
A rotor may also decrease the clear ance be tween the front
wheel and the pedals when the wheel is turned back wards.
3. Braking technique
Brakes are designed to
control your speed
, not just to
stop the bike.
Maximum
braking force for a wheel occurs at
the point
just before
the wheel “locks up” (stops ro tat ing) and
starts to skid. Once the tire skids, you actually
lose most of your
stopping force and all directional con trol
. You need to prac tice
slowing and stopping smoothly without locking up a wheel.
The technique is called
pro gres sive brake mod u la tion
. Instead
of slam ming on the coaster brake or jerking the brake lever
to the po si tion where you think you’ll generate ap pro pri ate
braking force, apply
progressive
force on the pedal or
squeeze
the lever, progressively increasing the braking force. If you
feel the wheel begin to lock up,
release
pressure just a little
to keep the wheel rotating just short of lockup. It’s important
to develop a feel for the amount of brake pressure required
for a wheel at different speeds and on different surfaces. To
better un der stand this, ex per i ment a little by riding your bike
slowly in an un re strict ed area and applying dif fer ent amounts
of pressure to the brake, until the wheel locks.