


11
!
WARNING: If your bicycle does not t properly, you may
lose control and fall. If your new bike doesn’t t, ask your dealer
to ex change it before you ride it.
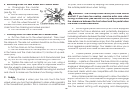
A. Standover height
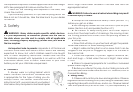
Standover height is the basic el e ment of bike t (see g. 2).
It is the dis tance from the ground to the top of the bi cy cle’s
frame at that point where your
crotch would be if you were
strad dling the bike and standing
half way between the saddle
and the han dle bars. To check for
correct standover height, straddle
the bike while wearing the kind
of shoes in which you’ll be riding,
and bounce vigorously on your
heels. If your crotch touches the
frame, the bike is too big for you.
Don’t even ride the bike around
the block. A bike which you ride
only on paved surfaces and
never take off-road should give
you a min i mum standover height
clearance of two inches (5 cm). A bike that you’ll ride on
unpaved sur fac es should give you a minimum of four inches
(7.5 cm) of standover height clear ance. And a bike that you’ll
use for rough ter rain, jumping or stunt riding should give you
four inches (10 cm) or more of clear ance.
!
WARNING: If you plan to use your bike for jumping or stunt
riding, read Section 2.G again.
B. Saddle position
Correct saddle ad just ment is an important factor in getting
the most performance and comfort from your bicycle. If the
saddle position is not comfortable for you, see your dealer,
who has the tools and skill to change it.
The saddle can be adjusted in three di rec tions:
1.
Up and down
2.
Forward and back
3.
Horizontal angle
Ask your dealer to set the saddle
in the position he rec om mends for you,
and to show you how to make further
ad just ments.
Small changes in saddle position can
have a sub stan tial effect on performance
and comfort. Only one di rec tion al change
at a time, and only a small change at
a time, should be made to your saddle
position.
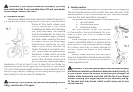
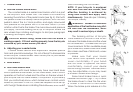
Always make sure that your seat post
does not extend from the frame beyond the
Minimum Insertion or Max i mum Extension
mark engraved on it.
!
WARNING: If your seat post projects from the frame beyond
the Minimum Insertion or Max i mum Ex ten sion mark (see g. 3)
or you cannot touch the bottom of the seat post through the
bottom of the interrupted seat tube with the tip of your nger
without in sert ing your nger beyond its rst knuckle (see g.
4), the seat post may break, which could cause you to lose
control and fall.