


8
Settings Menu
SkyScout allows you to view and manually enter both the date and time settings as well as the longitude
and latitude for your location. If the GPS is linked, it is not necessary to enter this information manually.
• Should you be in a location where it is difficult to establish a link with any GPS satellites, the GPS
acquisition process can be bypassed and the time/location information can be entered manually.
• SkyScout allows you to update the Universal Time Coordinate (UTC) to account for Daylight Savings
Time when setting the time zone for your location.
About menu
The About screen displays information about your SkyScout such
as the serial number and current software version. This may be
helpful when checking for updates online to make sure you have
the most current software version available.
Enter Time/Location Information Manually
If SkyScout is unable to acquire a GPS signal, the following screen will appear.
To bypass the GPS acquisition process and enter Time/Location information manually:
1. Use the navigation buttons to highlight “Enter Time/Location manually” and press Select.
2. Use the Up/Down arrow keys on the Menu Navigation Pad to select the correct input value.
3. Press the Select button to accept the value and move to the next field.
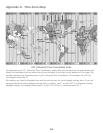
4. If you are entering local time, you must enter your time zone (UTC) offset. Refer to Appendix A to
locate the correct time zone (Universal Time Coordinate) for your location.
GPS Mode
Viewing GPS Information
Once linked with the necessary GPS satellites, the SkyScout can
display the information being received from the satellites.
From the GPS menu, select Position to view the SkyScout's GPS
data. SkyScout displays the following:
• Current longitude and latitude
• Current elevation above sea level
• Date and Universal Time
• Displays the last altitude and azimuth targeted by SkyScout
• Displays the last Right Ascension (RA) and Declination (DEC)
targeted by SkyScout
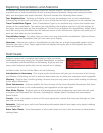
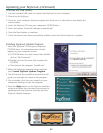
SkyScout can also show you the position and signal strength
of the available GPS satellites in the sky.
From the GPS menu, select GPS Satellites to view satellite position and signal strength.
The circular graph to the right of the display shows the position of each satellite available from your
location. Each satellite is identified by a number (from 1-32). The identification number of the available
satellites will appear on the graph to show its position in the sky.
Next to the graphic is a series of bars which represent the strength of each satellite signal being
received. The number below each bar identifies the satellite sending the signal. A gray bar indicates the
GPS receiver is gathering information from that satellite. A black bar indicates that the GPS receiver has
enough information from the satellite to use it for navigation.