


Operation Guide 3134 3205
10
To set an alarm time
1. In the Alarm Mode, use A and C to scroll
through the alarm screens until the one whose
time you want to set is displayed.
2. Hold down E until the hour setting of the alarm time start to flash, which
indicates the setting screen.
• This automatically turns on the alarm.
3. Press D to move the flashing between the hour and minute settings.
4. While a setting is flashing, use A (+) and C (–) to change it.
• When setting the alarm time using the 12-hour format, take care to set
the time correctly as a.m. (no indicator) or p.m. (P indicator).
5. Press E to exit the setting screen.
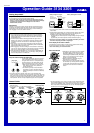
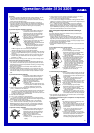
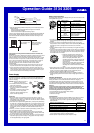
AL1 AL2 AL3
SIG AL5 AL4
A
C
Alarm on
indicator
On/Off status
Alarm Operation
The alarm sounds in all modes at the preset time for about 10 seconds, or
until you stop it by pressing any button.
To test the alarm
In the Alarm Mode, hold down A to sound the alarm.
To turn an alarm and the Hourly Time Signal on and off
1. In the Alarm Mode, use A and C to select an alarm or the Hourly Time
Signal.
2. When the alarm or the Hourly Time Signal you want is selected, press B
to turn it on (
ON) and off (OF).
Indicates alarm is ON.
Indicates Hourly Time Signal is ON.
• The alarm on indicator (
) and the Hourly Time Signal on indicator ( )
are shown on the display in all modes while these functions are turned on.
• If any alarm is on, the alarm on indicator is shown on the display in all
modes.
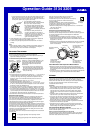
Illumination
The display of the watch is illuminated using an
EL (electro-luminescent) panel for easy reading
in the dark. The watch’s auto light switch turns on
illumination automatically when you angle the
watch towards your face.
• The auto light switch must be turned on
(indicated by the auto light switch on indicator)
for it to operate.
• See “Illumination Precautions” for other
important information about using illumination.
To turn on illumination manually
Press L in any mode to illuminate the display for about one second.
• The above operation turns on illumination regardless of the current auto
light switch setting.
• Illumination is disabled during time calibration signal reception, while
configuring sensor measurement mode settings, and during bearing sensor
calibration.
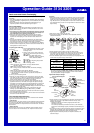
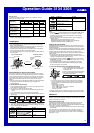
Auto light switch
on indicator
About the Auto Light Switch
Turning on the auto light switch causes illumination to turn on, whenever you
position your wrist as described below in any mode.
Note that this watch features a “Full Auto EL Light”, so the auto light switch
operates only when available light is below a certain level. It does not
illuminate the display under bright light.
Moving the watch to a position that is parallel to the ground and then tilting
it towards you more than 40 degrees causes illumination to turn on.
• Wear the watch on the outside of your wrist.
Warning!
• Always make sure you are in a safe place whenever you are reading
the display of the watch using the auto light switch. Be especially
careful when running or engaged in any other activity that can result
in accident or injury. Also take care that sudden illumination by the
auto light switch does not startle or distract others around you.
l
l
l
l
l
l
l
l
l
l
l
Parallel to
ground
More than
40°
• When you are wearing the watch, make sure that its auto light switch
is turned off before riding on a bicycle or operating a motorcycle or
any other motor vehicle. Sudden and unintended operation of the auto
light switch can create a distraction, which can result in a traffic
accident and serious personal injury.
To turn the auto light switch on and off
In the Timekeeping Mode, hold down L for about three seconds to toggle the
auto light switch on (A.EL displayed) and off (A.EL not displayed).
• The auto light switch on indicator (A.EL) is on the display in all modes while
the auto light switch is turned on.
• The auto light switch turns off automatically whenever battery power drops
to Level 4.
•
Illumination may not turn on right away if you raise the watch to your face
while a barometric pressure or altitude measurement operation is in progress.
Questions & Answers
Question: What causes incorrect direction readings?
Answer:
• Incorrect bidirectional calibration. Perform bidirectional calibration.
• Nearby source of strong magnetism, such as a household appliance, a
large steel bridge, a steel beam, overhead wires, etc., or an attempt to
perform direction measurement on a train, boat, etc. Move away from large
metal objects and try again. Note that digital compass operation cannot be
performed inside a train, boat, etc.
Question: What causes different direction readings to produce different
results at the same location ?
Answer: Magnetism generated by nearby high-tension wires is interfering with
detection of terrestrial magnetism. Move away from the high-tension
wires and try again.
Question: Why am I having problems taking direction readings indoors ?
Answer: A TV, personal computer, speakers, or some other object is
interfering with terrestrial magnetism readings. Move away from the
object causing the interference or take the direction reading
outdoors. Indoor direction readings are particularly difficult inside
ferro-concrete structures. Remember that you will not be able to take
direction readings inside of trains, airplanes, etc.
Question: How can the barometer be used to predict weather?
Answer:
Barometric pressure indicates changes in the atmosphere, and by
monitoring these changes you can predict the weather with reasonable
accuracy. Rising atmospheric pressure indicates good weather, while
falling pressure indicates deteriorating weather conditions.
The barometric pressures that you see in the newspaper and on the
TV weather report are measurements corrected to values measured
at 0 m sea level.
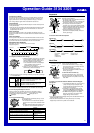
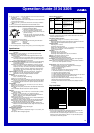
Question: How does the altimeter work?
Answer: Generally, air pressure and temperature decrease as altitude
increases. This watch bases its altitude measurements on
International Standard Atmosphere (ISA) values stipulated by the
International Civil Aviation Organization (ICAO). These values define
relationships between altitude, air pressure, and temperature.
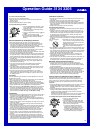
Alarms
You can set five independent daily alarms. When
an alarm is turned on, the alarm tone sounds
when the alarm time is reached.
You also can turn on an Hourly Time Signal,
which will cause the watch to beep twice every
hour on the hour.
• The alarm number (AL1 through AL5)
indicates an alarm screen. SIG is shown when
the Hourly Time Signal screen is on the display.
• When you enter the Alarm Mode, the data you
were viewing when you last exited the mode
appears first.
• All of the operations in this section are
performed in the Alarm Mode, which you enter
by pressing D.
Alarm time
(Hour : Minute)
Alarm number
Current time
• The auto light switch is always disabled, regardless of its on/off setting,
when any one of the following conditions exists.
While an alarm is sounding
During sensor measurement
While a bearing sensor calibration operation is being performed in the
Digital Compass Mode
While a receive operation is in progress in the Receive Mode
During tide data calculation
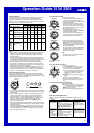
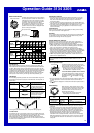
0 m
500 m
1000 m
1500 m
2000 m
2500 m
3000 m
3500 m
4000 m
899 hPa
795 hPa
701 hPa
616 hPa
8.5°C
2°C
–4.5°C
–11°C
15°C1013 hPa
About 6.5°C
per 1000 m
About 8 hPa per 100 m
About 9 hPa per 100 m
About 10 hPa per 100 m
About 11 hPa per 100 m
About 12 hPa per 100 m
Altitude Air Pressure Temperature