


E-16
Confi guring Current Time and Date Settings
You can use the procedure below to adjust the Timekeeping Mode time and date settings if they are off.
To change the current time and date settings
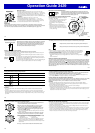
1. In the Timekeeping Mode, hold down
E
for at least two seconds.
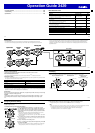
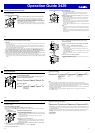
First,
SET Hold
will fl ash on the display, and
CITY
will be displayed in
the upper display. After that, the currently selected city code and city
name will scroll across the upper display. Keep
E
depressed until the
scrolling starts.
PM
indicator
City code
Hour :
Minutes
PM
indicator
City code
Hour :
Minutes
E-17
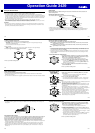
2. Press
D
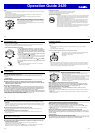
to move the fl ashing in the sequence shown below to select the other settings.
City Code DST
Thermometer/Barometer/
Altitude display unit
Illumination
Duration
Button Operation
Tone
Day Month
12/24-Hour
Format
Seconds Hour Minutes Year
• The following steps explain how to confi gure timekeeping settings only.
3. When the timekeeping setting you want to change is fl ashing, use
A
and/or
C
to change it as
described below.
Screen To do this: Do this:
Change the city code Use
A
(East) and
C
(West).
Toggle between Daylight Saving Time (
ON
) and
Standard Time (
OFF
).
Press
A
.
Toggle between 12-hour (
12H
) and 24-hour (
24H
)
timekeeping.
Press
A
.
Reset the seconds to
00
(If the current seconds count is between 30 and 59,
one is added to the minute count).
Press
A
.
Change the hour or minutes
Use
A
(+) and
C
(–).
Change the year, month, or day
4. After all of the settings are the way you want, press
E
twice to exit the setting screen.
E-18
Note
• For information about selecting a Home City and confi guring the DST setting, see “Confi guring
Home City Settings” (page E-14).
• While the 12-hour format is selected for timekeeping, a P (PM) indicator will appear for times from
noon to 11:59 p.m. No indicator appears for times from midnight to 11:59 a.m. With 24-hour format,
time is displayed from 0:00 to 23:59, without any P (PM) indicator.
• The watch’s built-in full automatic calendar makes allowances for different month lengths and leap
years. Once you set the date, there should be no reason to change it except after you have the
watch’s battery replaced.
• The day of the week changes automatically as the date and/or year changes. Make sure that your
date and year settings are correct.
• Refer to the pages shown below for more information on Timekeeping Mode settings.
- Button operation tone on/off: “To turn the button operation tone on and off” (page E-82)
- Illumination duration setting: “To change the illumination duration” (page E-78)
- Changing the temperature, barometric pressure, and altitude display units (for a city code other
than
TYO
): “To specify temperature, barometric pressure, and altitude display units” (page E-29)
E-19
Taking Direction Readings
You can use the Digital Compass Mode to determine the direction of north, and to check your bearing to a
destination.
• For information about what you can do to improve digital compass reading accuracy, see “Calibrating
the Bearing Sensor” (page E-22) and “Digital Compass Precautions” (page E-27).
To take a direction reading
1. Make sure the watch is in the Timekeeping Mode or any one of the sensor modes.
• The sensor modes are: Digital Compass Mode, Barometer/Thermometer Mode, and Altimeter
Mode.
2. Place the watch on a fl at surface. If you are wearing the watch, make sure that your wrist is horizontal
(in relation to the horizon).
3. Point the 12 o’clock position of the watch in the direction whose reading you want to take.
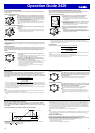
4. Press
C
to start.
• COMP will appear in the upper display to indicate that a digital compass operation is in progress.
• About one second after you press
C
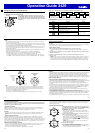
, pointers (three graphic segments for north, one graphic
segment each for south, east, and west) will appear on the display to indicate north, south, east,
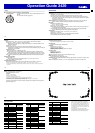
and west. Direction will also be indicated by literal direction indicators and by a direction angle.
E-20
315°
0°
Objective Bearing Indication
Meaning
N: North
E: East
W: West
S: South
Bearing to objective:
Northwest
Bearing angle
to objective
North
Note
• If the four pointers (north, south, east, west) and the direction indicating letters do not appear
on the display when you press
C
, it could mean that the watch is displaying bearing memory
information. If this happens, press
E
to delete the current bearing memory contents. For more
information, see “Using Bearing Memory” (page E-25).
• To return to the Timekeeping Mode, press
D
.
Pressing
D
will return to the Timekeeping Mode even is a reading operation is in progress.
E-21
Important!
• If the digital display contents start to fl ash after you perform a reading operation, it means that abnormal
magnetism has been detected. Move away from any potential source of strong magnetism and try
taking a reading again. If the problem occurs when you try again, continue to keep away from the
source of strong magnetism, perform bidirectional calibration, and then try taking a reading again. For
more information, refer to “To perform bidirectional calibration” (page E-23) and “Location” (page E-27).
Digital Compass Readings
• When you press
C
to start digital compass reading operation,
COMP
will initially appear on the
display to indicate that a digital compass operation is in progress.
• After the fi rst reading is obtained, the watch will continue to take digital compass readings automatically
each second for up to 60 seconds. After that, the reading operation will stop automatically.
• The direction indicator and angle value will show
- - -
to indicate that digital compass readings are
complete.
• The auto light switch is disabled during the 60 seconds that digital compass readings are being taken.
• The margin of error for the angle value and the direction indicator is ±11 degrees while the watch is
horizontal (in relation to the horizon). If the indicated direction is northwest (
NW
) and 315 degrees, for
example, the actual direction can be anywhere from 304 to 326 degrees.
• Note that taking a direction reading while the watch is not horizontal (in relation to the horizon) can
result in large direction reading error.
•
You can calibrate the bearing sensor if you suspect the direction reading is incorrect.
• Any ongoing direction reading operation is paused temporarily while the watch is performing an alert
operation (daily alarm, Hourly Time Signal, countdown timer alarm) or while illumination is turned on (by
pressing
L
). The direction reading operation resumes for its remaining duration after the operation
that caused it to pause is fi nished.
• See “Digital Compass Precautions” (page E-27) for important information about taking direction readings.
E-22
Calibrating the Bearing Sensor
You should calibrate the bearing sensor whenever you feel that the direction readings being produced by
the watch are off. You can use any one of two different bearing sensor calibration methods: bidirectional
calibration or magnetic declination correction.
•
Bidirectional Calibration
Bidirectional calibration calibrates the bearing sensor in relation to magnetic north. Use bidirectional
calibration when you want to take readings within an area exposed to magnetic force. This type of
calibration should be used if the watch becomes magnetized for any reason.
Important!
• To ensure correct direction readings by this watch, be sure to perform bidirectional calibration before
using it. The watch may produce incorrect direction readings if you do not perform bidirectional
calibration.
•
Magnetic Declination Correction
With magnetic declination correction, you input a magnetic declination angle (difference between
magnetic north and true north), which allows the watch to indicate true north. You can perform this
procedure when the magnetic declination angle is indicated on the map you are using. Note that you can
input the declination angle in whole degree units only, so you may need to round off the value specifi ed
on the map. If your map indicates the declination angle as 7.4°, you should input 7°. In the case of 7.6°
input 8°, for 7.5° you can input 7° or 8°.
Precautions about bidirectional calibration
• You can use any two opposing directions for bidirectional calibration. You must, however, make sure
that they are 180 degrees opposite each other. Remember that if you perform the procedure
incorrectly, you will get wrong bearing sensor readings.
• Do not move the watch while calibration of either direction is in progress.
E-23
• You should perform bidirectional calibration in an environment that is the same as that where you plan
to be taking direction readings. If you plan to take direction readings in an open fi eld, for example,
calibrate in an open fi eld.
To perform bidirectional calibration
1. In the Digital Compass Mode, hold down
E
for at least two seconds.
First,
SET Hold
will fl ash on the display. After that,
CALIBRATION
will
scroll across the upper display. Keep
E
depressed until
CALIBRATION
starts scrolling.
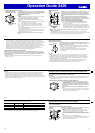
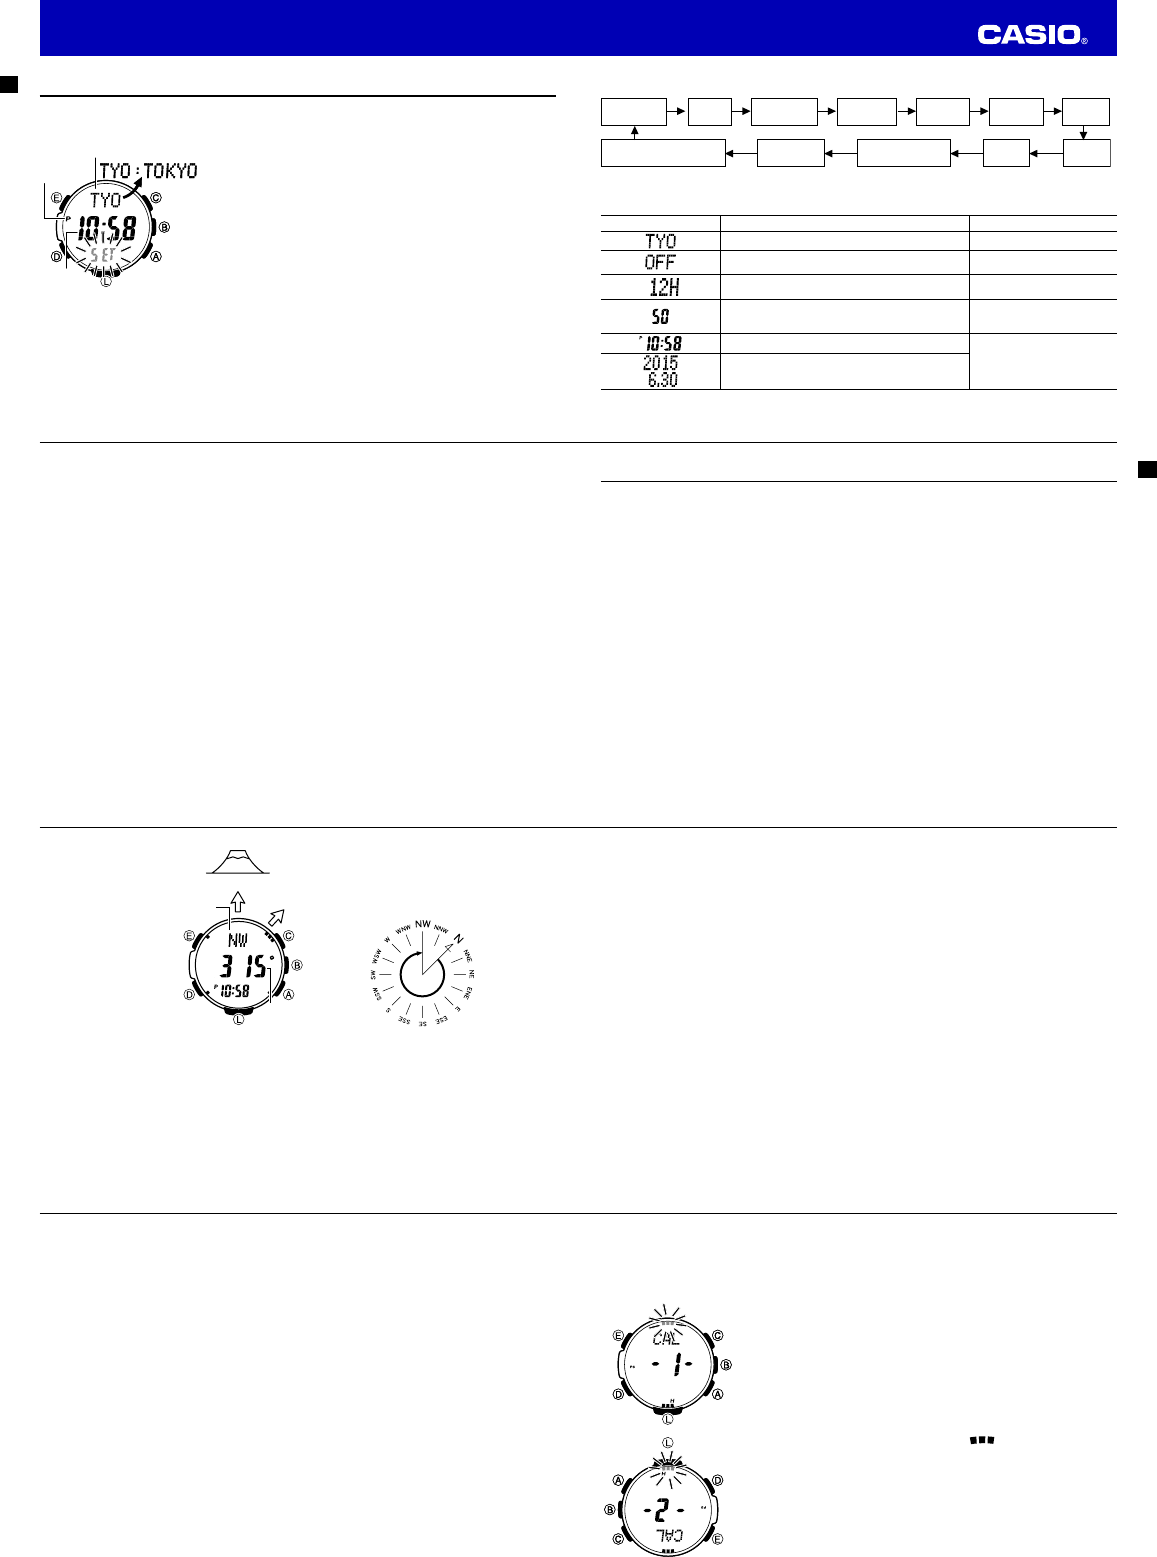
• At this time, the north pointer fl ashes at the 12 o’clock position
and the display will show -1- to indicate that the watch is ready to
calibrate the fi rst direction.
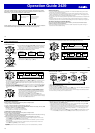
2. Place the watch on a level surface facing any direction you want, and
press
C
to calibrate the fi rst direction.
• - - - is shown on the display while calibration is being performed.
When calibration is successful, Turn 180° will appear on the
display and three graphic segments (
) will fl ash at 6 o’clock.
After about one second, CALIBRATION -2- will scroll across the
upper display.
• If ERR-1 appears on the display, press
C
again to restart the
direction reading operation.
3. Rotate the watch 180 degrees.
4. Press
C
again to calibrate the second direction.
• - - - is shown on the display while calibration is being performed.
When calibration is successful, the display will show OK and then
change to the Digital Compass Mode screen.
Operation Guide 3439