


USER’S GUIDE 2367/2739
2
• Auto Receive is turned on when the watch is shipped from the factory.
• See the information under “Time Calibration Signal Reception Precautions” if you
experience problems with time calibration signal reception.
Auto Summer Time (DST) Switching
The time calibration signal transmitted from Mainflingen, Germany includes both
standard time and summer time (Daylight Saving Time or DST) data. Because of this,
the watch automatically switches between standard time and summer time (DST)
automatically whenever BER, LON, PAR, CAI, or JRS is selected as the Home City
code.
• Daylight Saving Time (DST) advances the time setting by one hour from Standard
Time. Remember that not all countries or even local areas use Daylight Saving Time.
Auto Summer Time (DST) Default Settings
The following shows the default settings for each of the Home City codes that support
auto summer time (DST) switching.
The following flows show how to switch the auto summer time setting between AUTO,
ON, and OFF.
• The following are the meanings of the AUTO, ON, and OFF indicators.
AUTO - Watch will switch between standard time and summer time (DST)
automatically.
ON - Summer time (DST)
OFF - Standard time (summer time turned off)
• See “To set the current digital time and date manually” for information about
configuring summer time (DST) settings.
Home City Code
BER, LON, PAR
CAI, JRS
Auto Summer Time Default Setting
AUTO
OFF
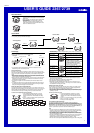
When BER is the Home City Code
When LON, PAR, CAI, or JRS is the Home City Code
AUTO (Default)
Press D.
After receipt of the time calibration
signal turns summer time off.
After receipt of the time calibration
signal turns summer time on.
AUTO (Default for
LON and PA R)
OFF (Default for
CAI and JRS)
ON
Press D.
Press B.
Press Bor D.
ON
OFF
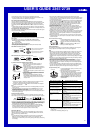
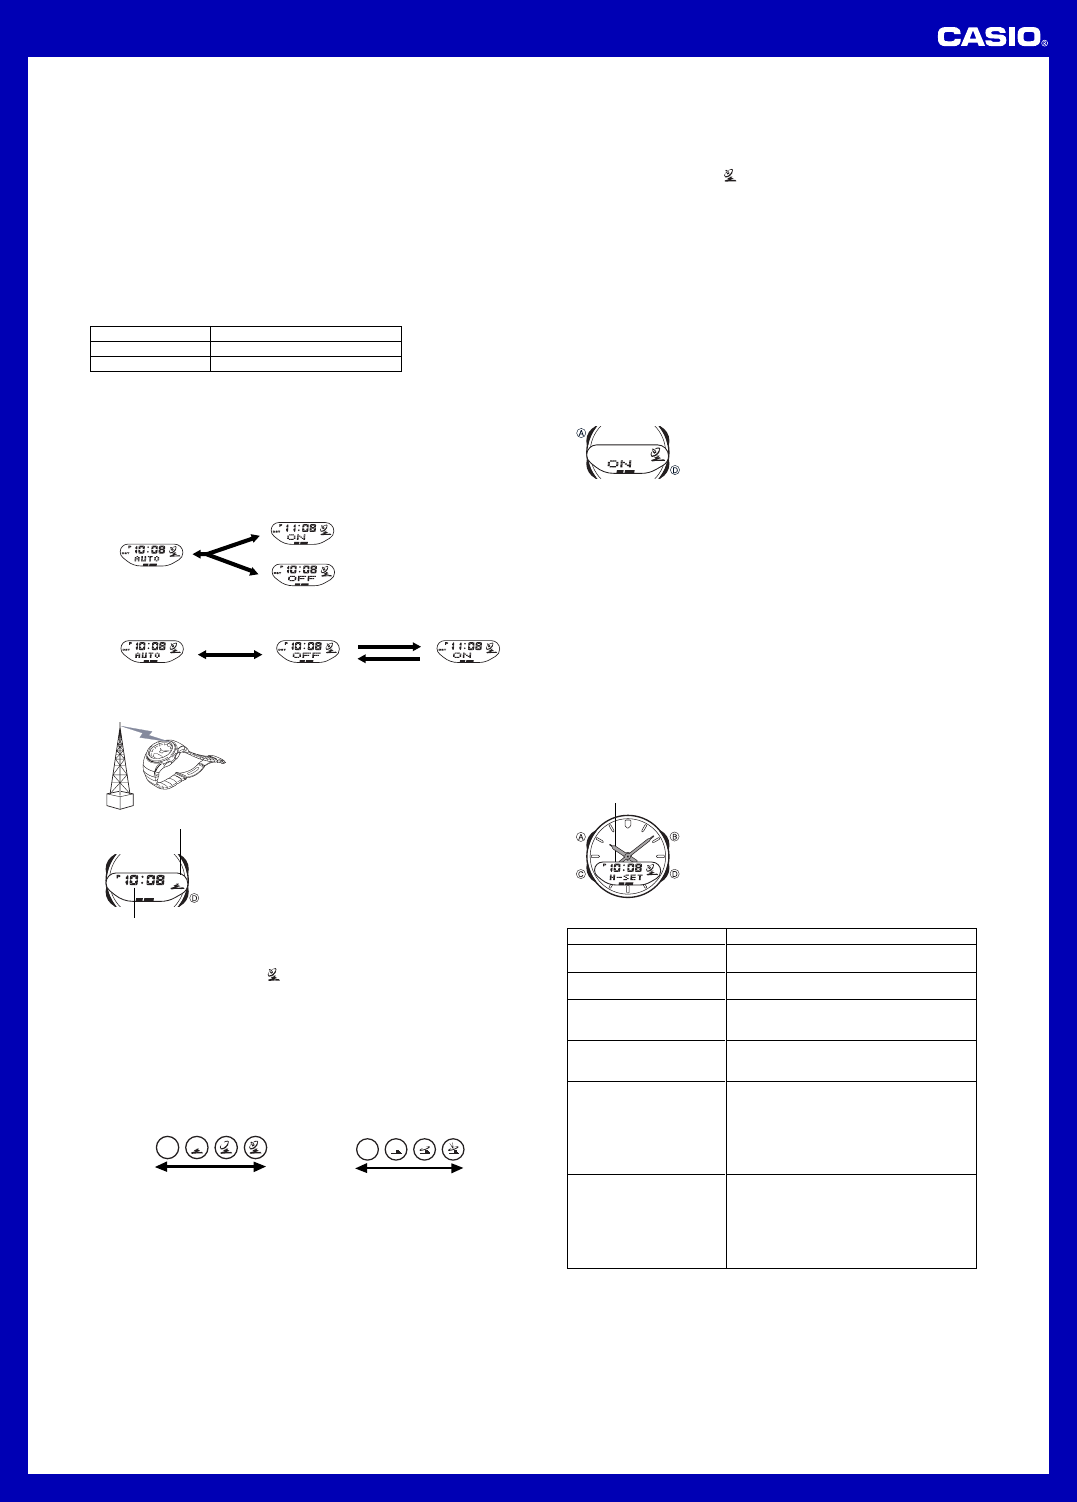
To perform manual time calibration signal reception
1.Place the watch on a stable surface to its top (12
o’clock side) is facing in the general direction of
Frankfurt, Germany.
• Position the watch so the case is pointing upwards as
shown in the nearby illustration. This puts the watch in
the optimum position for time calibration signal
reception.
• Note that signal reception is poor if the watch is on its
back or side.
2.In the Timekeeping Mode, hold down D for about two
seconds, until the watch beeps and the current time is
flashing on the display.
• This indicates that signal reception has started.
• Time calibration signal reception takes from four to 11
minutes. Take care that you do not move the watch
during this time.
l
l
l
l
l
l
l
l
l
l
l
l
l
l
l
l
l
l
l
l
l
l
l
l
l
l
l
l
l
l
l
l
l
l
Receiving indicator
Current time
• After signal reception is complete, the display of the watch changes to the Last
Signal screen, which shows the new signal receive date and time.
• The Level 4 receiving indicator (
) indicates that the calibration time reception
attempt was successful.
Note
• To interrupt a receive operation and return to the Timekeeping Mode (Date or Time
screen), press D.
• If the receive operation is unsuccessful, the message ERR appears on the Last
Signal screen for about one or two minutes. After that, the watch returns to the
Timekeeping Mode (Date or Time screen).
• You can also change from the Last Signal screen to the Timekeeping Mode (Date or
Time screen) by pressing D.
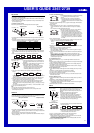
About the Receiving Indicator
The receiving indicator shows the strength of the calibration signal being received. For
best reception, be sure to keep the watch in a location where signal strength is strongest.
Weak
Strong
Module 2367
Weak
Strong
Module 2739
(Level 1) (Level 4) (Level 1) (Level 4)
• Even in an area where signal strength is strong, it takes about 10 seconds for signal
reception to stabilize enough for the receiving indicator to indicate signal strength.
• Use the receiving indicator as a guide for checking signal strength and for finding the
best location for the watch during signal receive operations.
• The receiving indicator (Level 4) remains on the display in all modes following
reception of the time calibration signal and calibration of the watch’s time setting.
The receiving indicator (Level 4) is not displayed if signal reception was
unsuccessful or after manual adjustment of the current time setting.
About Auto Receive
When auto receive is turned on, the watch automatically starts to receive the time
calibration signal when the digital time in the Timekeeping Mode reaches 2:00 AM,
and 4:00 AM each day (calibration times).
Note
• The Auto Receive operation is performed only if the watch is in the Timekeeping
Mode when one of the calibration times is reached. It is not performed if the
calibration time is reached while you are making settings (while settings are flashing
on the display).
• Auto receipt of the calibration signal is designed to be performed early in the
morning, while you sleep (provided that the digital time is set correctly). Before going
to bed for the night, remove the watch from your wrist, and put it in a location where
it can easily receive the signal.
• The Level 4 receiving indicator (
) indicates that one or both of the last calibration time
reception attempts were successful. If you do not see the Level 4 receiving indicator, it
means there was some problem with the last calibration reception operation. Either
perform reception manually, or make sure the watch is set up properly to receive the
time calibration signal for the next automatic reception time.
• Even if the calibration reception is successful, the Level 4 receiving indicator
disappears every day at 3am.
• When auto receive is turned on, the watch receives the calibration signal for four to
11 minutes each day when the digital time reaches 2:00 AM, and 4:00 AM. Do not
operate any of the watch’s buttons within 15 minutes prior to or following the
calibration times. Doing so can interfere with correct calibration.
• Remember that reception of the calibration signal depends on the time shown on the
digital display. The receive operation will be performed whenever the digital display
shows 2:00 AM, and 4:00 AM, regardless of whether or not the displayed time is
actually the correct time.
• When two receptions are successful, the watch uses the data of the last reception
for calibration. When only one reception is successful, the watch uses the data of the
successful reception.
To turn auto receive on and off
1.In the Timekeeping Mode, hold down A until the
current Auto Receive On/Off setting (the receiving
indicator) starts to flash, which indicates the setting
screen.
2.Press D to toggle Auto Receive on (ON) and off
(OFF).
3.Press A to exit the setting screen.
Analog Timekeeping
The analog time of this watch is synchronized with the digital time. The analog time
setting is adjusted automatically whenever you change the digital time.
l
l
l
l
l
l
l
l
l
Note
• Whenever you manually change the digital time setting or Home City code, or if the
time is adjusted by receipt of a time calibration signal, the hands of the analog
timepiece move clockwise or counter clockwise to adjust to the new setting. If the
analog time does not match the digital time for any reason, use the procedure
described under “To adjust the analog time” to match the analog setting to the digital
setting.
• Whenever you need to adjust both the digital and the analog time settings manually,
make sure you adjust the digital setting first.
• Depending on how much the hands have to move in order to adjust to the digital
time, it may take some time before the analog hands stop moving.
• The analog time does not change while a signal receipt operation is in progress.
After the receive operation is complete, the analog time is automatically adjusted to
match the digital time.
• If a signal receive operation is performed while the analog time and digital time do
not match, the digital time will be adjusted correctly but the analog time may not be
adjusted. If this happens, perform the steps below to adjust the analog time.
To adjust the analog time
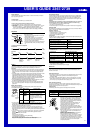
1.In the Timekeeping Mode, press C five times to enter
the Hand Setting Mode.
2.Hold down A until the current digital time starts to
flash, which indicates the setting screen.
• Note that you will not be able to change to the setting
screen if the analog hands are moving because the
watch is automatically adjusting the analog time to
match the digital time. If this happens, wait until the
hands stop moving.
3. Use D (+) and B (–) to adjust the analog setting as
described below.
Current time
l
l
l
l
l
l
l
l
l
l
l
l
l
l
l
l
l
l
When you want to do this:
Move the hand setting
forward 20 seconds
Move the hand setting back
20 seconds
Move the hand setting a short
way forward at high speed
Move the hand setting a
short way back at high speed
Move the hand setting a
long way forward at high
speed
Move the hand setting a long
way back at high speed
Perform this button operation:
• Press D.
• Press B.
• Hold down D.
• Release D when the hands reach the setting
you want.
• Hold down B.
• Release B when the hands reach the setting
you want.
• While holding down D to move the hands at
high-speed, press B to lock the high-speed
hand movement.
• Press any button when the hands are close to
the setting you want.
• Hand movement stops automatically if the hour
hand makes one full (12-hour) revolution.
• While holding down B to move the hands at
high-speed, press D to lock the high-speed
hand movement.
• Press any button when the hands are close to
the setting you want.
• Hand movement stops automatically if the hour
hand makes one full (12-hour) revolution.
4. Press A to exit the setting screen.
• The minute hand will be adjusted slightly to match the seconds when you exit the
setting screen.
• To return to the Timekeeping Mode, press C.