2345/2347-4
A
MEMORY
The watch is equipped with memory that you can use to store up to 10
barometric pressure and temperature readings. Note that the date and time of
the measurement is not included with the data. The number of available blank
records that can be used to store data is shown on the right side of the
Barometer and Thermometer Mode screens.
Storing a Measurement
While in the Barometer or Thermometer Mode, hold down D for about one
second until the watch beeps, indicating that the latest measurement is stored
in memory.
• The message “FULL” appears on the display for about one second when
you hold down D while memory is full. No more data can be stored while
memory is full.
• If you want to store more data after memory becomes full, use the
procedure under “Recall Mode” below to delete the current data to make
room for new data.
RECALL MODE
Recalling data
1. Use C to enter the Recall Mode.
2. Each press of D cycles through the barometric pressure and temperature
data in memory. Mode indicators appear to tell you what type of data is
currently displayed.
• Note that measurement units are not indicated on the Recall Mode screens.
• The display shows “- - - - – –” if there is no data.
Deleting Data
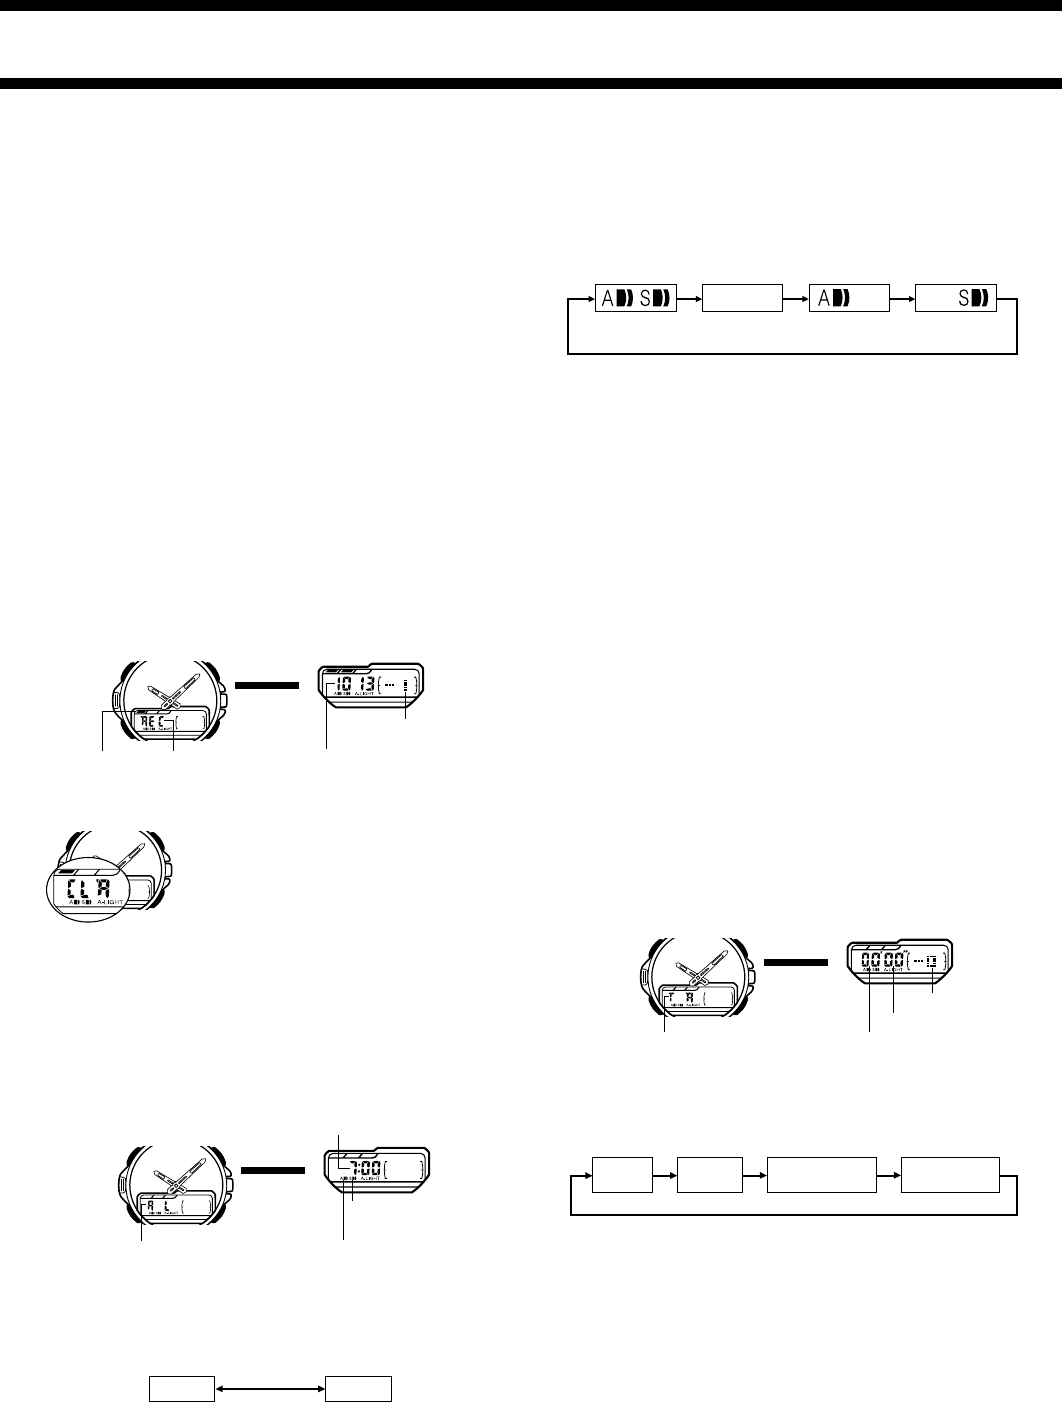
While in the Recall Mode, hold down A. The
watch beeps, and the message CLR flashes
on the display to indicate data is about to be
deleted. Keep A depressed for about two
seconds to delete all the measurement data
currently in memory.
• Note that this procedure deletes all
measurement data in memory. You cannot
delete individual records.
AB
CD
Memory number
1 second
later
▼
Barometric pressure
Recall Mode indicator
ALARM MODE
When the Daily Alarm is turned on, the alarm sounds for 20 seconds at the
preset time each day. Press any button to stop the alarm after it starts to
sound.
When the Hourly Time Signal is turned on, the watch beeps every hour on the
hour.
To set the alarm time
1. Hold down A until the hour digits start to flash on the display. The hour
digits flash because they are
selected
. At this time the alarm is
automatically turned on.
2. Press C to change the selection in the sequence shown below.
Minutes
Hour
3. Press D to increase the number or B to decrease it.
• Holding down either button changes the setting at high speed.
4. After you set the alarm time, press A to return to the Alarm Mode screen.
• The format (12-hour and 24-hour) of the alarm time matches the format you
select for normal timekeeping.
• When setting the alarm time using the 12-hour format, take care to set the
time correctly as morning or afternoon.
AB
CD
Hourly Time Signal on
indicator
1 second
later
▼
Daily Alarm on indicatorAlarm Mode indicator
Alarm time
Both ON
Both OFF
Hourly Time
Signal only
Daily Alarm only
To stop the alarm
• Press any button to stop the alarm after it starts to sound.
To turn the Daily Alarm and Hourly Time Signal on
and off
Press D while in the Alarm Mode to change the status of the Daily Alarm and
Hourly Time Signal in the sequence shown below.
• The Daily Alarm and Hourly Time Signal on indicator is displayed in all
modes.
To test the alarm
Hold down D while in the Alarm Mode to sound the alarm.
• Note that pressing D also changes the Daily Alarm and Hourly Time Signal
on and off settings.
COUNTDOWN ALARM MODE
The countdown alarm can be set within a range of 10 seconds to 60 minutes.
When the countdown reaches zero, an alarm sounds for 10 seconds or until
you press any button.
About Auto-repeat
• When the end of the countdown is reached while Auto-repeat is on, the
alarm sounds, but the countdown restarts from the beginning without
stopping.
• To stop the countdown, press D. You can then manually reset to the start
time by pressing B.
• If you set a starting time of 1 minute or less and have Auto-repeat turned
on, the countdown alarm tone (which normally sounds for 10 seconds)
sounds for only one second.
About the Progress Beeper
• When the Progress Beeper is turned on, the watch beeps as the countdown
time passes the 10, 5, 4, 3, 2, and 1-minute marks, and the 50, 40, 30, 20,
10, 5, 4, 3, 2, and 1-second marks.
• Even if the Progress Beeper is turned on, it does not operate if you set a
starting time of 1 minute or less and have Auto-repeat turned on.
To make countdown alarm settings
1. Hold down A while in the Countdown Alarm Mode. The minites setting
flashes on the display because they are
selected
.
2. Press C to change the selection in the following sequence.
Minutes
Seconds
Auto-repeat
AUTO ON/OFF
Progress beeper
BEEP ON/OFF
AB
CD
1/10 second
1 second
later
▼
Minutes
Countdown Alarm Mode indicator
Seconds
3. Press D to increase the selected number or B to decrease it. Holding
down either button changes the setting at high speed.
• The seconds can be set in units of 10 seconds.
• Set 0 minutes, 0 seconds to specify a start time of 60 minutes.
• While the Progress Beeper ON/OFF setting is selected (flashing), press D
or B to toggle the Progress Beeper on and off.
• While the Auto-repeat ON/OFF setting is selected (flashing), press D or B
to toggle Auto-repeat on and off.


