


2271-4
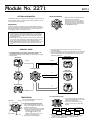
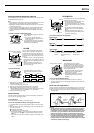
To set a reference altitude
1. In the Altimeter Mode, hold down A until
the display clears. After four or five
seconds, either
OFF or the current
reference altitude value (if set) will start to
flash, which indicates the setting screen.
• OFF indicates no reference altitude.
2. Press E to increase the current reference
altitude value by 5 meters (or 20 feet) or B
to decrease it.
• You can set the reference altitude within the range of –10,000 to 10,000
meters (–32,800 to 32,800 feet).
• Pressing E and B at the same returns to
OFF, so the watch
performs air pressure to altitude conversions based on preset data
only.
3. Press A to exit the setting screen.
About the Altitude Alarm
The altitude alarm sounds for about five seconds whenever the current
altitude matches a preset value. You can press any button to stop the alarm
after it starts to sound.
Example
If you set the altitude alarm at 130 meters, it sounds when you pass the 130-
meter mark on your way up and on your way back down.
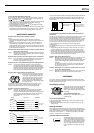
To set the altitude alarm
1. In the Altimeter Mode, hold down A until
the display clears. After four or five
seconds, either
OFF or the current
reference altitude value (if set) will start to
flash, which indicates the setting screen.
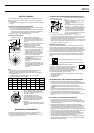
2. Press D once to move the flashing to the
altitude alarm setting.
• Press D to move the flashing in the
sequence shown below.
Reference
Altitude
Altitude
Alarm
Memory
Measurement
Altitude
Unit
3. While the altitude alarm setting is flashing, press E to increase the
current altitude alarm value by 5 meters (or 20 feet) or B to decrease it.
• You can set the altitude alarm value within the range of –10,000 to
10,000 meters (–32,800 to 32,800 feet).
• Pressing E and B at the same resets the altitude alarm value to
O.
4. Press A to exit the setting screen.
To turn the altitude alarm on and off
1. In the Altimeter Mode, hold down A until
the display clears. After four or five
seconds, either
OFF or the current
reference altitude value (if set) will start to
flash, which indicates the setting screen.
2. Press D once to move the flashing to the
altitude alarm setting.
3. Press C to switch the altitude alarm on
(
ON) and off (OFF).
4. Press A to exit the setting screen.
• If the altitude alarm is on, the altitude
alarm on indicator remains on the
display when you change to another
mode.
Memory Data Management
Each altitude record includes an altitude reading, plus the month, day, hour,
and minutes the measurement was taken. Records are displayed in the order
they were saved.
Memory can hold up 50 records. You can store 50 Auto measurement
records, 50 Manual measurement records, or any mixed combination of Auto
and Manual measurement records. In addition, there are two extra records
that show the highest (max) and lowest (min) altitude values, from among the
displayed data (Altimeter Mode measurements) and memory data (Memory
measurements).
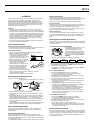
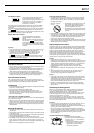
The following example illustrates how data would be arranged in memory after
you perform one Auto measurement (Auto 1), two Manual measurements
(Manual 1, Manual 2), and then one Auto measurement (Auto 2).
Auto 1 Auto 2
MAX MINManual 2
Manual 1
• Note that the highest (MAX) and lowest (MIN) records always are last.
Altitude alarm on indicator
Current On/Off status
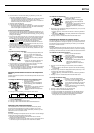
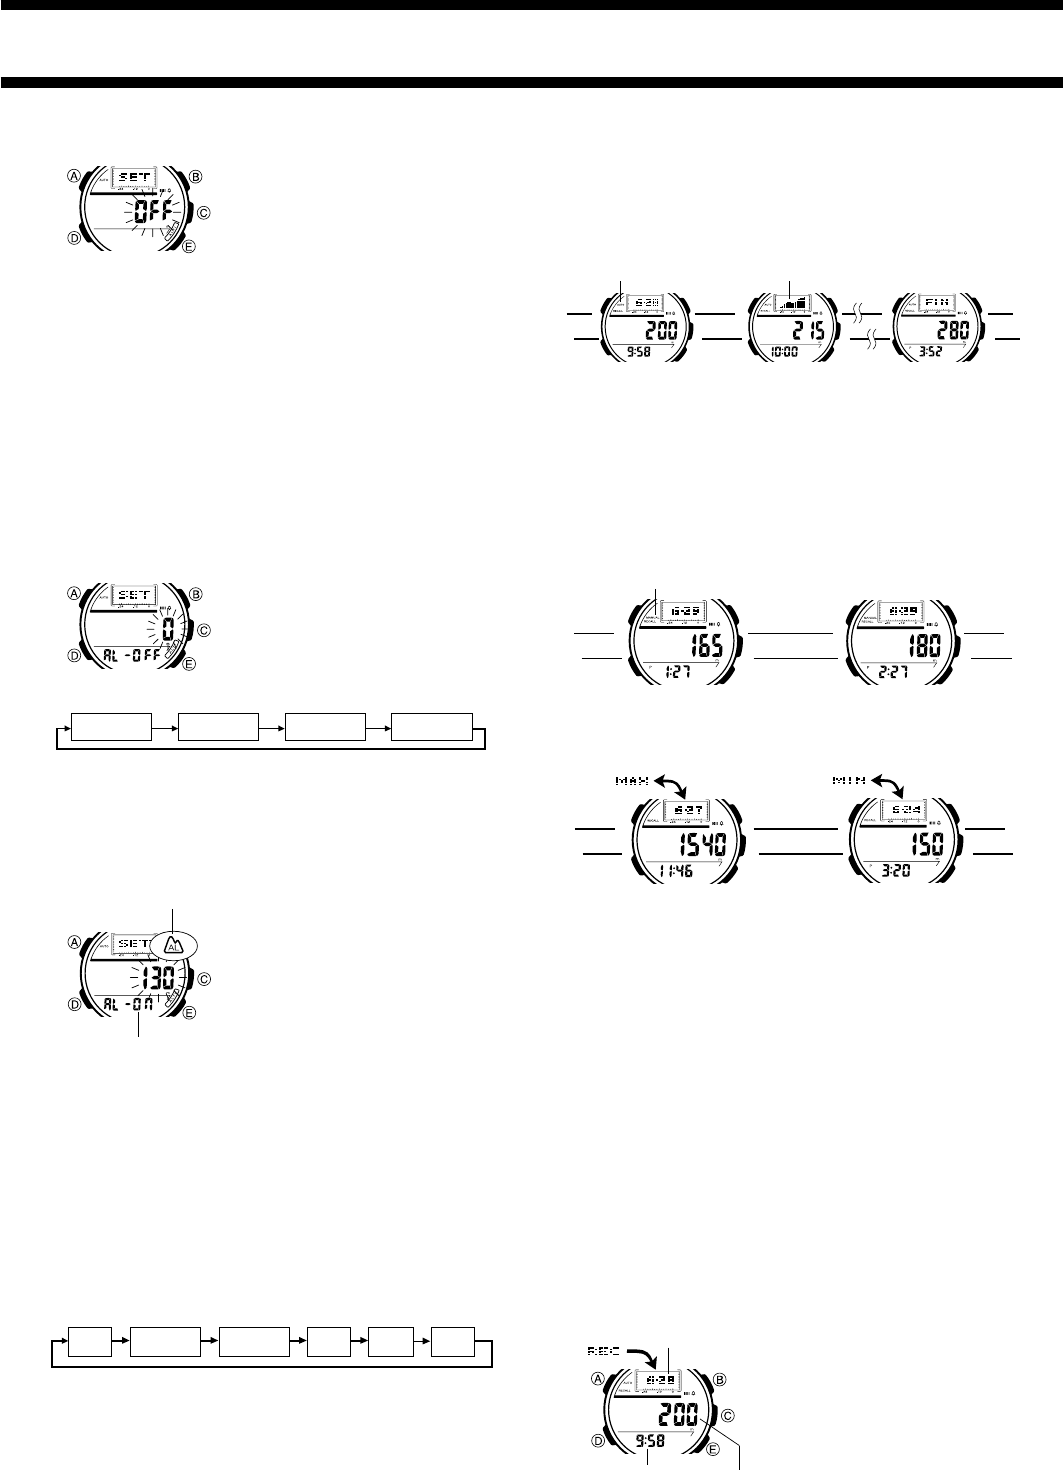
Auto Measurement Records
• Performing an Auto measurement produces a set of records of all the
measurements taken during the Auto measurement session. Since Auto
measurement produces four altitude readings per hour (at 00, 15, 30, and
45 minutes of each hour) leaving Auto measurement turned on for two
hours would result in a set of eight records.
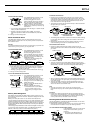
• The following shows how the records that make up an Auto measurement
set appear when you recall them.
• The altitude graph separates the maximum and minimum altitude readings
by nine display dots. Other readings are shown relative to the maximum
and minimum.
• Note that Auto measurement records are always treated as a set. This
means that deleting one record in a set deletes the entire set.
Manual Measurement Records
• Performing a Manual measurement produces a single record. The
illustration below shows how a Manual measurement record appears when
you recall it.
MIN and MAX Records
• The
MIN record shows the lowest altitude reading from among those
contained in memory (both Auto and Manual), and the reading displayed in
Altimeter Mode. The
MAX record shows the highest altitude reading.
• When you display the
MAX screen, the message MAX alternates every
second with the date in the upper display. The message
MIN alternates
on the
MIN screen.
• The
MIN and MAX records are changed automatically whenever a
measurement produces a reading that is greater than the current
MAX
value or less than the current MIN value.
Note
• 50 records are enough to store 12 hours and 15 minutes of Auto
measurement data (if you do not take any Manual readings during that
time).
Important!
• Further Auto or Manual measurements become impossible whenever
memory is full. The message
FULL on the display indicates that memory
is full. Always check the amount of memory remaining before starting
memory measurements, and delete records if necessary.
▲
▲
▲
▲
▲
▲
▲
▲
AUTO indicator Altitude graph
First record
of the set
All records between the initial
screen and final screen
Final record
of the set
MANUAL indicator
▲
▲
▲
▲
▲
▲
▲
▲
▲
▲
▲
▲
Highest Altitude Attained Lowest Altitude Attained
Recalling Altitude Measurement Records
Use the Recall Mode to recall altitude measurement records. You can enter
the Recall Mode by pressing the D button.
• Measurement records are stored in memory even if an error occurs during
the measurement. For details on errors, see “Warning Indicators”.
To recall altitude measurement records
In the Recall Mode, press E to scroll forward
through the stored records or B to scroll
backward.
• See “Memory Data Management” for
information about how data is stored.
Date
Time
Altitude