


2030-2
Setting the Longitude and Lunitidal Interval
• The lunitidal interval is the time elapsing between the Moon’s transit over
the meridian and the next high tide. See “Lunitidal Interval” for more
information.
• This watch displays lunitidal intervals in terms of hours and minutes.
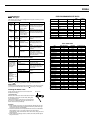
To set the longitude and lunitidal interval
1. In the Timekeeping Mode, hold down A
until the seconds digits start to flash, which
indicates the setting screen.
2. Press A twice to move the flashing to the
Longitude setting.
3. Press C to move the flashing in the
sequence shown below to select other
settings.
Longitude Hours Minutes
Lunitidal Interval
4. While the longitude, or lunitidal interval hours or minutes setting is
flashing, use D (+) and B (–) to change it.
• The “CITY DATA LIST” provides GMT differential information for a number
of time zones, cities and longitudes around the world.
• Longitude can be specified in the range of 179°W to 180°E, in 1-degree
steps.
5. Press A to exit the setting screen and return to the current time screen.
Lunitidal interval
Longitude
THERMO SCANNER MODE
The Thermo Scanner Mode uses a sensor built into the watch to measure the
surface temperature of an object with the touch of a button.
Warning!
• The Thermo Scanner of this watch is not a precision measurement.
Its readings should be regarded as reasonably accurate values only.
• Getting too close to a very hot object creates the risk of burn injury, even
if you do not actually touch the object. Make sure you do not get too close
to hot objects when performing Thermo Scanner measurements.
• Do not rely on Thermo Scanner readings to determine whether or not
a very hot or very cold object is safe to touch.
• Do not use the Thermo Scanner as a clinical thermometer.
• The temperature reading produced by the Thermo Scanner indicates
only the surface temperature, and not the actual temperature of an
object.
Using the Thermo Scanner
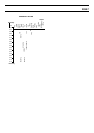
1. As shown in the illustration, point the
sensor of the watch at the object whose
surface temperature you want to measure.
2. Enter the Thermo Scanner Mode, and then
press D to start temperature measurement.
• Pressing D in the Timekeeping Mode
directly enters the Thermo Scanner Mode
and immediately starts temperature
measurement.
Note
• The area measured by the Thermo Scanner
is roughly equivalent to a circle whose
diameter can be approximated by the
formula: d (diameter) = D × 0.78.
The value of “D” is the distance in centimeters
between the object and the sensor.
• For the example shown in the illustration, the diameter of the area
measured is approximately 7.8cm (10 × 0.78).
• You can change the measured temperature value displayed by this watch
between Celsius (°C) and Fahrenheit (°F). See “To change the
temperature units”.
Object
10cm
7.8cm
Current time
Measured value
Sensor
How the Thermo Scanner Measures Temperature
The Thermo Scanner doesn’t actually measure temperature directly. Instead,
it calculates the temperature of an object after detecting how much infrared
radiation is being emitted by the object. All objects emit infrared radiation in
accordance with their temperature, their constituent material, and their
surface properties. The intensity of radiation that an object emits (due to the
material it is made out of and its surface properties) is called its
emissivity
.
The Thermo Scanner of this watch calculates temperatures based on the
amount of infrared radiation detected and preset emissivity values.
• Setting the correct emissivity value for the object whose temperature you
are measuring helps to ensure results that are more accurate.
• The initial factory default emissivity setting is 0.95, because this is the most
common emissivity for object we encounter in daily life.
• “Thermo Scanner Mode” provides important precautions and other
supplementary information about taking measurements with the Thermo
Scanner.
Checking the Current Emissivity Setting
In the Thermo Scanner Mode, hold down B to display the current emissivity
setting.
Changing the Emissivity Setting
1. In the Thermo Scanner Mode, hold down
A until the emissivity value starts to flash,
which indicates the setting screen.
2. Use D (+) and B (–) to change the
setting.
• You can set a value in the range of 0.10 to
1.20 in steps of 0.05.
• Pressing B and D at the same time resets
the emissivity value to its initial default
setting of 0.95.
3. Press A to exit the setting screen.
Emissivity indicator
SITE MODE
You can use the Site Mode to view the current
time, Moon phase, and tide graph for any one
of 10 different sites.
• The watch comes pre-programmed with site
data (site name, GMT differential, longitude,
and lunitidal interval) for famous fishing
sites around the world. You can use this site
data as it is or change it to suit your needs.
• See “Moon Phase Indicator” and “Tide
Graph” for more information about these
display items.
• See “PRE-PROGRAMMED SITE DATA” for
more information about the pre-
programmed data.
• When you enter the Site Mode, the site that
was displayed when you last exited the
mode appears first.
Viewing Site Data
In the Site Mode, press D to scroll forward through site data and B to scroll
in reverse.
• If the site name is longer than four characters, the display alternates
between the first four characters and the remaining characters.
• The site named
HOME is your Home Site, which is the one used for your
Timekeeping Mode settings.
Changing Site Data
Site data consists of the site name, DST (Daylight Saving Time) setting, GMT
differential, longitude, and lunitidal interval of the site. Changing site data
causes its time to be set automatically in accordance with the GMT
differential.
• You cannot change the site data of your
HOME site.
• Having the watch battery replaced causes all sites to revert to their initial
factory defaults. If you want to use your own site data, you must re-input it
each time you have the battery replaced.
Site name
Tide graph
Current date
Current time in the
selected site
Moon phase indicator
To change site data
1. In the Site Mode, use B and D to display
the name of the site whose data you want
to change.
2. Hold down A until the DST On/Off setting
starts to flash, which indicates the setting
screen.
• Pressing C moves the flashing between
the settings in the sequence shown below.
3. Use C to move the flashing to the DST On/Off setting.
4. Press D to toggle Daylight Saving Time on (
ON) and off (OFF).
5. Press C to move the flashing to the GMT differential setting, and then
use D (+) and B (–) to change it.
• The “CITY DATA LIST” provides GMT differential information for a number
of time zones, cities and longitudes around the world.
GMT differential
DST On/Off GMT differential Site name