


1632/1813-3
TIMETEL
SCHVIT ALM
STW
TIMETEL
SCHVIT ALM
STW
B
M
A
C
VITAL STATISTICS/ID MODE
The Vital Statistics/ID Mode provides a handy
place to store data about your vital statistics
(name, blood type, date of birth) and personal
identification (ID) data (credit card number,
license number, passport number, and two
undefined items).
• Whenever you enter the Vital Statistics/ID
Mode, the text
VITAL STATS./ID
scrolls across the text area of the display
once. Next, the name screen appears on the
display. You can interrupt scrolling of the initial
text and immediately display the name screen
at any time by pressing A, B, or C.
• The name screen always appears first
whenever you enter the Vital Statistics/ID
Mode.
Important!
• Once you input your vital statistics, take care that the watch is not borrowed
by another person. Otherwise, emergency medical personnel may assume
that the data in the Vital Statistics/ID Mode applies to the person who is
currently wearing the watch.
Text area
Number area
Mode indicator
• Note that storing important personal identification data in the watch’s
memory runs the risk of it being misused should you lend the watch to
someone or should the watch become lost or stolen. Because of this, the
manufacturer strongly recommends that you input such important information
in coded form that cannot be deciphered by others.
• Note that CASIO COMPUTER CO., LTD. shall not be held liable to you or
any third party for any losses or damages suffered through the misuse of
data stored in the memory of this watch.
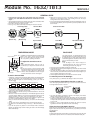
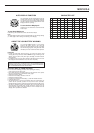
To recall Vital Statistics/ID data
In the Vital Statistics/ID Mode, press B or C to change the data on the
display in the following sequence.
NAME
(Name)
BLOOD
(Blood type)
CREDI
(Credit card
number)
BIRTH
(Date of birth)
(Undefined)
(Undefined)
LICEN
(License
number)
PASSP
(Passport
number)
Press C
Press B
• The titles of the each data item appear in the text area of the display. In the
case of the undefined items, you can specify titles that appear in the text
area whenever you later display that item.
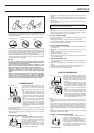
To input your name
1. In the Vital Statistics/ID Mode, display the
NAME screen.
2. Hold down A until the flashing cursor appears
in the text area of the display.
3. Input your name into the text area.
• You can input up to 16 characters for your name.
Use B and C to input characters, and M to
move the cursor around the display. For de-
tails, see “INPUTTING TEXT”.
• You can clear the characters currently input for the name by pressing B
and C at the same time.
4. After inputting your data, press A to store it and return to the normal
NAME screen (without cursor).
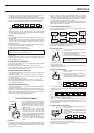
To input your blood type
1. In the Vital Statistics/ID Mode, display the
BLOOD screen.
2. Hold down A until the Rh factor setting flash in
the text area of the display.
3. Use B and C to scroll through the available
Rh factor settings in the following sequence.
4. Press M to advance to the blood type.
5. Use B and C to scroll through the available blood type settings in the
following sequence.
6. After inputting your data, press A to store it and return to the normal
BLOOD screen (no flashing characters).
• Select
--- if you do not want to specify an Rh factor and -- if you do not
want to select a blood type in the above sequence. When neither an Rh
factor nor blood type is specified, the blood data screen shows
----- on
the watch’s display.
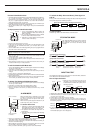
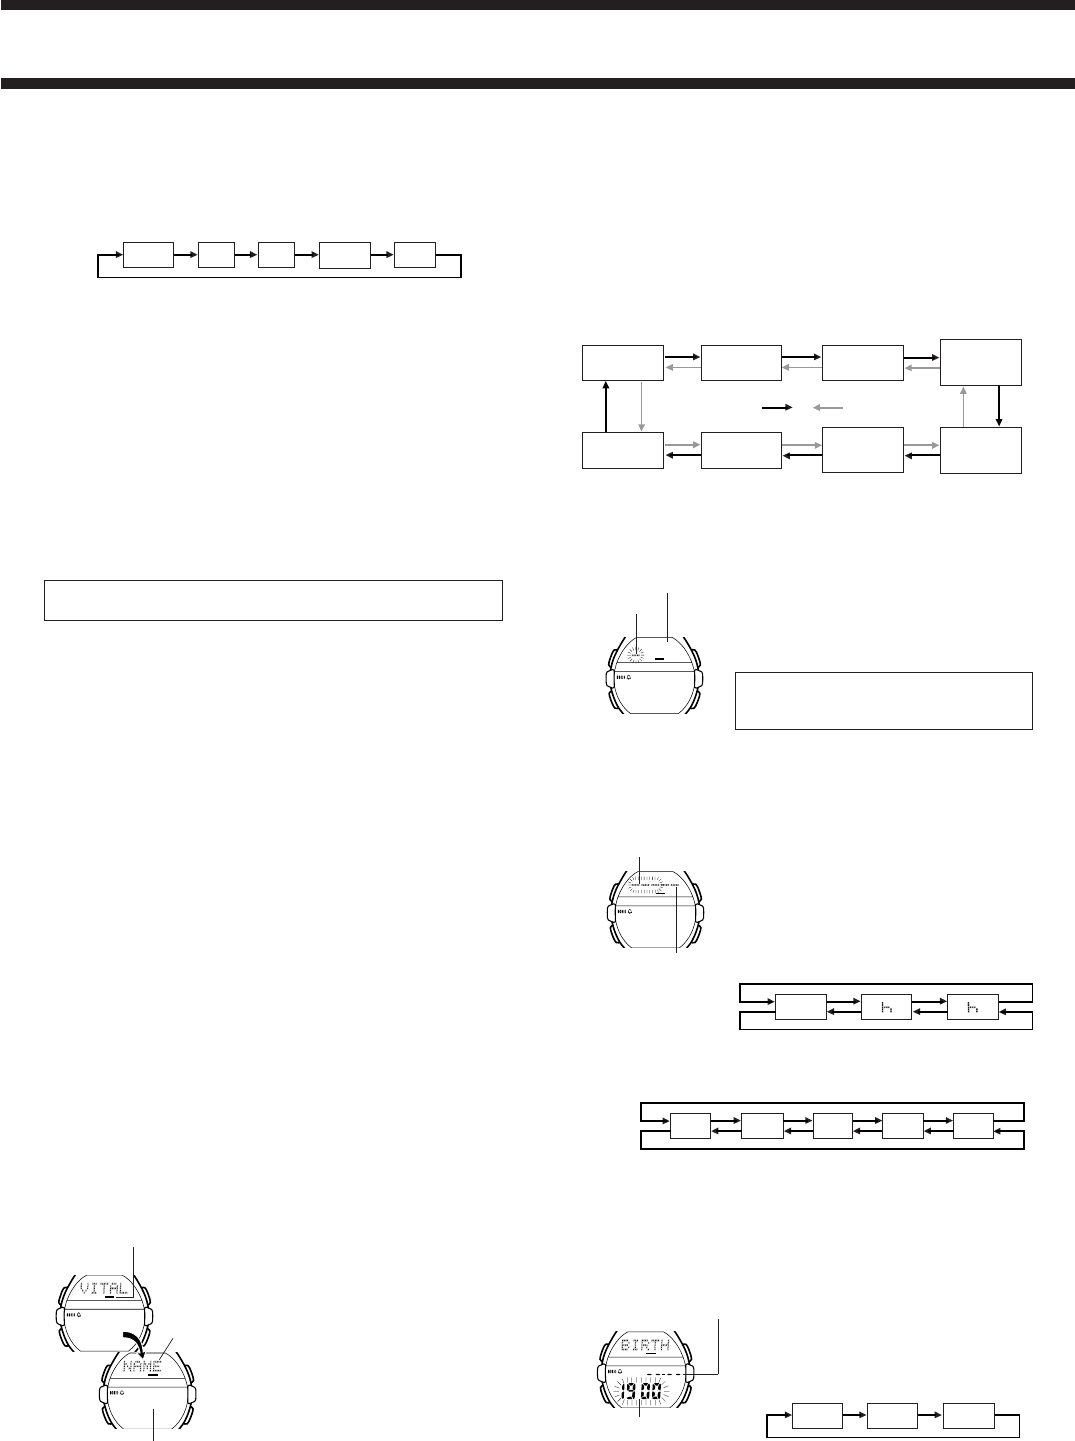
To input the date of your birth
1. In the Vital Statistics/ID Mode, display the
BIRTH screen.
2. Hold down A until the year digits start to flash
on the display. The year digits flash because
they are
selected
.
3. Press M to change the selection in the following
sequence.
4. Press C to increase the selected digits and B to decrease them. Holding
down either button changes the selected digits at high speed.
• The year can be set in the range of 1900 to 2039.
5. After inputting your data, press A to store it and return to the normal
BIRTH screen (no flashing digits).
TIMETEL
SCHVIT ALM
STW
B
M
A
C
Press C
Press B
Rh factor
TIMETEL
SCHVIT ALM
STW
B
M
A
C
Text area
Cursor
---
R
+
R
-
Press C
Press B
--
A
B ABO
Blood type ABO
TIMETEL
SCHVIT ALM
STW
B
M
A
C
Year
Month
Day
Year
Month – Day
2. Hold down A until the month setting starts to flash in the number area of
the display. The month setting flashes because it is
selected
.
• The initial Schedule-memo time setting is always midnight, which is indicated
as 12:00 with the 12-hour timekeeping format and 0:00 in the 24-hour
format. You can select the timekeeping format in the Timekeeping Mode.
3. Press M to change the flashing selection in the following sequence.
Month Day
Minutes
Hour Text *
*
11 spaces are provided for the text. This means that if you input only five
characters for the text, so you have to press
M
6 times to reach the month
setting.
4. While the month, day, hour or minutes is flashing, press C to increase the
selected setting or B to decrease it. Holding down either button changes
the current selection at high speed.
Important!
• Correct storage of Schedule-memo data is impossible if you do not input a
month and date.
• The date you can specify must be within one year from the current date.
This means that if the current date (in the Timekeeping Mode) is June 30,
1998, you will be able to specify any date up to June 29, 1999 for a
Schedule-memo date.
• When setting the time using the 12-hour format, take care to set the time
correctly as morning (no indicator) or afternoon (P).
5. Input text in the text area of the display.
• You can input up to 11 characters for the text.
Use B and C to input characters, and M to move the cursor around the
display. For details, see “INPUTTING TEXT”.
6. After inputting your data, press A to store it and return to the Schedule-
memo Mode.
• Schedule-memo data remains in memory until you delete it. Be sure to
delete old Schedule-memo data whenever you no longer need it. See “To
delete Schedule-memo data”.
To recall Schedule-memo data
In the Schedule-memo Mode, press C to scroll forward through stored data
items or B to scroll in reverse.
• Holding down either button scrolls through the data at high speed.
• The new data display appears whenever scrolling reaches the beginning or
the end of data currently stored in memory.
To edit Schedule-memo data items
1. In the Schedule-memo Mode, scroll through the data items and display the
one you want to edit.
2. Hold down A until the month setting starts to flash in the number area.
3. Use M to move the flashing to the part of the Schedule-memo data item
you want to change.
4. Use B and C to change the data.
• See “To input new Schedule-memo data” for details on inputting data.
5. After making the changes that you want, press A to store them and return
to the Schedule-memo Mode.
To delete Schedule-memo data
1. In the Schedule-memo Mode, scroll through the data items and display the
one you want to delete.
2. Hold down A until the month setting starts to flash in the number area.
3. Press B and C at the same time to delete the Schedule-memo data item.
• The message
CLEAR appears for a short while. Next, the month setting
starts to flash on the display, ready for input of new data.
4. Press A to return to the Schedule-memo Mode.