


8
Burley Cub Owner’s Instruction and Safety Manual
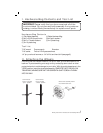
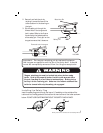
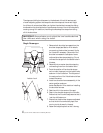
3. Use a 1/4” pin punch and a hammer to pop out three dimples - the ones in
depressions 1, 3, and 6 (as numbered in the illustration on page 9). If you are
lacking a pin punch, use a 1/4” drill bit in a hand drill to drill out those dimples.
4. Clean the slugs and/or burrs from the resulting holes where they enter the
inside of the bucket.
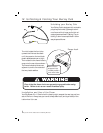
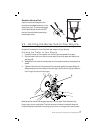
5. Put a spring washer on a mounting screw, and put a fender washer on the screw.
These parts are found in the hardware bag.
6. Place the brass center post of the brake assembly in the number 3 depression
so that the black vinyl grip on the brake handle clears the rear of the bucket and
let the brake arms hang down. Hold the center post and screw in place with a
Phillips screwdriver.
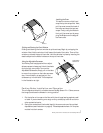
7. Reach inside the bucket and thread the screw/spring washer/fender washer
stack through the punched hole and into the brake assembly center post. Don’t
tighten it yet.
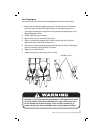
8. Swing each of the two brake assembly arms into place in turn, so their posts
enter their respective depressions, and fasten them from the inside of the
bucket with the scew/springwasher/fender stacks.
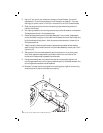
9. Using two screwdrivers, one inside the bucket and one outside, tighten the
mounting screws fi rmly, until the spring washers are fully fl attened between the
mounting screw heads and fender washers.
10. Be careful to keep the left-most post from rotating as you tighten its mounting
screw so as not to distort the brake return spring.
1
2
3
4
5
6
Brake
Released
Brake
Engaged