


12 BURLEY TRAILER OWNER’S INSTRUCTION AND SAFETY MANUAL
BURLEY TRAILER OWNER’S INSTRUCTION AND SAFETY MANUAL 13
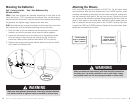
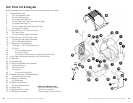
Attaching the Handle
d’Lite
™
, Encore
™
, Solo
™
, Lady Bug
™
, Cub
™
(Bee
™
: no handle)
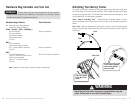
Your trailer comes with a handle which allows for easier maneuvering of the
trailer when it’s not attached to your bicycle. The handle is also an important
part of the optional Burley Jogger Kit
™
and the optional Burley Stroller Kit
™
,
which are available at your Authorized Burley Dealer.
To install the handle, slide it into the lower handle bar receivers and tighten
the knobs. (The upper handlebar receivers have spacers in them for the
optional Burley Rollbar, available from your Burley dealer.) To change the
position, remove the handle from the handle bar receivers, flip it over and
reinstall it as described above.
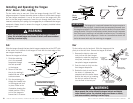
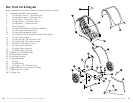
Installing the Cub
™
Parking Brake
The trailer should be fully unfolded and the tongue removed.
1. Put the trailer on its nose on the floor with the roll cage leaning against
a wall or table. Sort the contents of the hardware bag.
2. Facing the underside of the bucket, locate the rear row of six molded
depressions (see illustration). Holes are drilled in the first, third and
sixth depressions (numbered from the left). See illustration.
3. Put a spring washer and then a fender washer on a mounting screw.
Repeat for the other two screws.
4. Place the brass center post of the brake assembly in the number 3
depression so that the black vinyl grip on the brake handle clears the
rear of the bucket. Let the brake arms hang down. Hold the center post
and screw it into place with a Phillips screwdriver.
5. Reach inside the bucket and thread the screw/spring washer/fender
washer stack through the punched hole and into the brake assembly
center post. Don’t tighten it yet.
6. Swing each of the two brake assembly arms into place in turn, so their
posts enter their respective depressions, and fasten them from the
inside of the bucket with the screw/spring washer/fender stacks.
7. Using two screwdrivers, one inside the bucket and one outside, tighten
the mounting screws firmly, until the spring washers are fully flattened
between the mounting screw heads and fender washers.
8. Take care to keep the far left post
from rotating as you tighten its mounting
screw so that the brake return spring
does not distort.
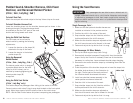
Handlebar
Flag
Rollbar
Accessory
(optional)
Flag Installation
Hole
Knob
Handlebar
Installation